Set up private lessons
You configure private lessons in one place: in the office panel go to Settings → Private lessons. The section has three tabs — Lesson types, Instructors and Settings — and opens on the Lesson types tab. You save the lesson types, the hours and the settings each on its own with Save changes in the bar at the bottom of the page — each lesson type and the hours of each instructor separately.
Lesson types
Section titled “Lesson types”The Lesson types tab is the school’s offer of private lessons. A lesson type is an item of the offer, e.g. “Introduction to Yoga” or “Consultations”: it has its own lengths with prices and its own instructors. The customer picks a lesson type, then an instructor, a length and a date.
The list shows each lesson type with its description, its lengths with prices (e.g. “60 min · 200 zł”) and the assigned instructors — listed by name, in alphabetical order. A lesson type without instructors is marked No instructors — customers do not see it. The Room column shows the names of the selected rooms, or Any room or No room. If a lesson type has the Selected rooms option and all of its rooms were deleted or are no longer available for private lessons, the column shows No rooms available with the hint “Without a selected room, this class type has no available slots.” — the same warning appears in the Room card of that lesson type’s editor. Click a row or Edit to open the lesson type.
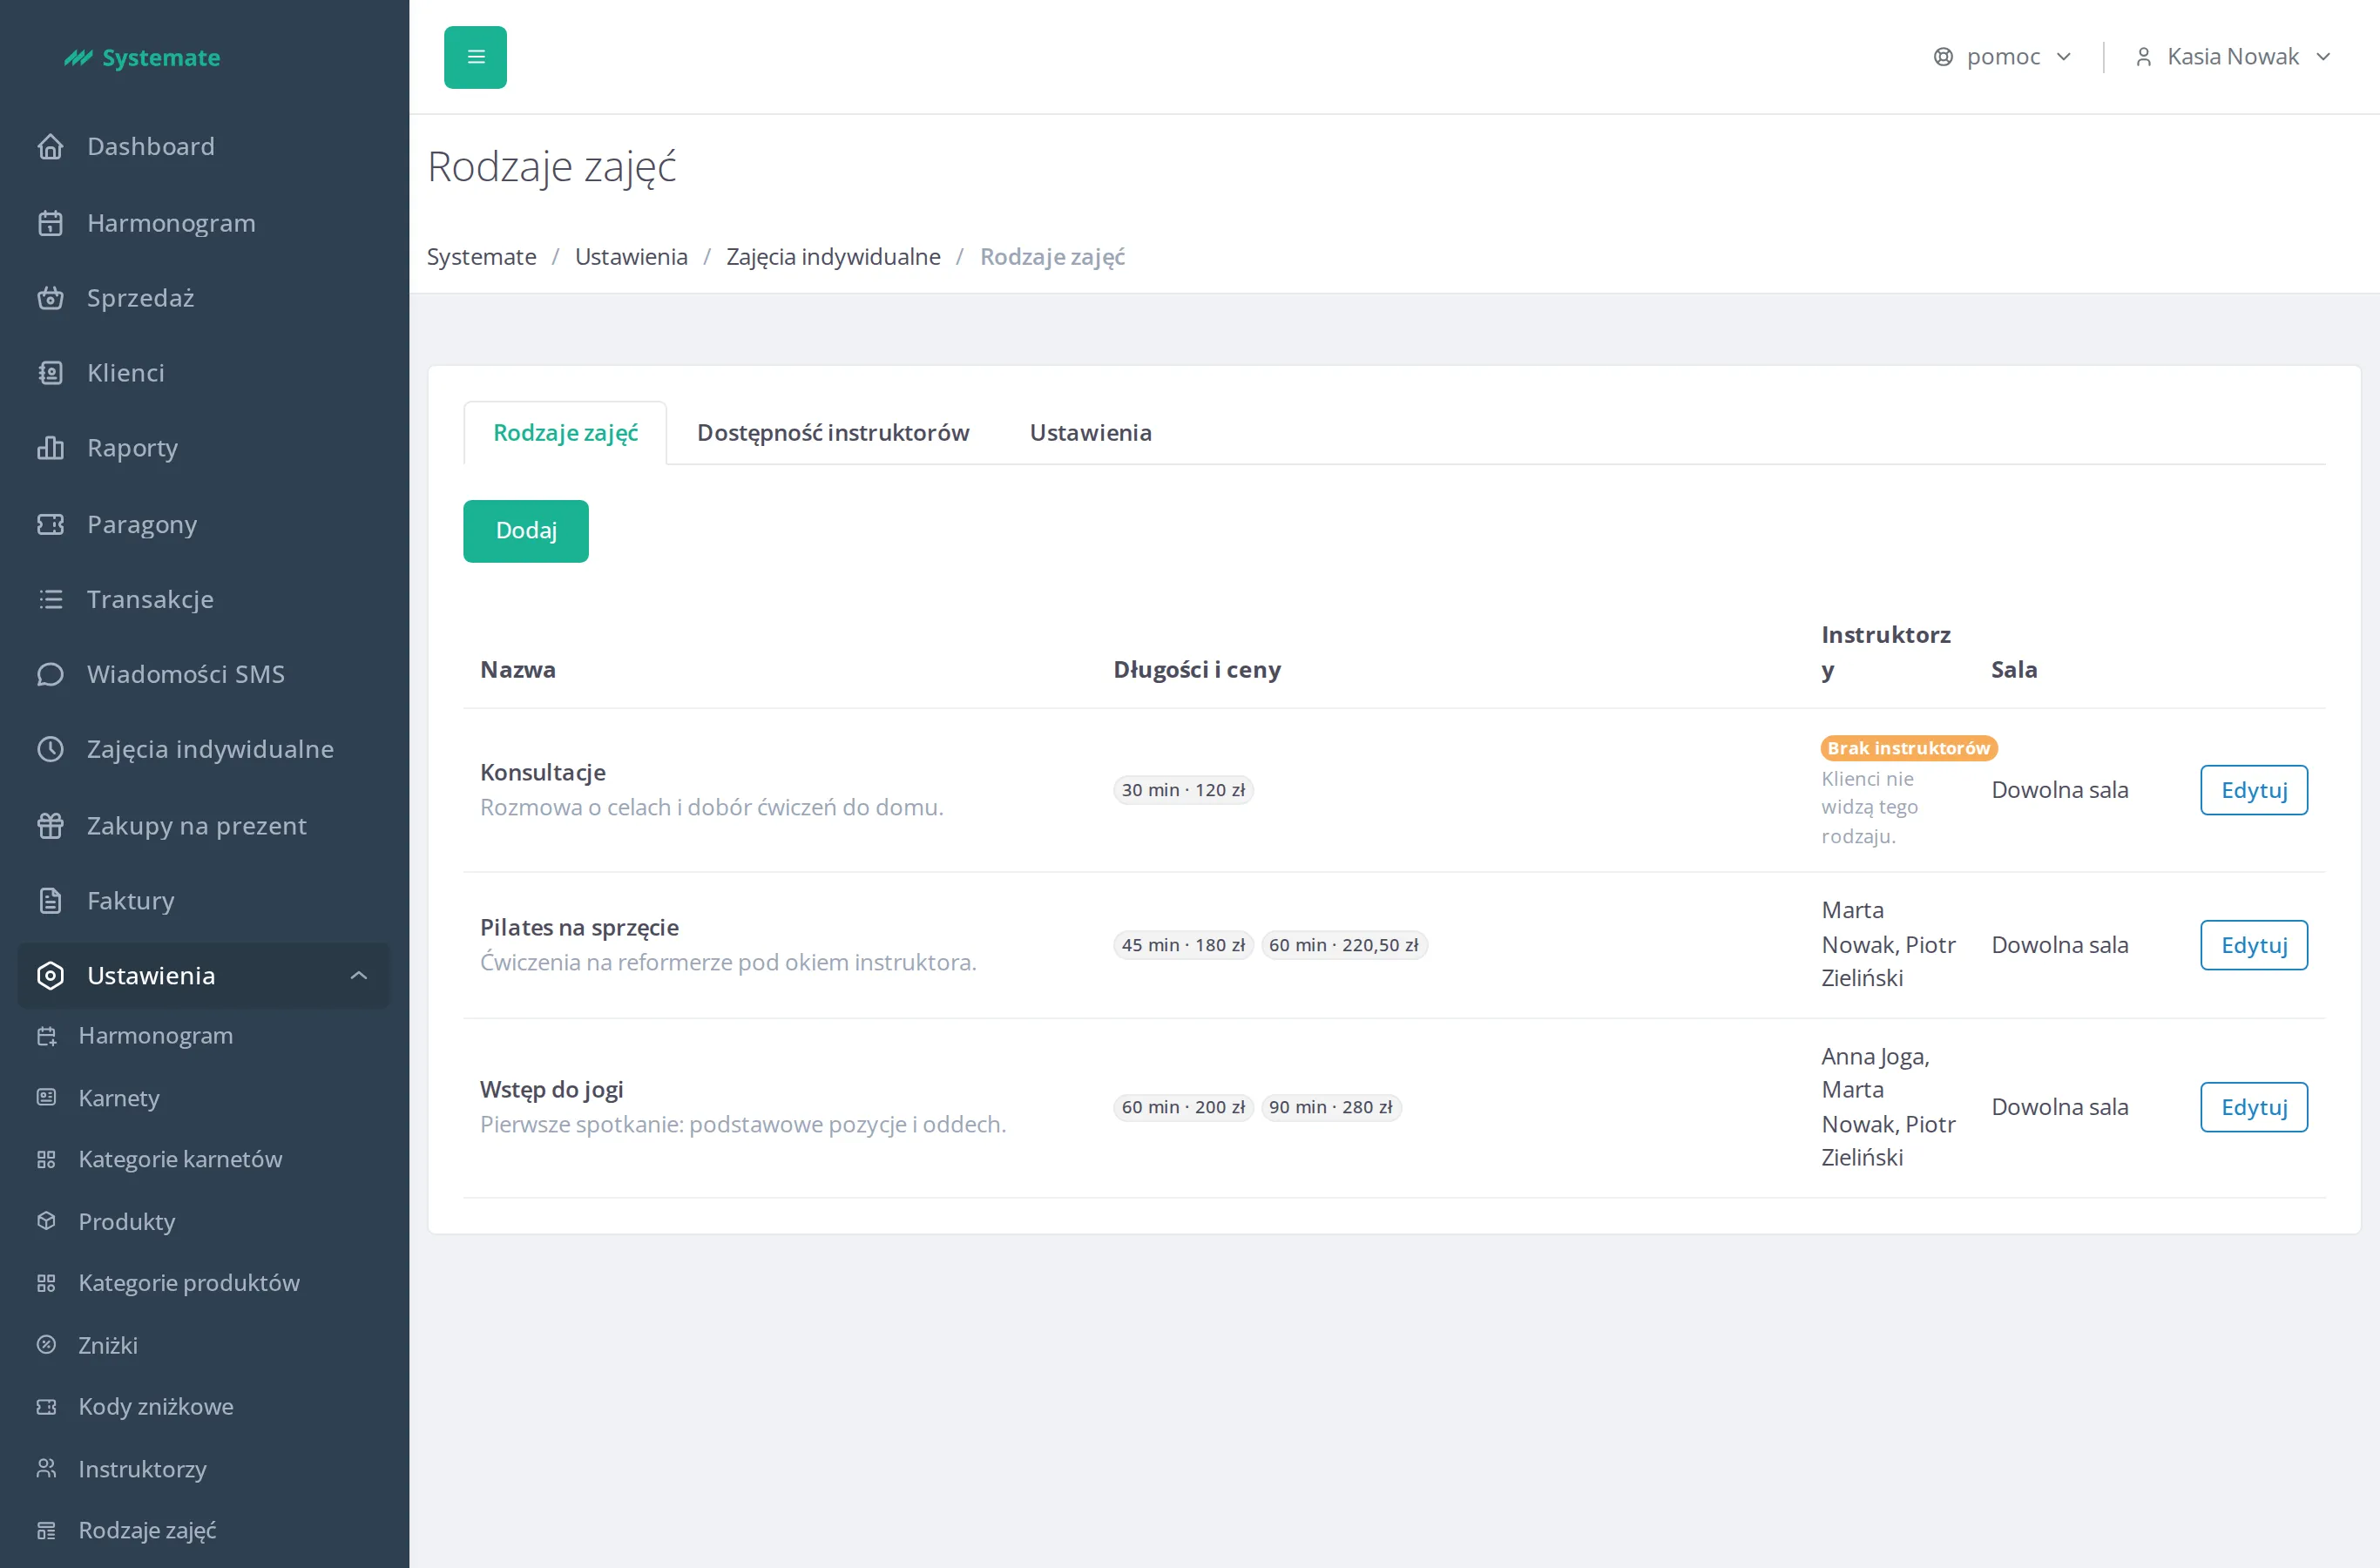
Add a lesson type
Section titled “Add a lesson type”-
Click Add.
-
Enter the Name (at most 80 characters) and, if you like, the Description for the client (at most 300 characters) — the customer sees it when choosing a lesson type.
-
In the Lengths and prices card enter a length in minutes and a price. The length must be a multiple of 5 minutes, from 15 to 240, and may not repeat. Add another length with Add length and remove one with the cross next to it. A lesson type needs at least one length with a price.
-
In the Instructors card click Assign an instructor, tick the instructors in the list (the Search for an instructor field narrows it by name) and click Assign. An assigned instructor teaches every length of the lesson type.
-
In the Room card choose where lessons of this type take place:
- Any room — lessons can take place in any room available for private lessons,
- Selected rooms — check the rooms where they can take place; the list holds only rooms available for private lessons, and at least one must be checked,
- No room — lessons do not occupy a room; the i button next to this option shows the hint “Classes at the client’s location, outdoors, or online”.
Whether a room is available for private lessons is set in the room form (see Add a location).
-
Click Add in the bar at the bottom of the page. The panel saves the lesson type and returns to the list of lesson types.
You change an existing lesson type the same way: open it from the list, correct what you need and click Save changes — after the save the panel returns to the list of lesson types. Cancel drops the unsaved changes and returns to the list as well.
An instructor’s own prices
Section titled “An instructor’s own prices”An instructor can have prices of their own in a lesson type. In the ··· menu next to their name choose Set the instructor’s own prices — a field for each length appears under the row, with the length’s regular price in its label. An empty field means the regular price. An instructor with an own price is tagged Own prices, with a summary of their prices next to it. Remove the instructor’s own prices empties all their fields.
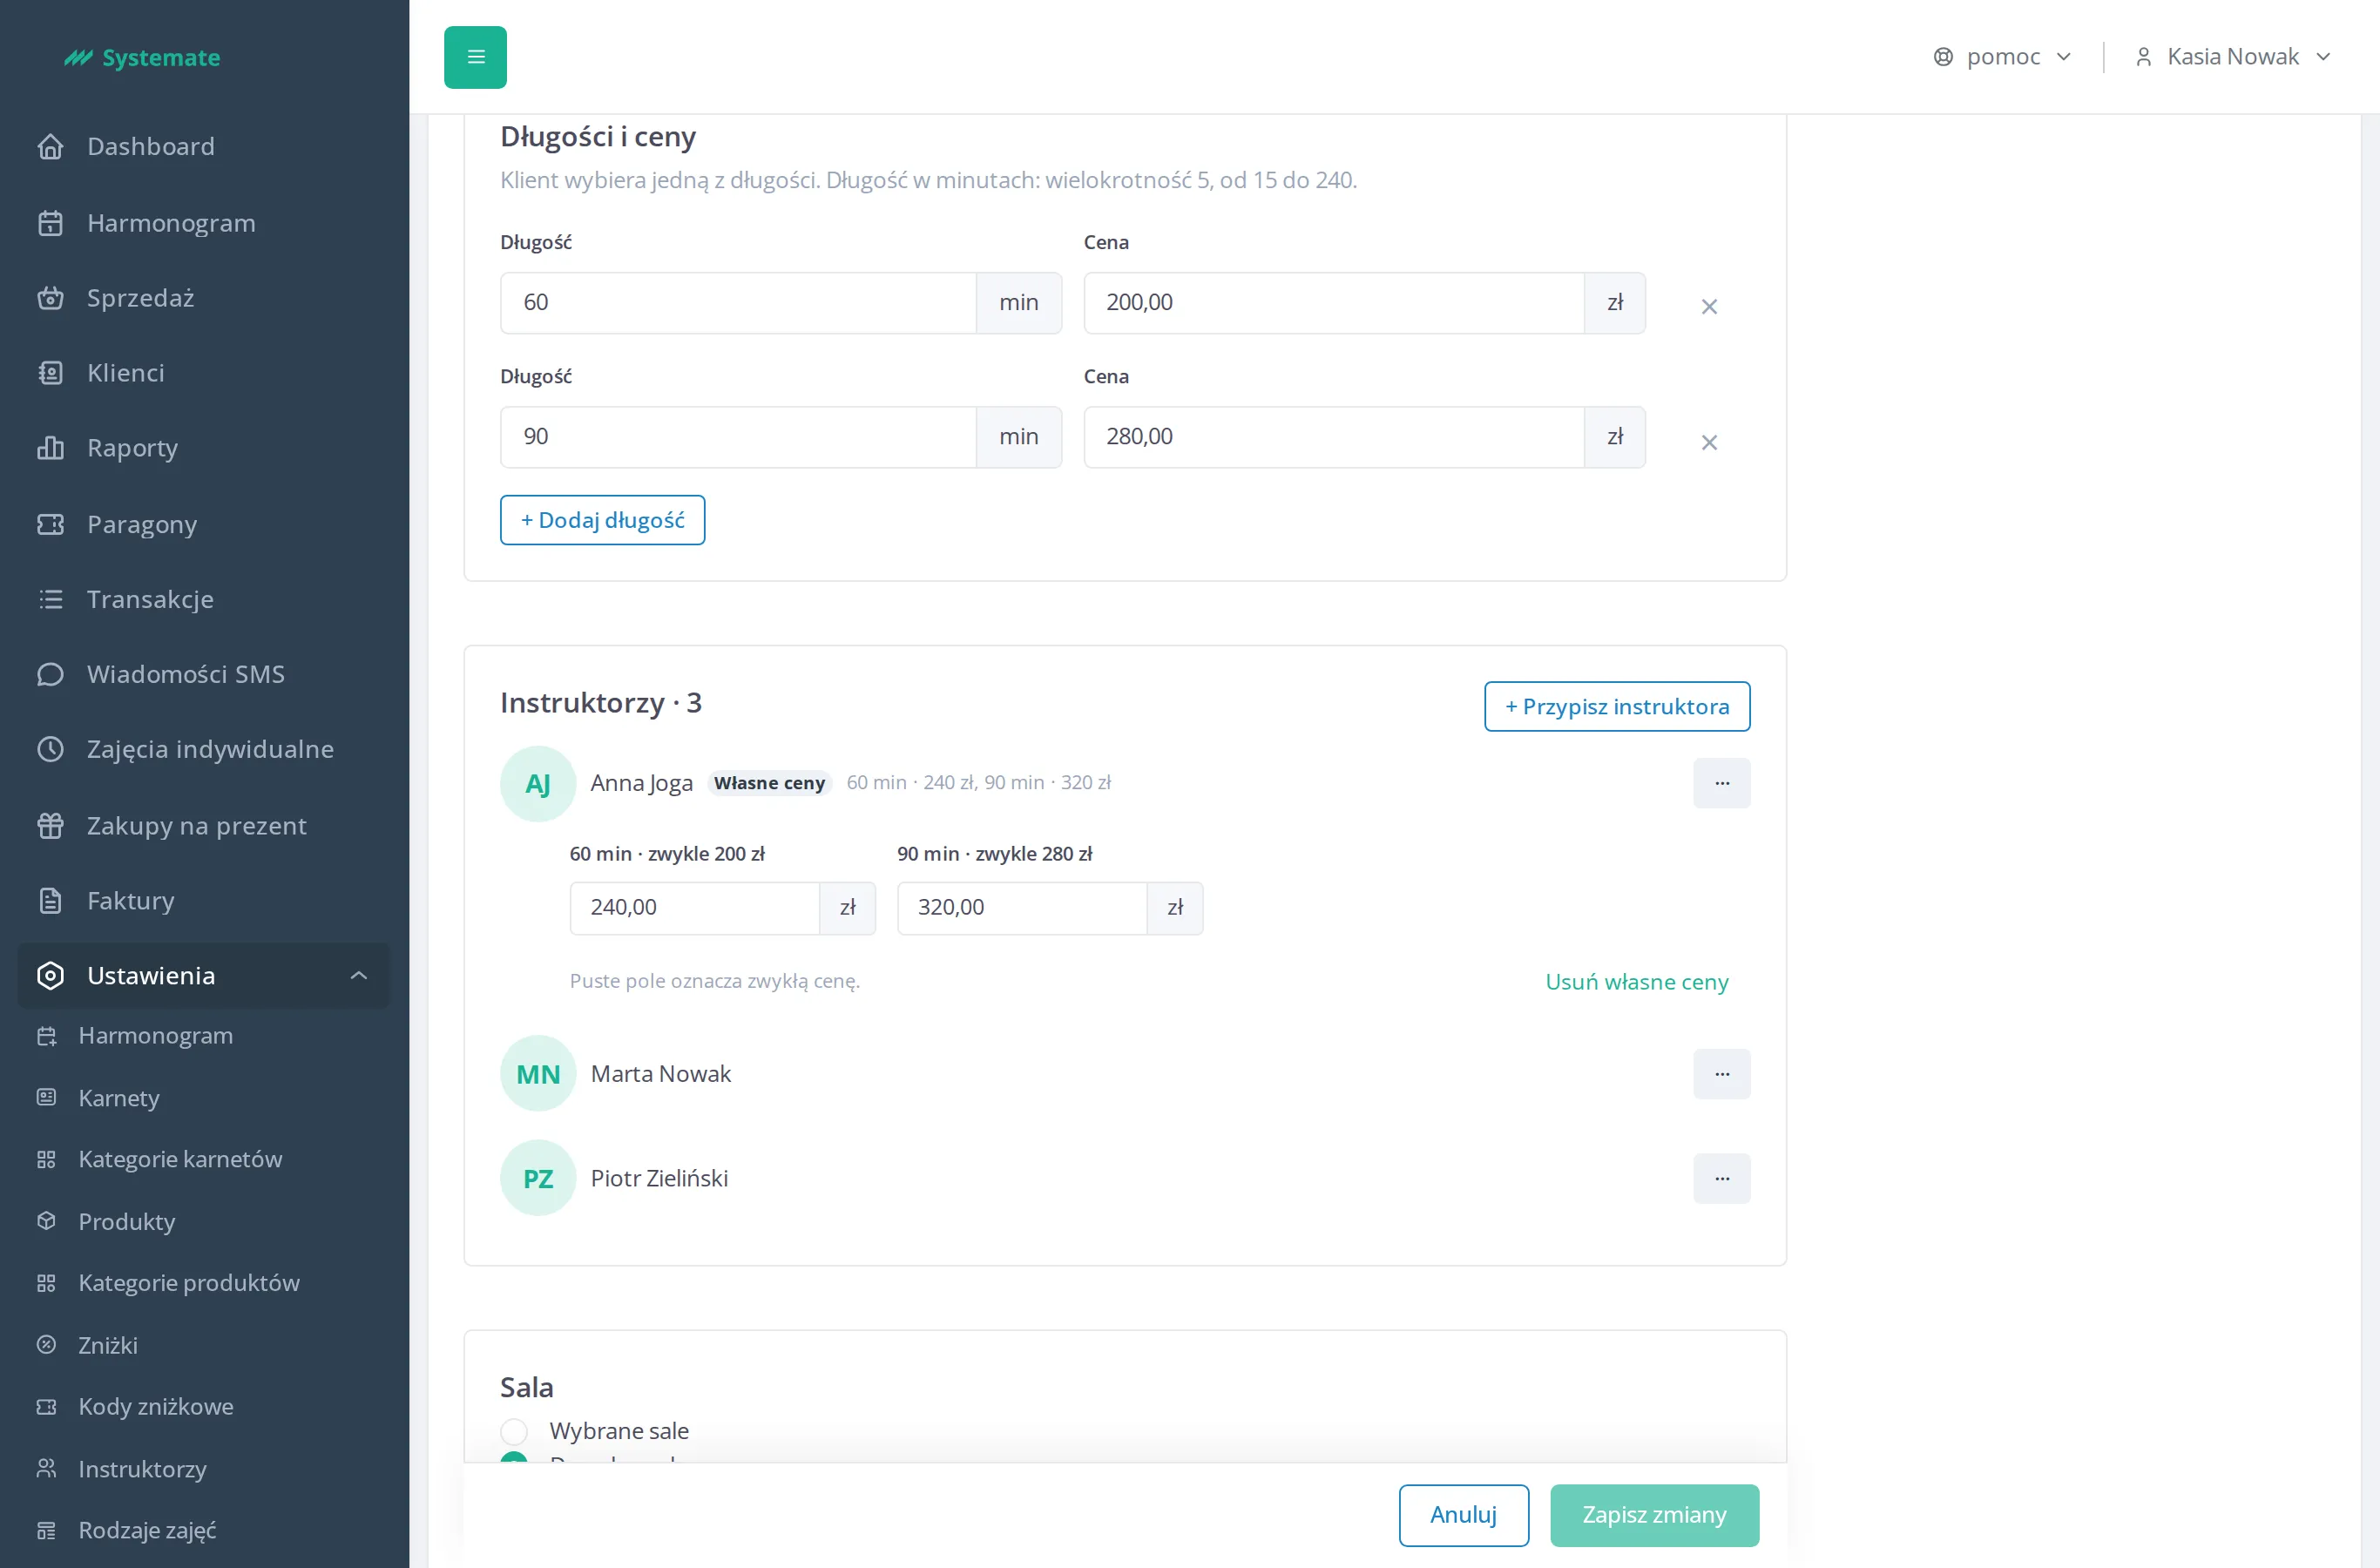
The same menu unassigns an instructor from the lesson type: Unassign. Their own prices in this lesson type go with them.
Removing a length, an instructor or a lesson type
Section titled “Removing a length, an instructor or a lesson type”When a save removes a stored length or unassigns an instructor, the panel asks first and names what you remove. Customers can no longer book that length, or these lessons with the unassigned instructor. Upcoming reservations stay unchanged, with their stored name and price.
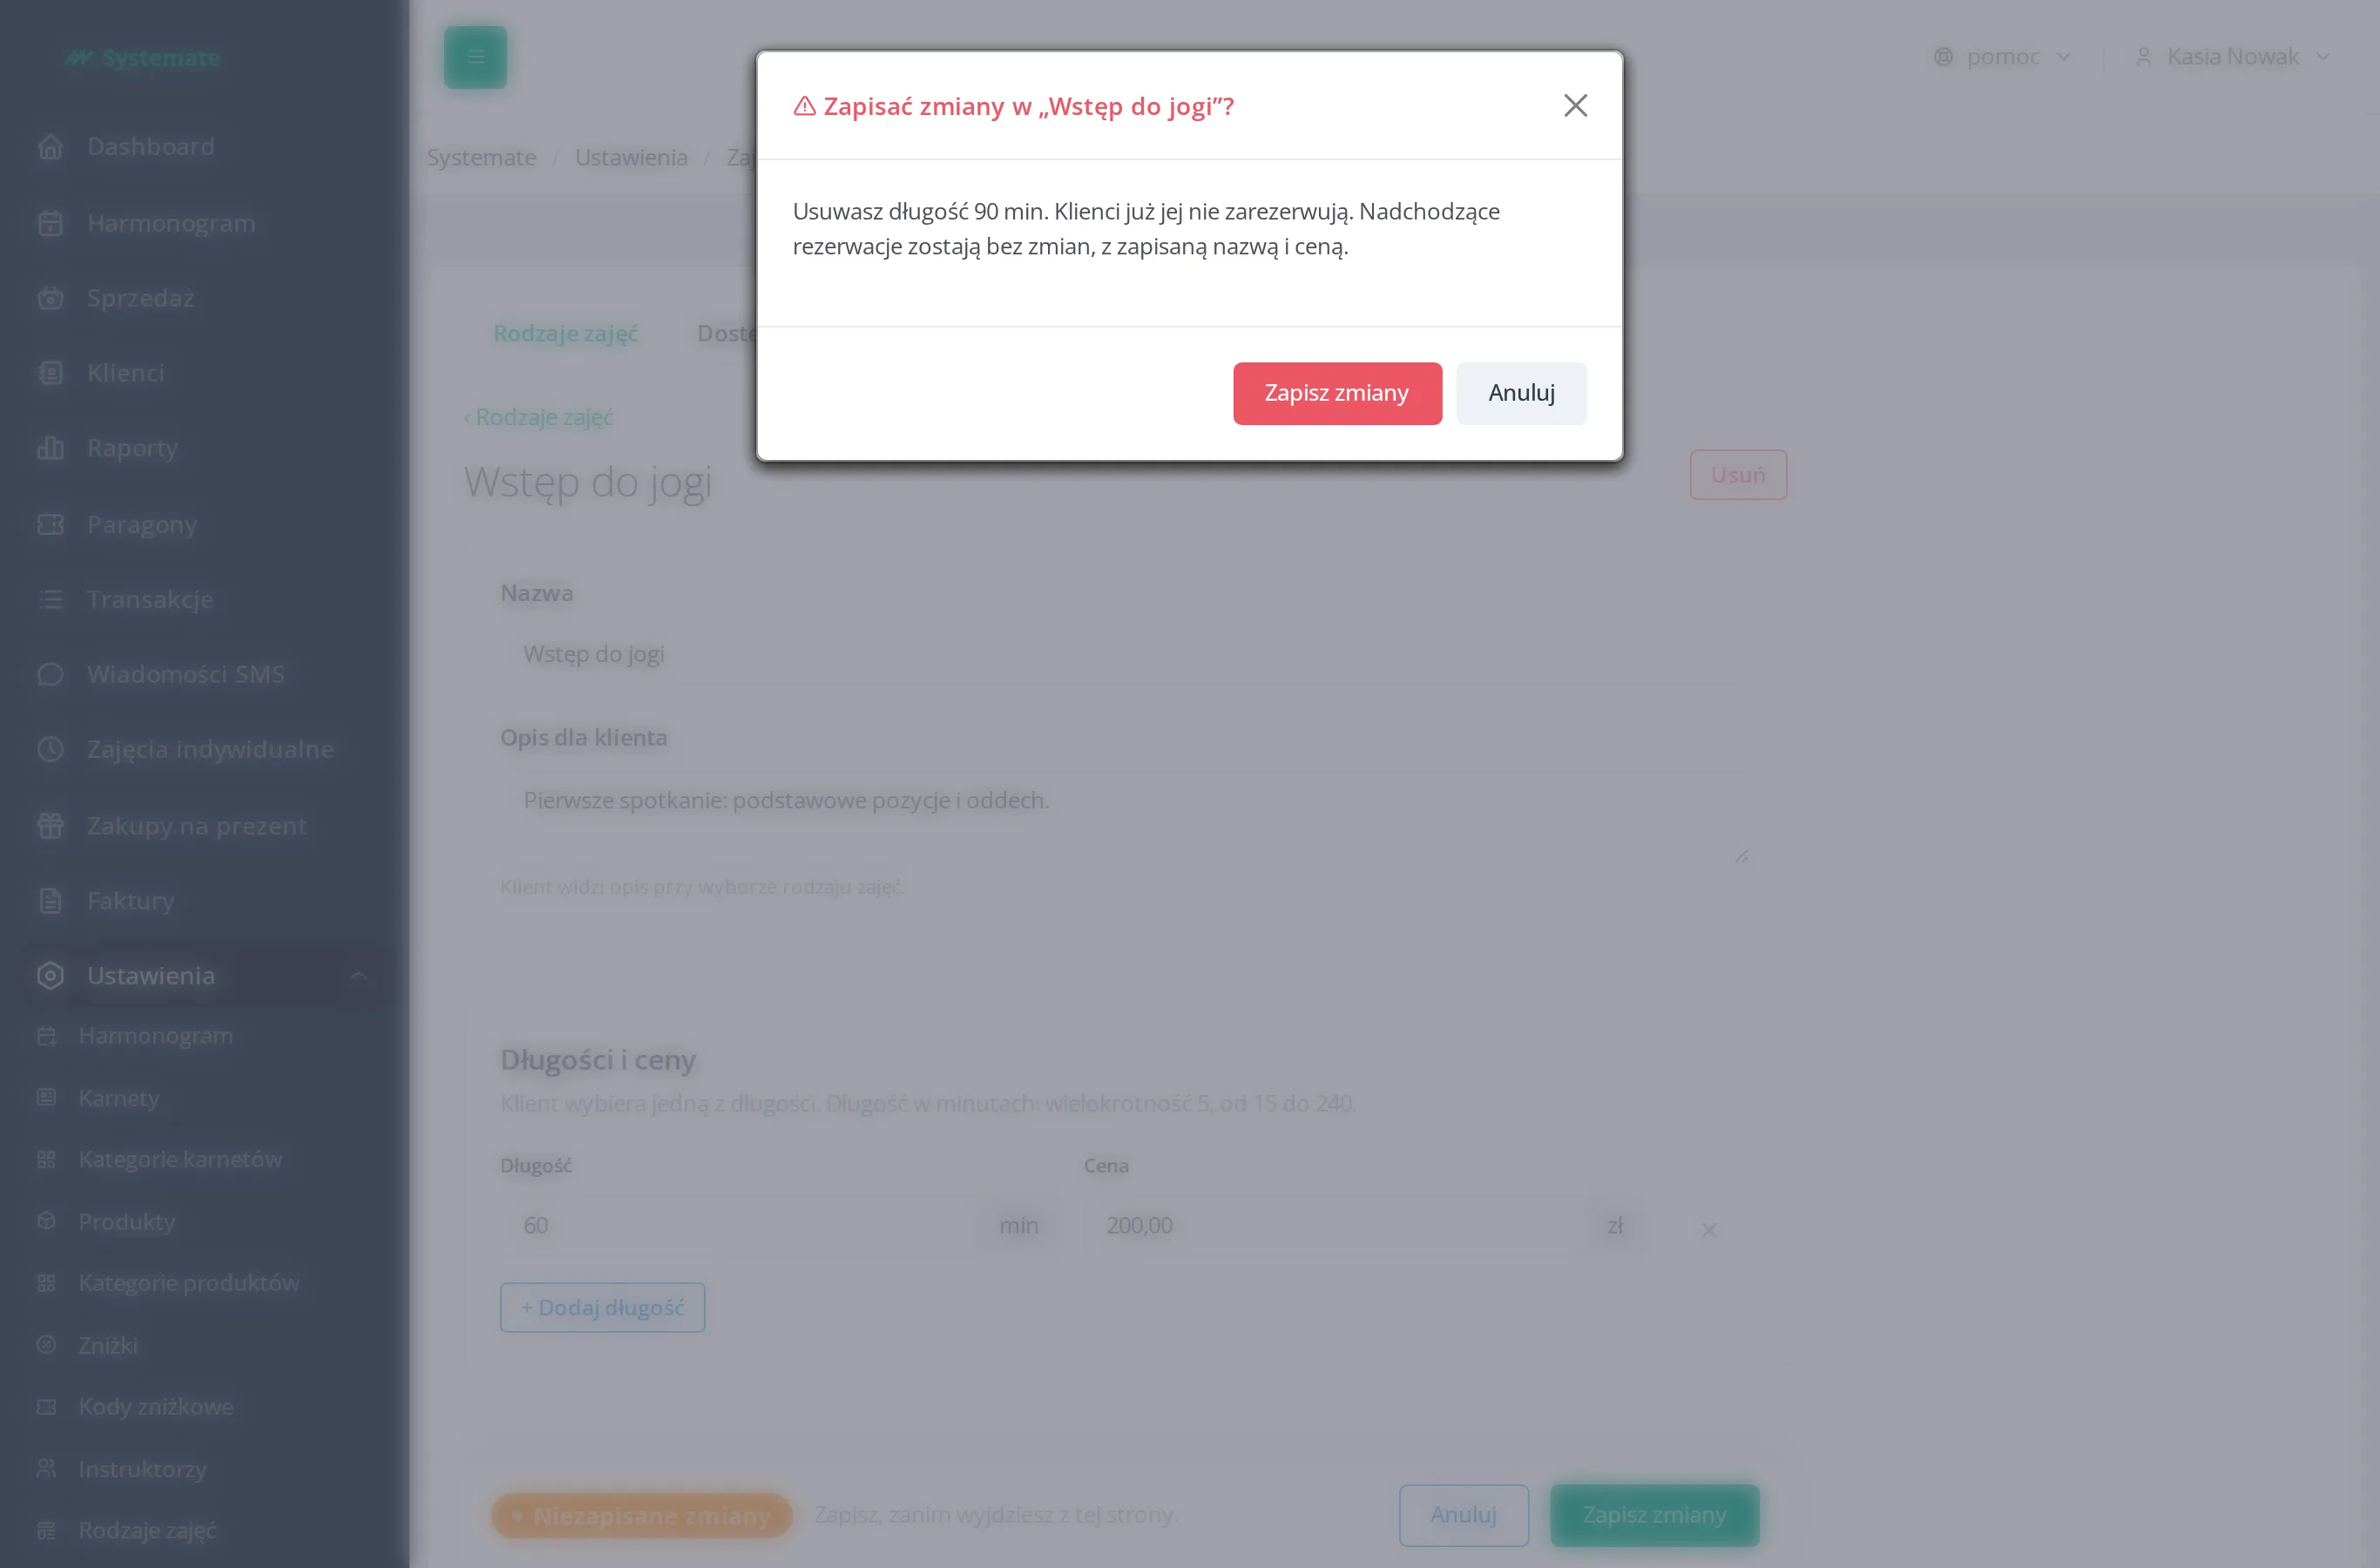
Delete a whole lesson type with Delete in the lesson type editor. The panel always asks first. Customers can no longer book these lessons — the lesson type leaves the offer at once. Upcoming reservations stay unchanged, with their stored name and price.
If the lesson type has been deleted in the meantime, the editor says “This lesson type no longer exists.” with a link back to the list. If the system refuses the changes, the message appears at the field it concerns — for example when a lesson type with that name already exists, or an assigned instructor is no longer active.
Instructors
Section titled “Instructors”The Instructors tab sets the hours in which a given instructor takes customers: regular weekly hours and exceptions for specific days.
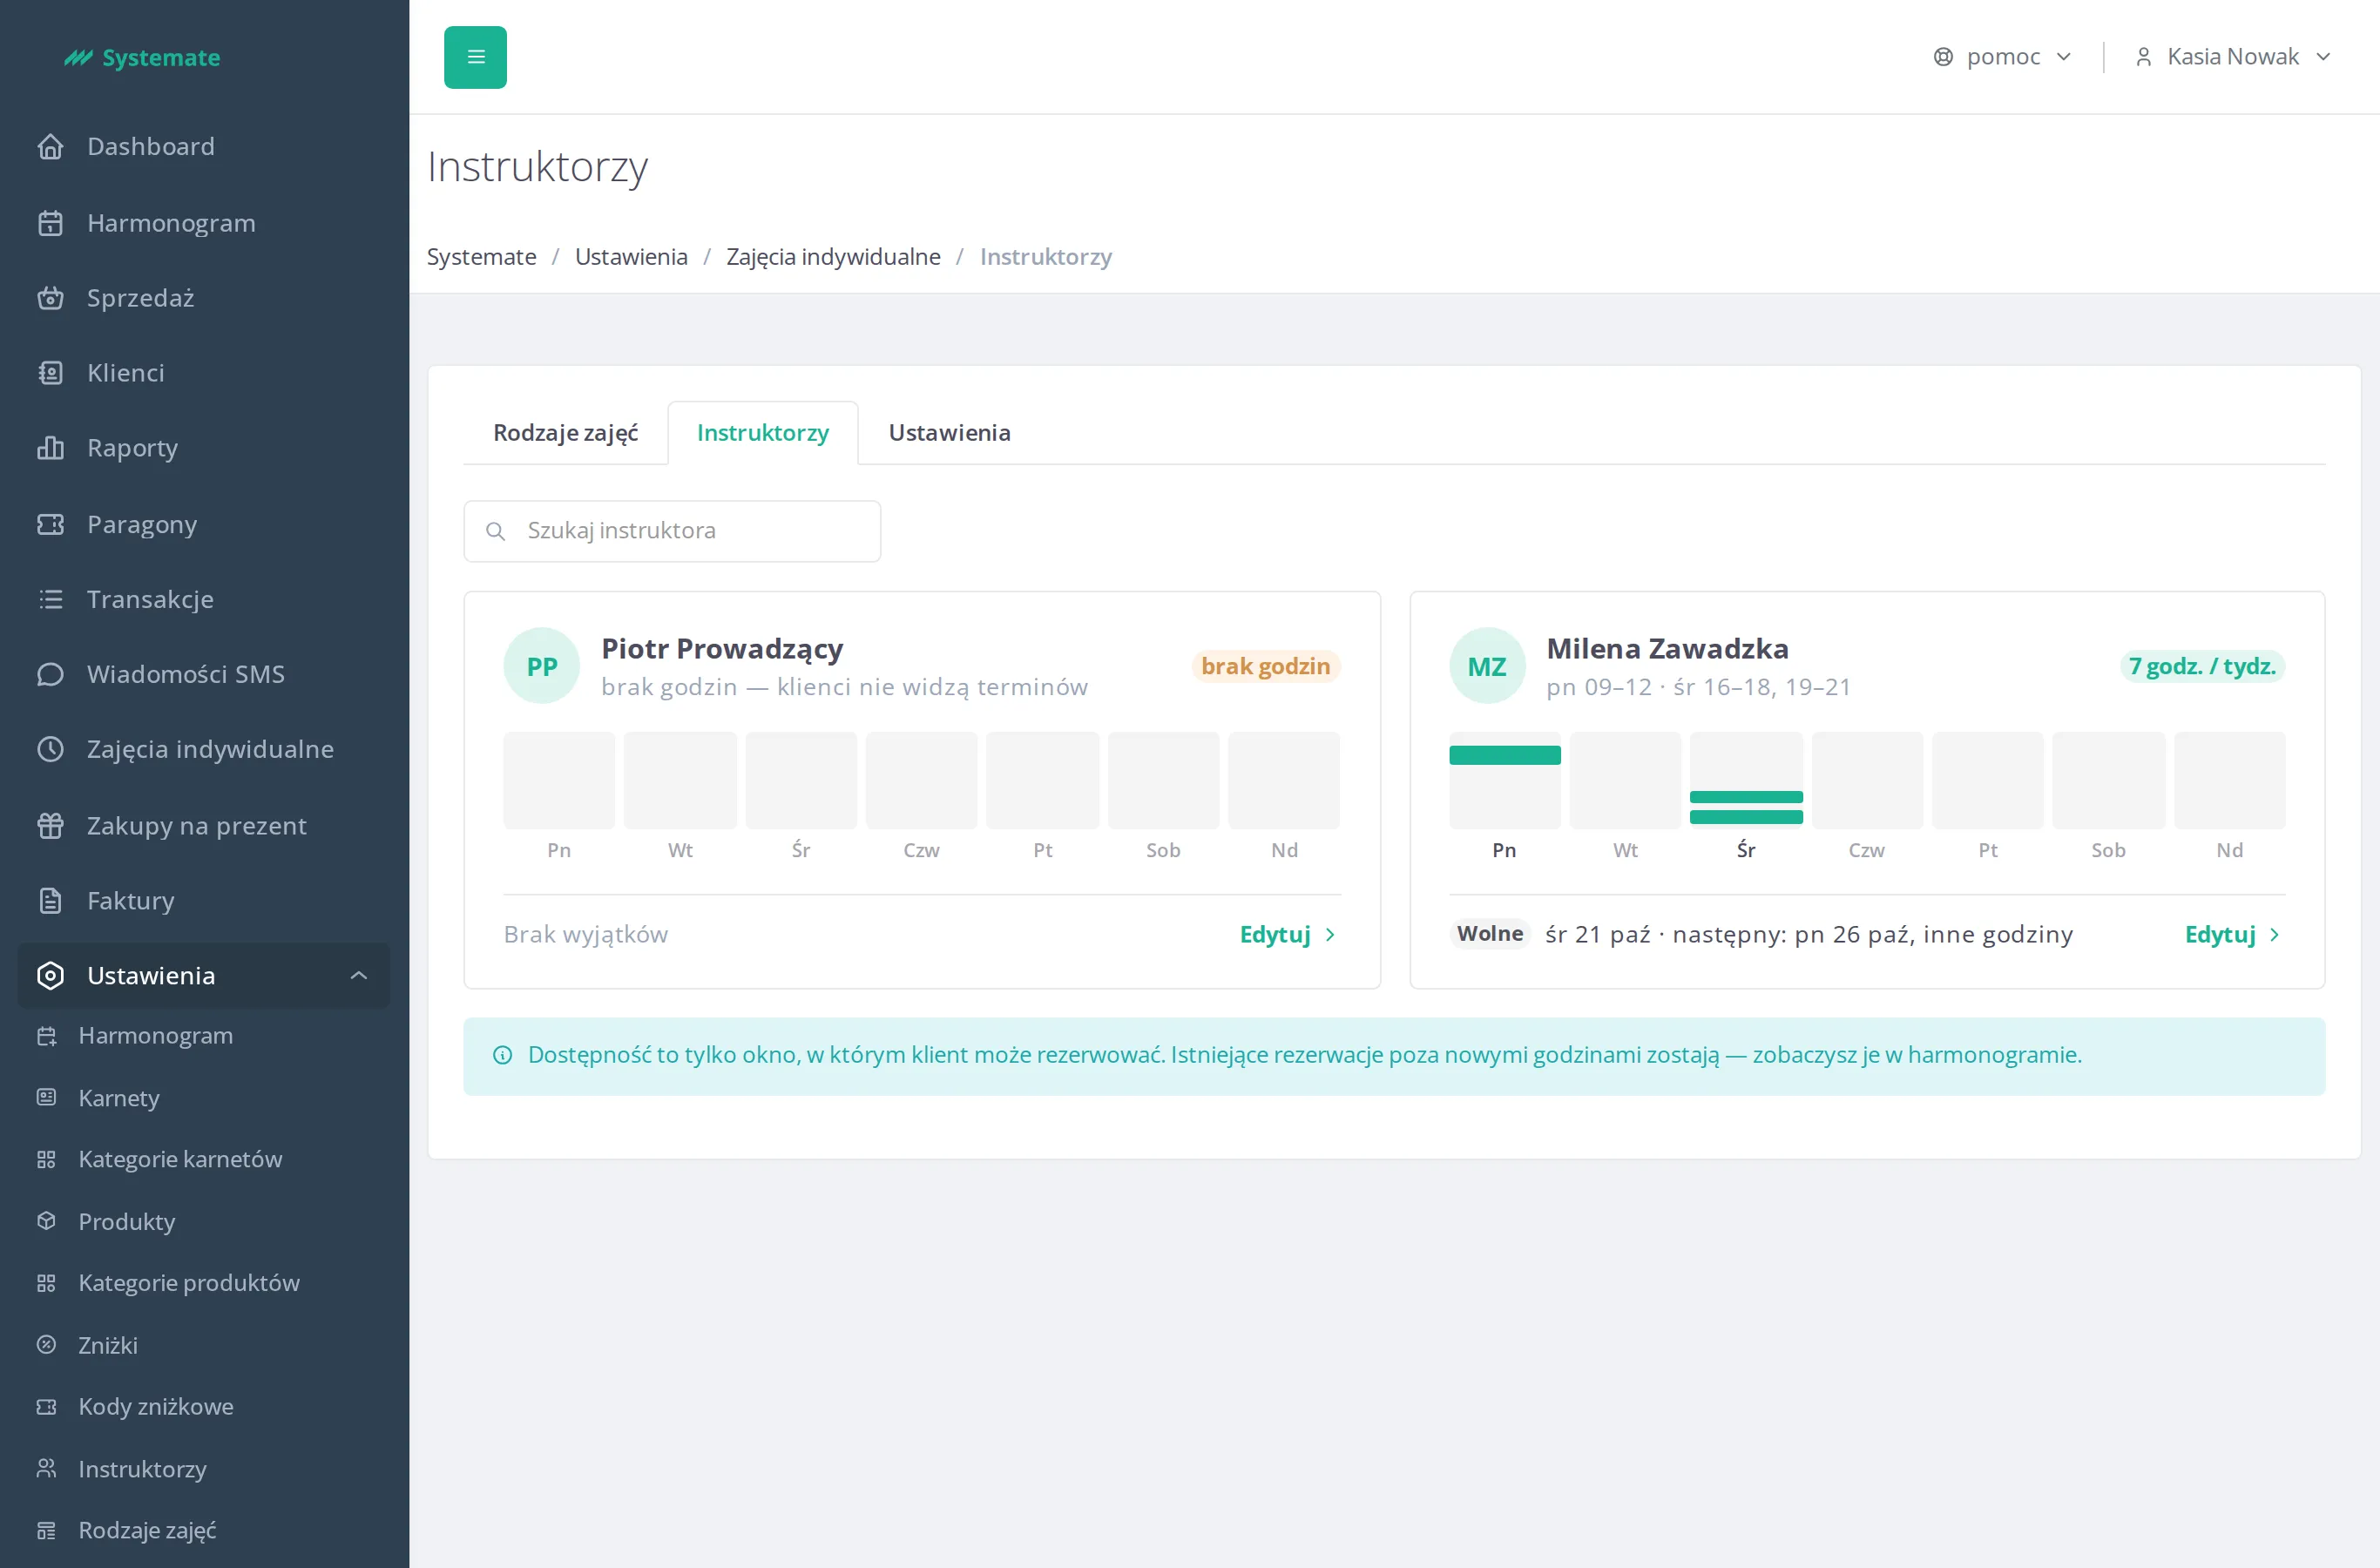
The tab opens with a list of cards—one for each instructor who leads private lessons, meaning they are assigned to at least one type of class. If no one is currently leading these classes, the tab indicates this and provides a link to the Lesson types tab. Each card displays a summary of weekly hours (for example, “Mon 9:00 AM–12:00 PM · Wed 4–6 PM, 7–9 PM”), the total number of hours per week, a small preview of the week from 7:00 AM to 10:00 PM, and the next scheduled exception; if there is another one, its date is also shown. Instructors with no classes appear at the top of the list marked no hours: clients do not see any appointments for them. The Search instructors field filters the list by last name.
-
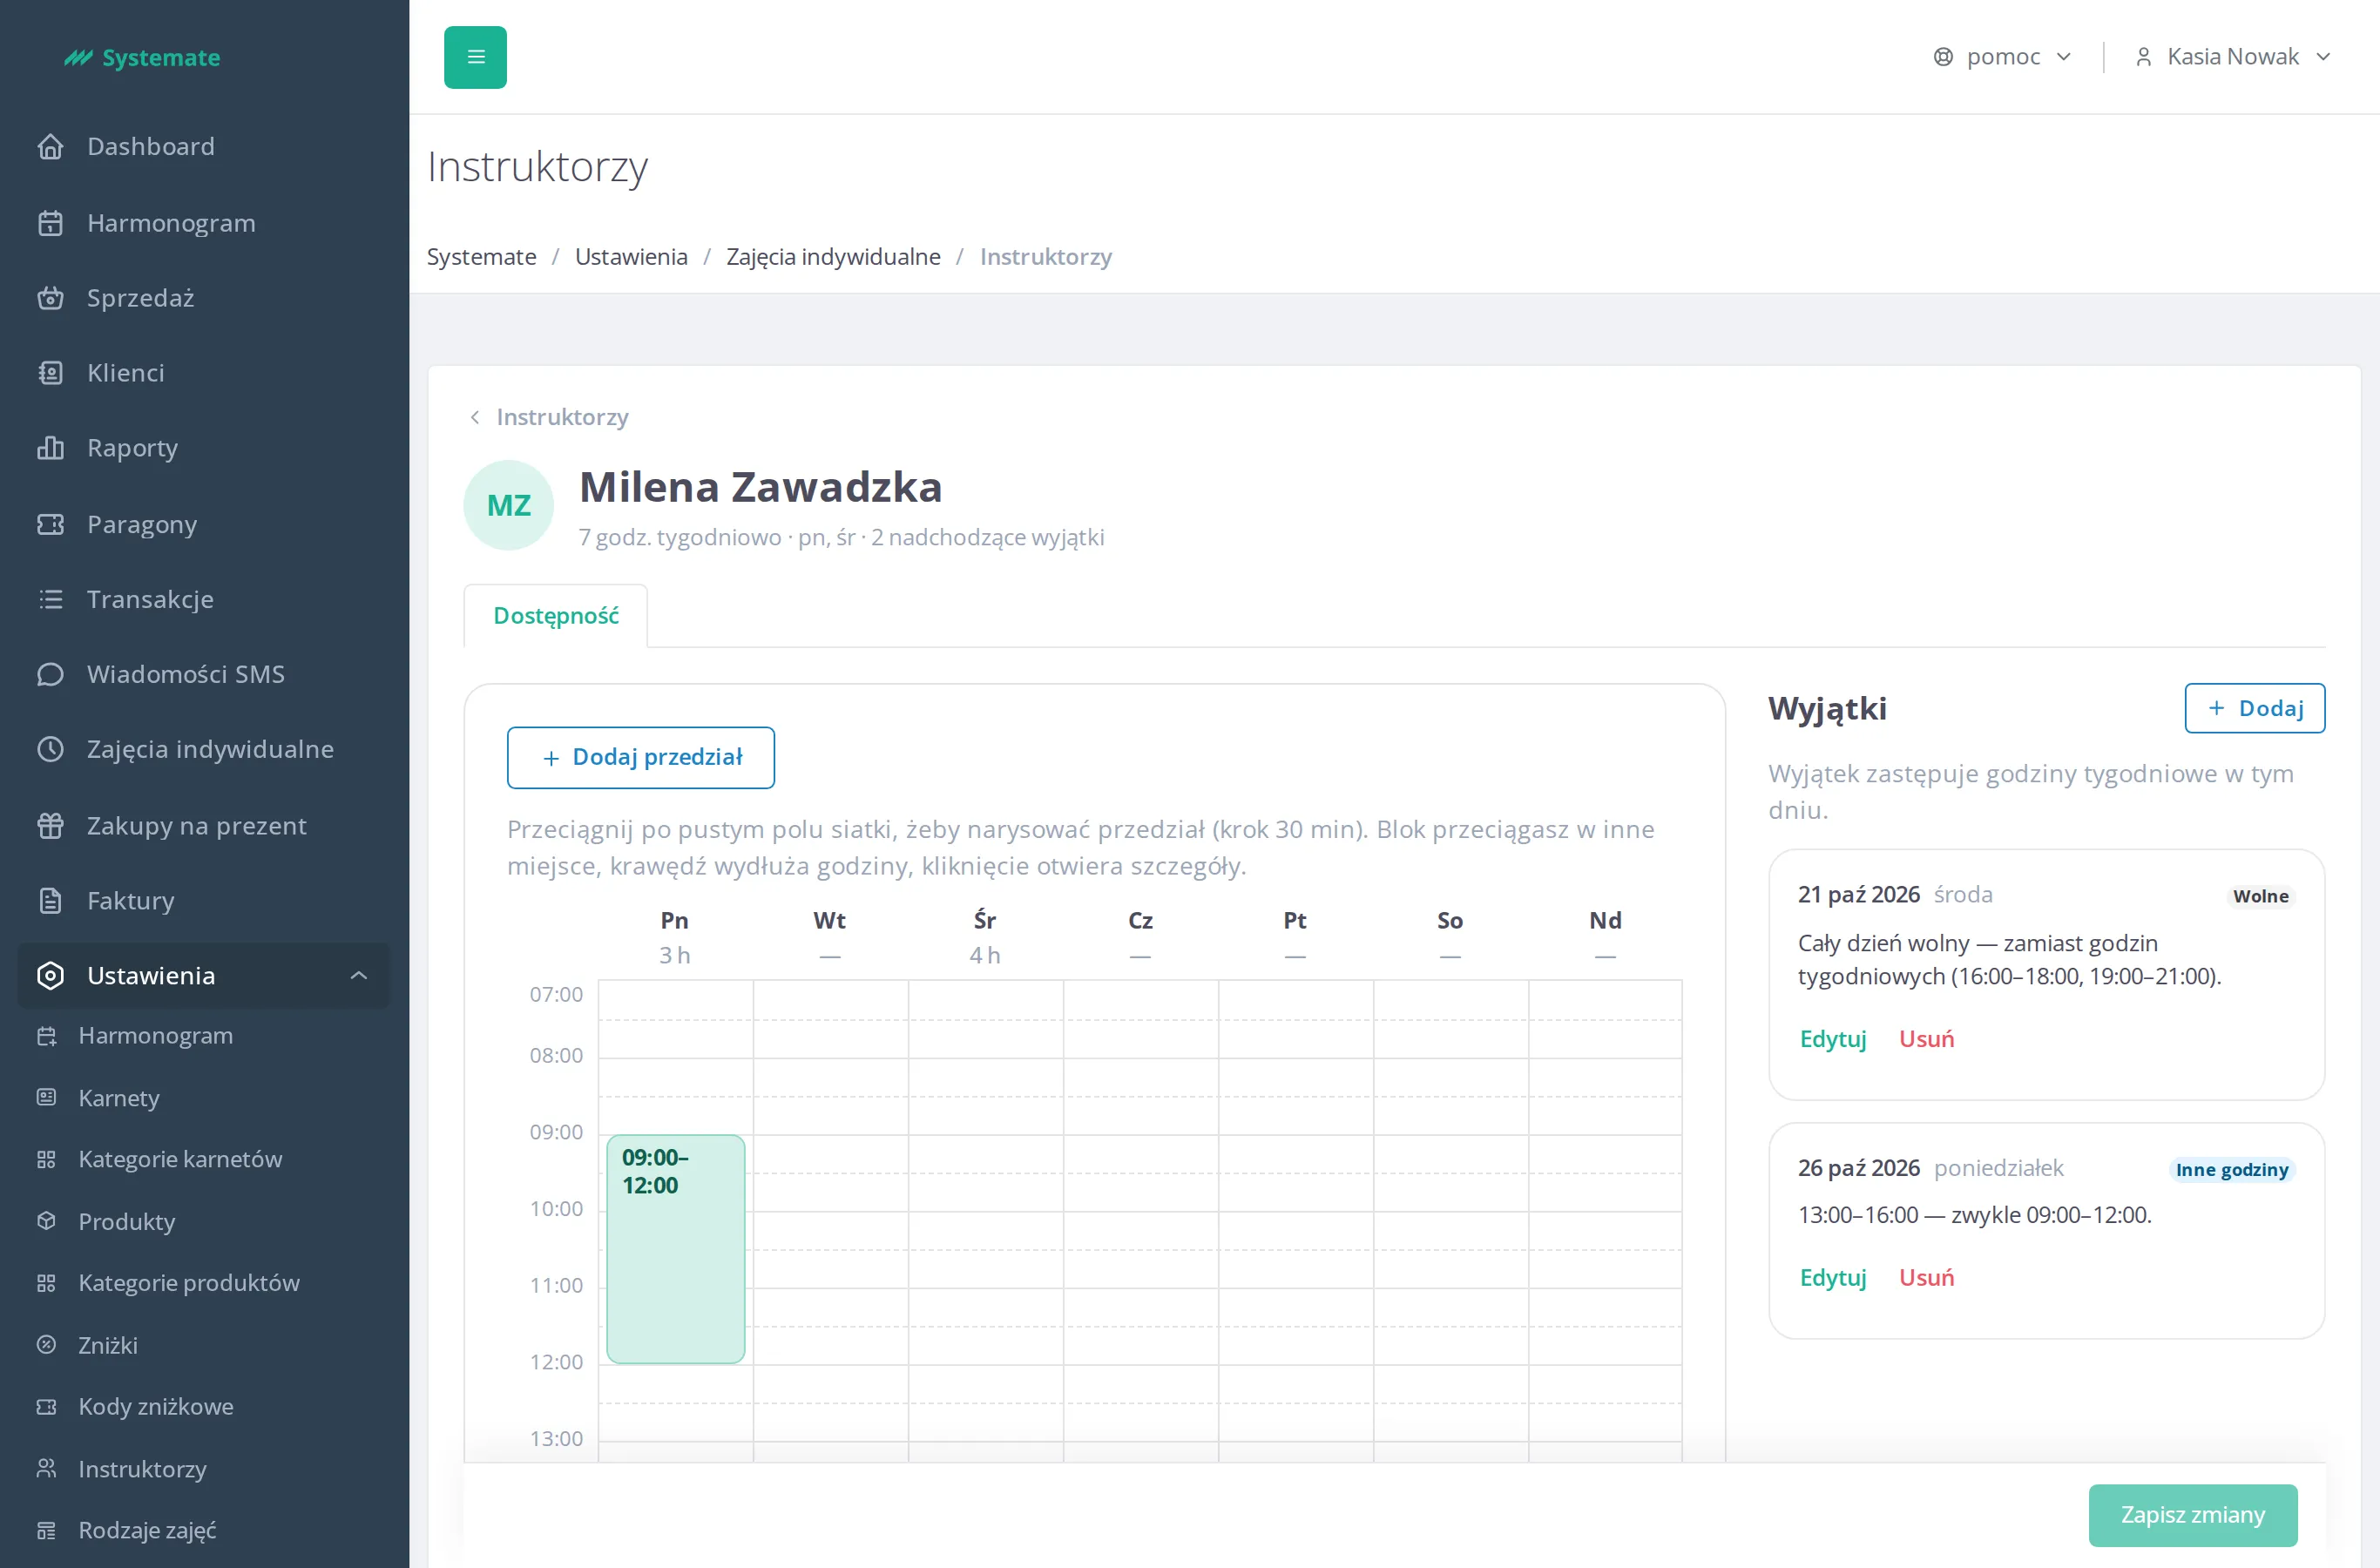
On the instructor’s card click Edit. The instructor’s page opens — a page of its own, without the section’s tabs. At the top is the Instructors link, below it the name: you see how many hours a week the instructor takes customers, on which days, and how many upcoming exceptions they have. Further down the page has its own Availability tab with the instructor’s hours.
-
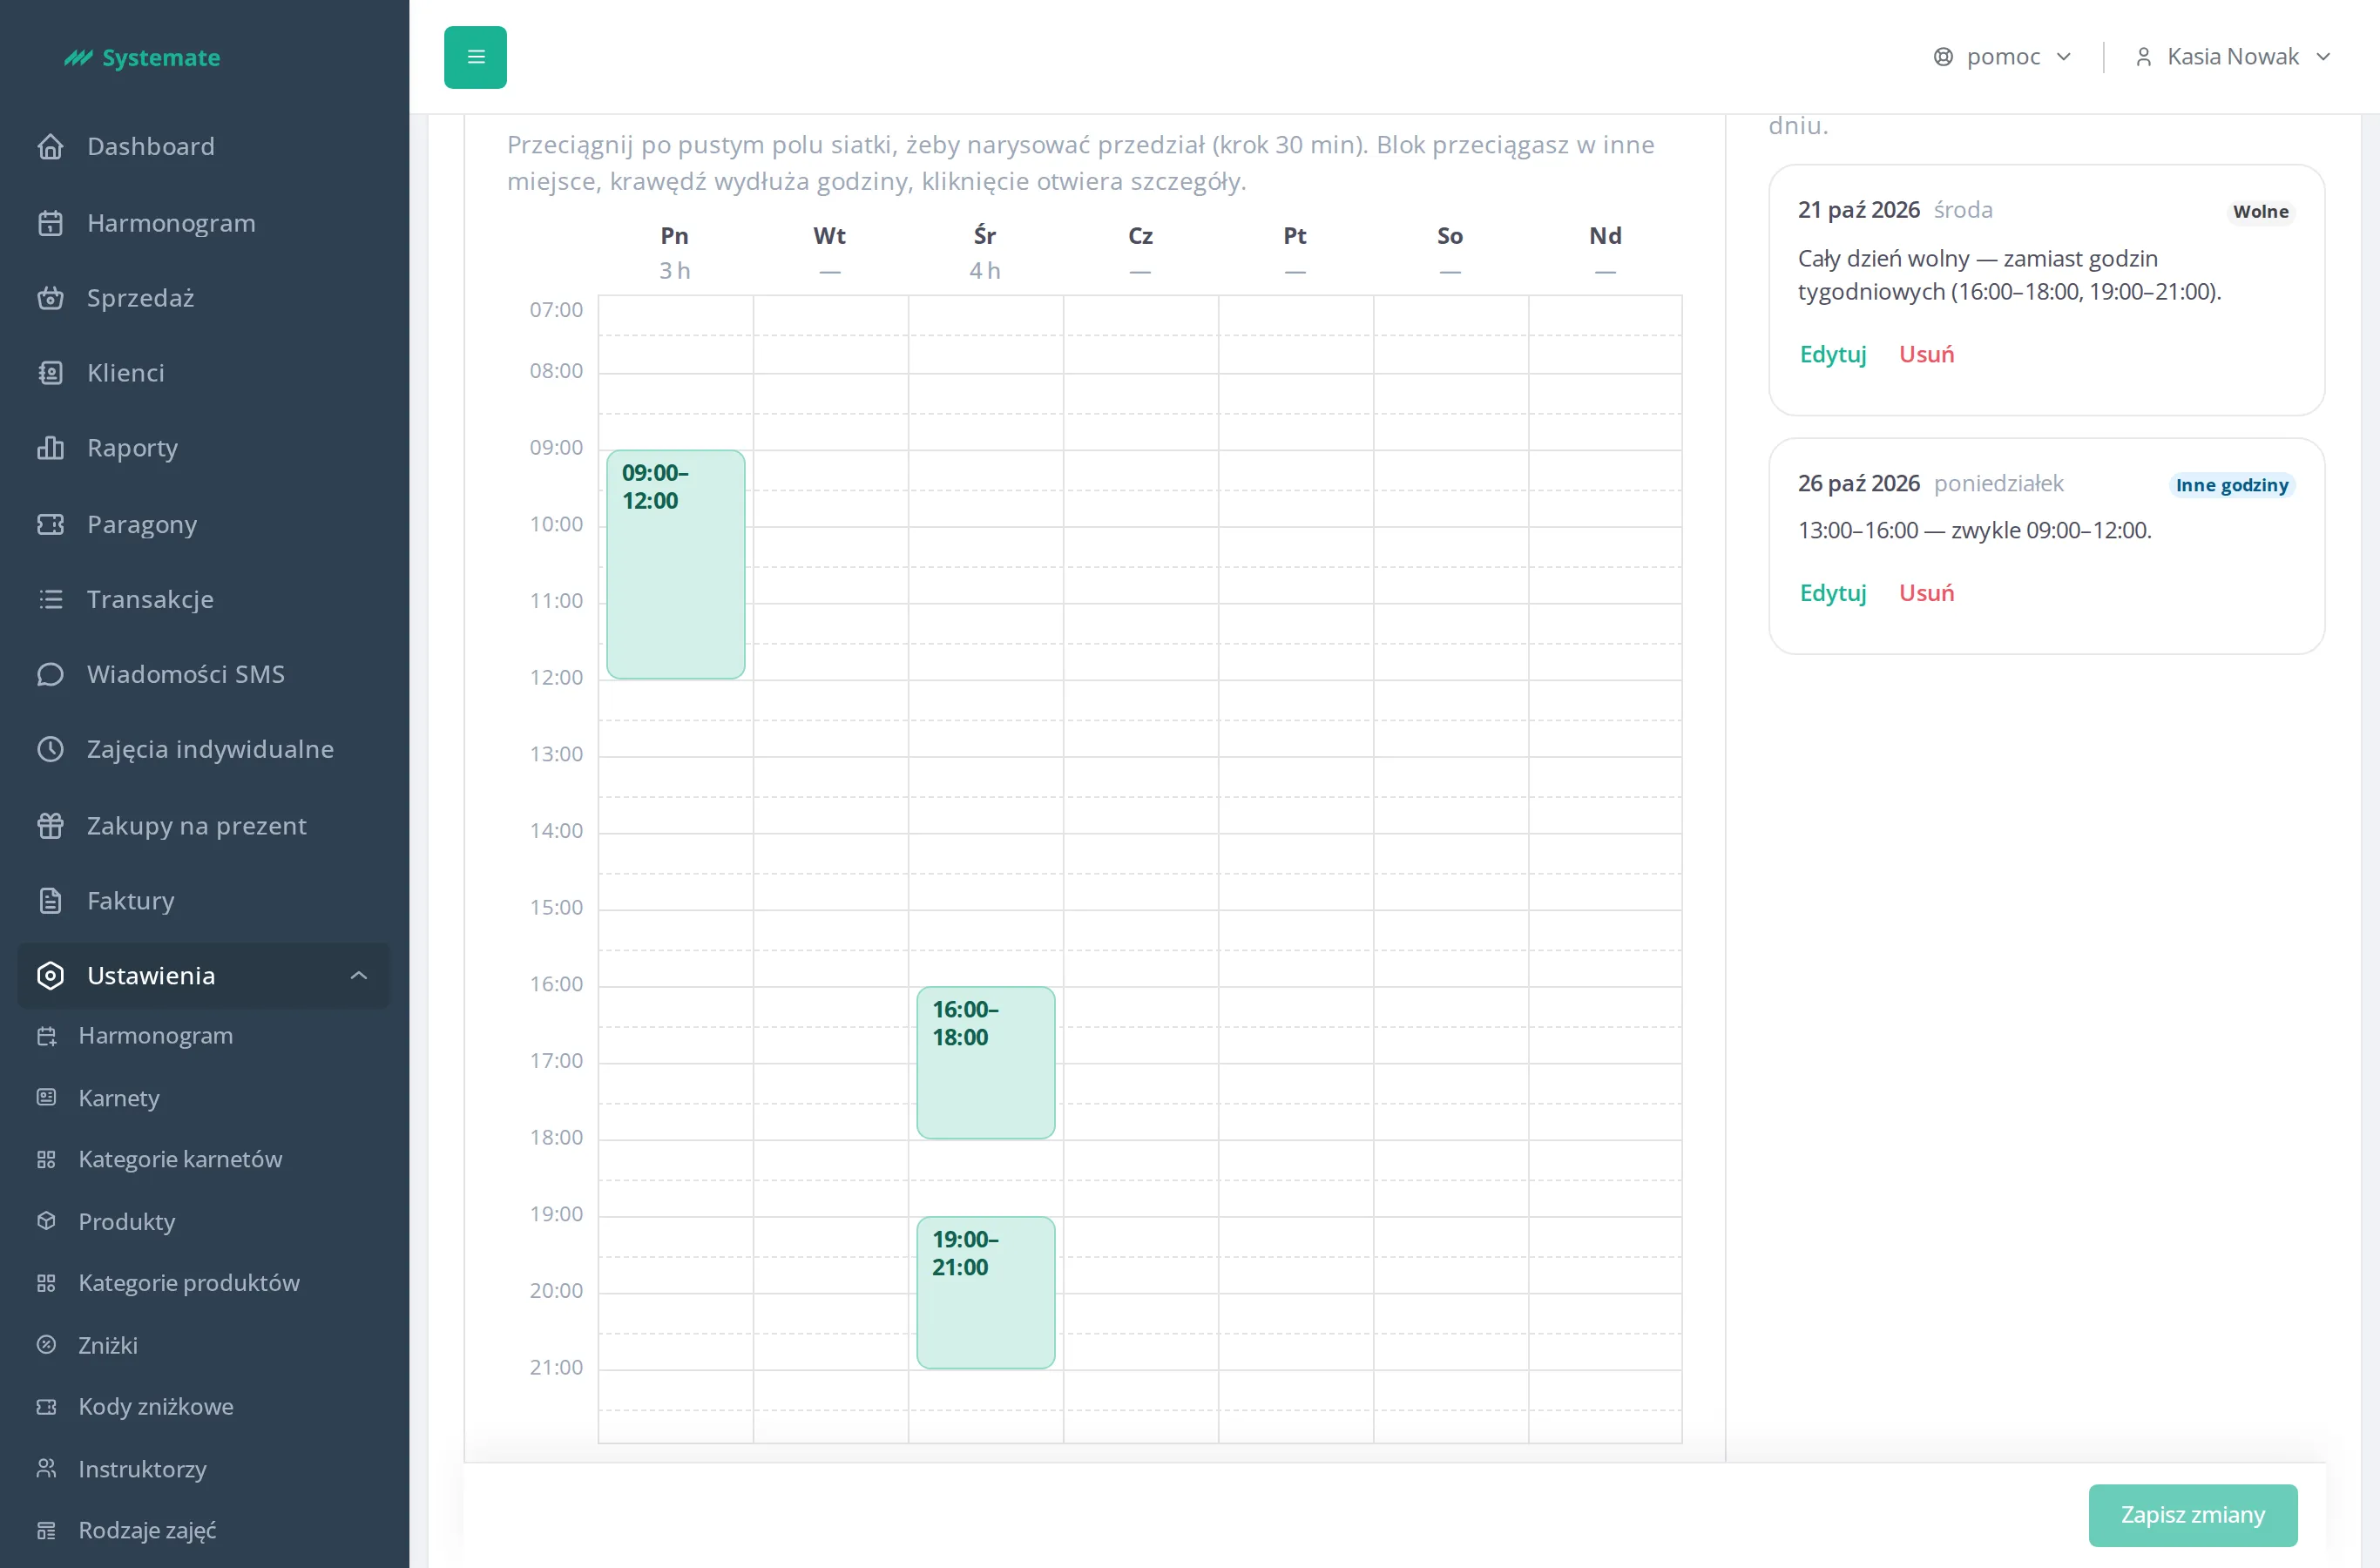
Weekly hours are displayed in a weekly grid: columns from Monday to Sunday, rows from 7:00 a.m. to 10:00 p.m. (the grid expands if an instructor has classes earlier or later). Each time slot is a block with its own hours, and the day’s header shows the total hours for that day. An instructor’s hours are not assigned to a specific room—the classroom is determined by the class type (the Room field in the class type).
- Drag the mouse over an empty part of a day to draw a new time slot — the times round to full half hours.
- Drag a block to another place or another day to move it, and its top or bottom edge to change its start or end.
- Click a block to open a pop-up window with details: Day, times from and to (in 15-minute increments). The Delete button removes the time slot, and Done closes the pop-up window.
- Add a time slot puts 09:00–10:00 on the first day where that hour is free and opens its window at once — this is how you set hours without a mouse.
The time slots of one day must not overlap. When they do, the panel says Time slots overlap, both blocks get a red frame, and the save bar shows the number of errors to correct — saving stays blocked until you correct them.
-
The exceptions are in the column next to the grid, the upcoming ones nearest first. Each shows its date, type and what it replaces. To change the hours for a specific day, click Add next to the Exceptions heading. In the draft exception pick the Date in the calendar and the type:
- Day off — the instructor does not take customers that day,
- Other hours — that day only the time slots given in the exception apply, instead of the regular weekly hours; add another time slot with + next time slot.
Click Add an exception — only then does the exception become part of the instructor’s hours. Edit and Delete at an exception change or remove it.
-
Click Save changes in the bar at the bottom of the page. The panel saves the hours and returns to the instructor list, where you pick the next instructor. Discard drops the unsaved changes and returns to the list as well.
-
The Instructors link at the top of the page takes you back to the list. If you have unsaved changes, the panel first asks whether to leave without saving.
The exception calendar does not let you pick a day that has passed, and one day can have only one exception — for a date that is taken the panel tells you to edit the existing one. Exceptions whose date has passed are folded under Past exceptions and cannot be changed.
If the system does not accept the hours, a list of errors with the day and times of the time slot appears above the grid, and the faulty block gets a red frame. An error of an exception appears at its card.
Availability is only the window in which customers can book. Existing bookings outside the new hours stay — you will see them in the schedule.
Settings
Section titled “Settings”The Settings tab holds the rules shared by all instructors, split into four cards placed one under another. You do not set lesson lengths here — each lesson type has its own lengths with prices in the Lesson types tab.
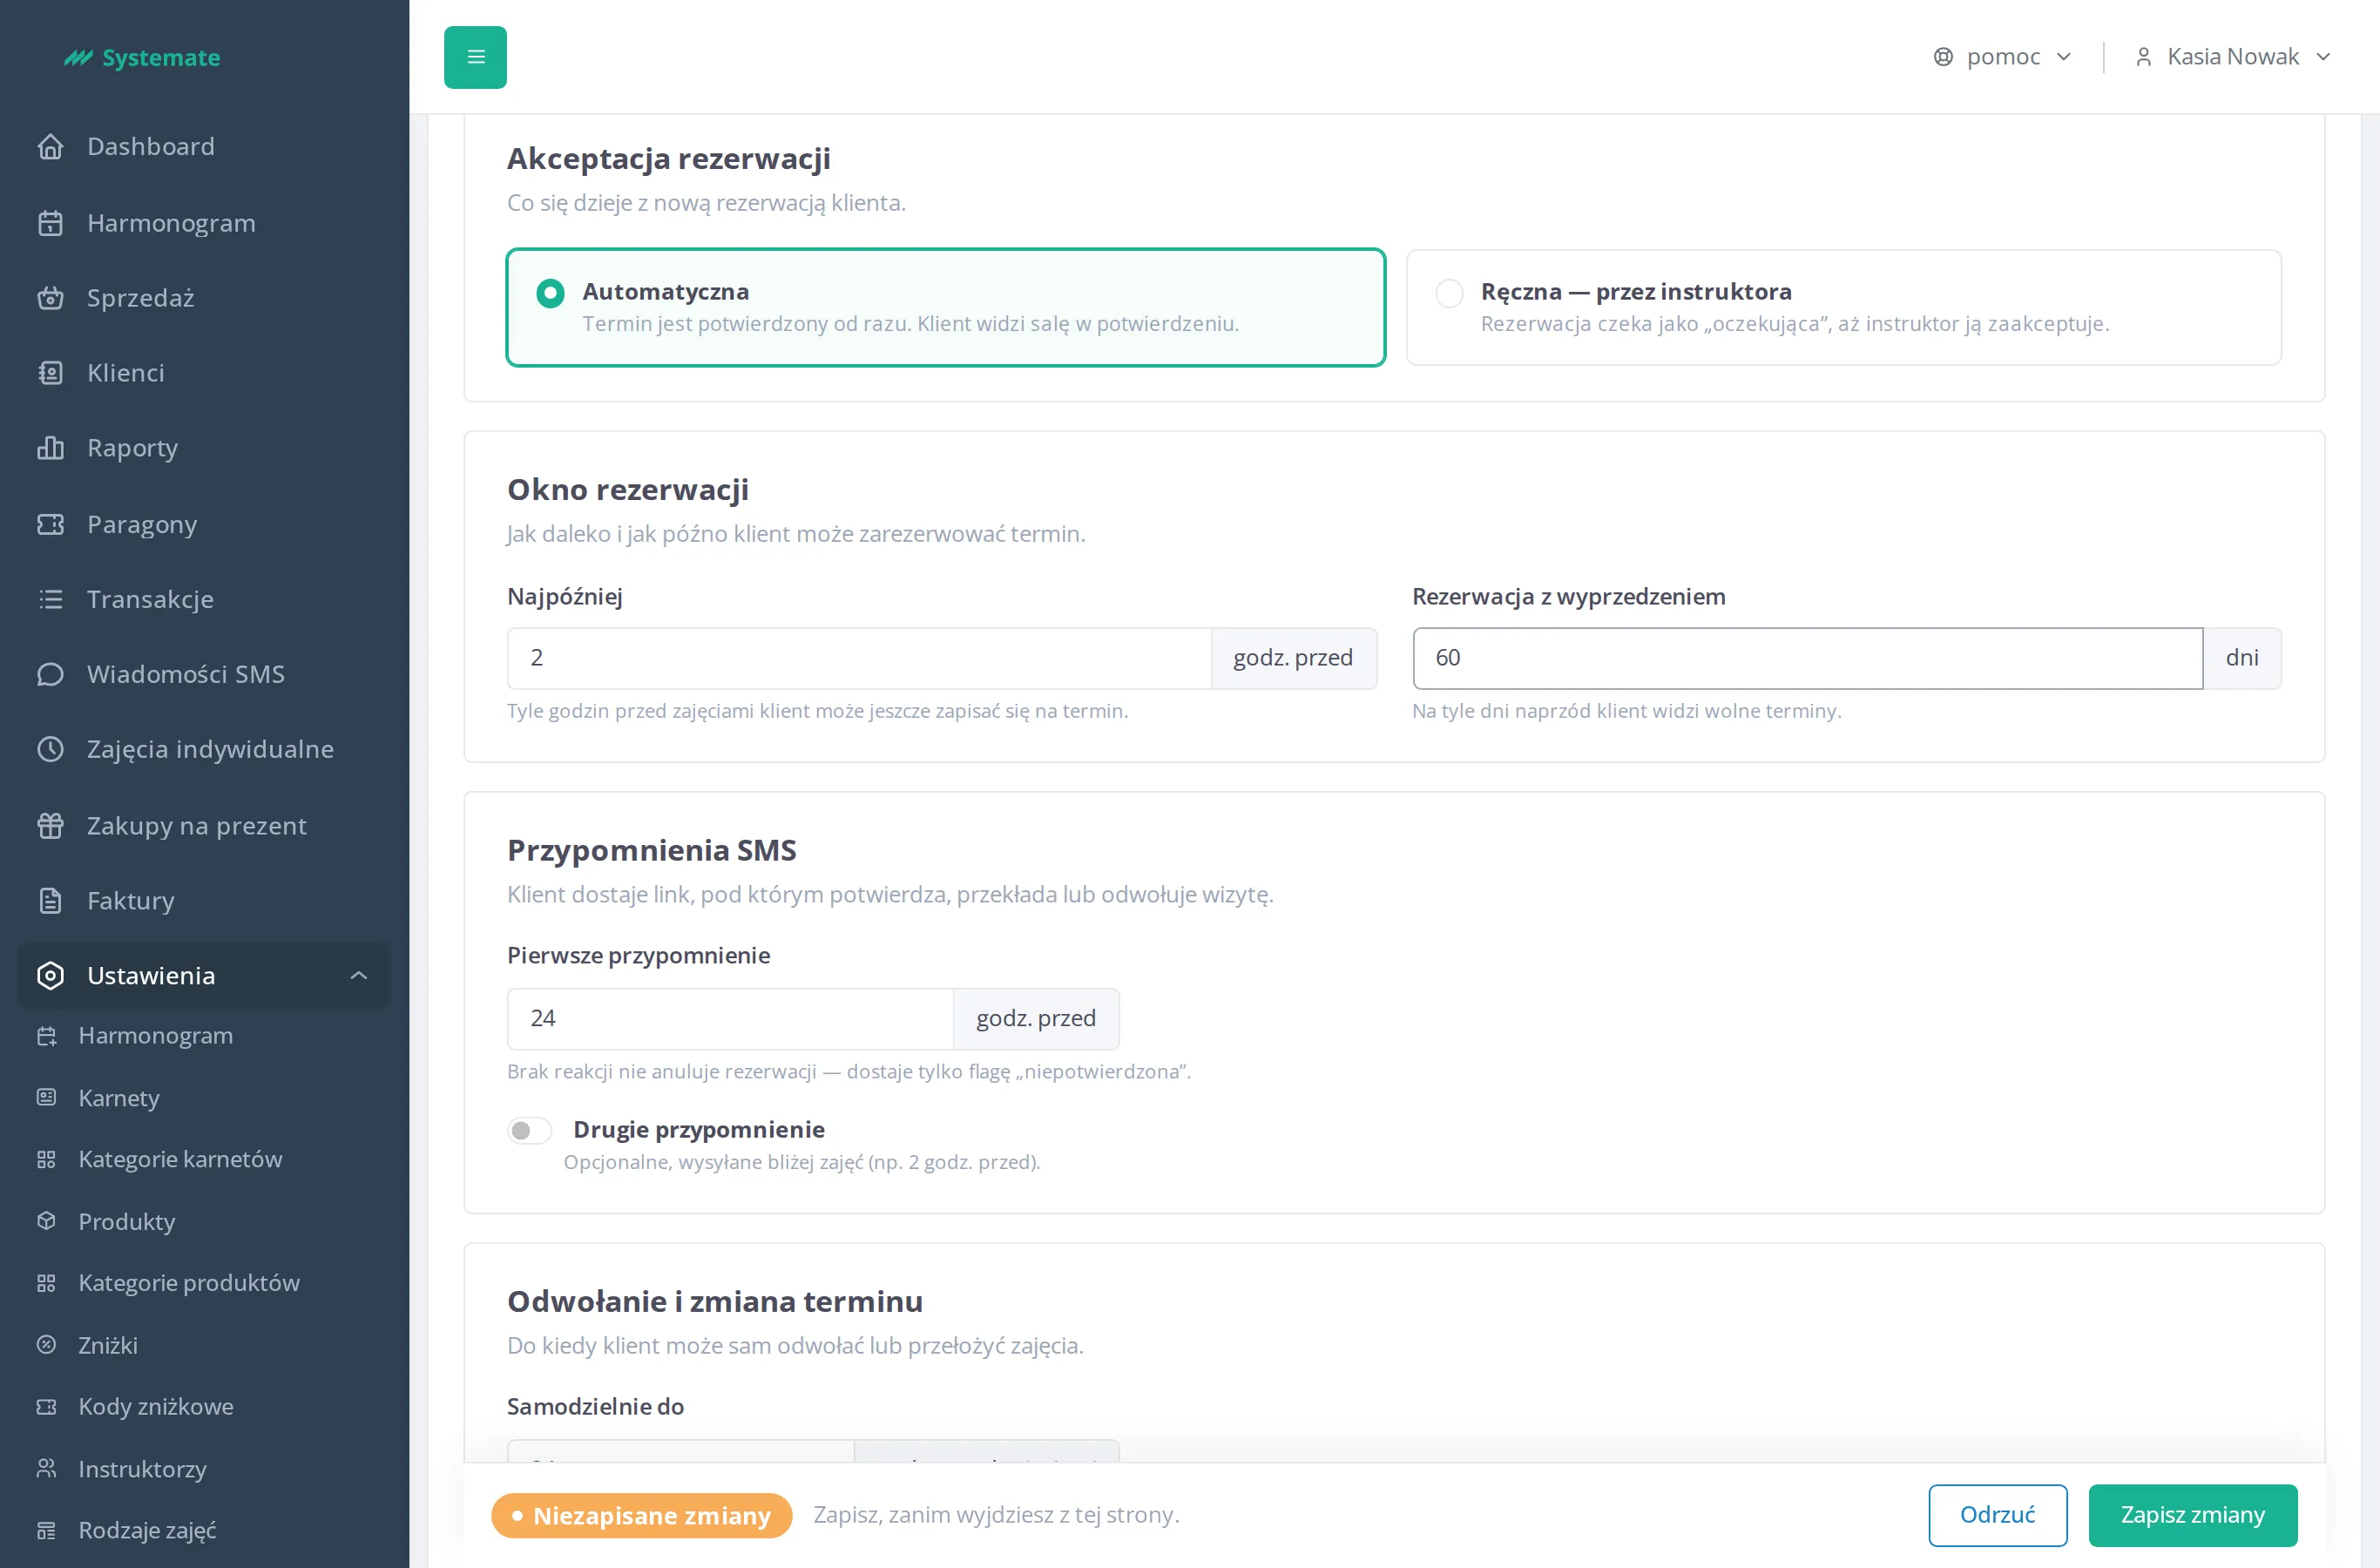
- In the Booking Confirmation card pick Automatically if a new booking should be confirmed straight away, or Manual — by an instructor if the instructor has to accept it first. If you pick manual acceptance while an instructor has no access to the panel, a warning under the cards shows how many such instructors there are — their bookings will wait as pending and the front desk will accept them.
- In the Reservation Window card enter in No later than how many hours before the lesson the customer may still book a slot, and in Advance booking — how many days ahead they see free slots.
- In the SMS reminders card enter in First reminder how many hours before the lesson the customer gets an SMS reminder (1 to 72). To send a second reminder as well, switch on Second reminder and enter how many hours before the lesson it goes out — it has to be closer to the lesson than the first one.
- In the Cancellation and rescheduling card enter in Self-service until up to how many hours before the lesson the customer may cancel or reschedule the booking on their own (0 to 168). After that they have to contact the front desk. In Contact phone for customers enter the number the customer sees once that deadline has passed (at most 30 characters). Leave it empty if you do not want to show a number.
- Click Save changes in the bar at the bottom of the page.
The bar at the bottom of the page shows whether anything waits to be saved. While changes are unsaved it shows Unsaved changes with the Discard and Save changes buttons. Discard brings back the settings last saved. After a save the panel confirms that the private lesson settings were saved, and the bar no longer shows unsaved changes. If you switch on the second reminder without entering its hours, the bar shows the number of errors to correct and Save changes stays inactive until you correct them.