Family and Loved Ones
If the studio has family accounts enabled and there are linked people in your profile, you can sign them up for classes with you—with just one click.
Sign Up Multiple People at Once
Section titled “Sign Up Multiple People at Once”-
Open the class details in the schedule and click Sign up.
-
The Who’s coming? window will open with a list of people you can sign up. You’re at the top of the list, marked as (You). Above the list, you can see how many spots are left in the class.
-
Next to each person, you’ll see the pass they’ll use: the number of remaining entries, the owner of the shared pass, and the person limit, if the pass has one. People with a matching pass are automatically selected.
-
Uncheck the people who aren’t coming, and click Register N people.
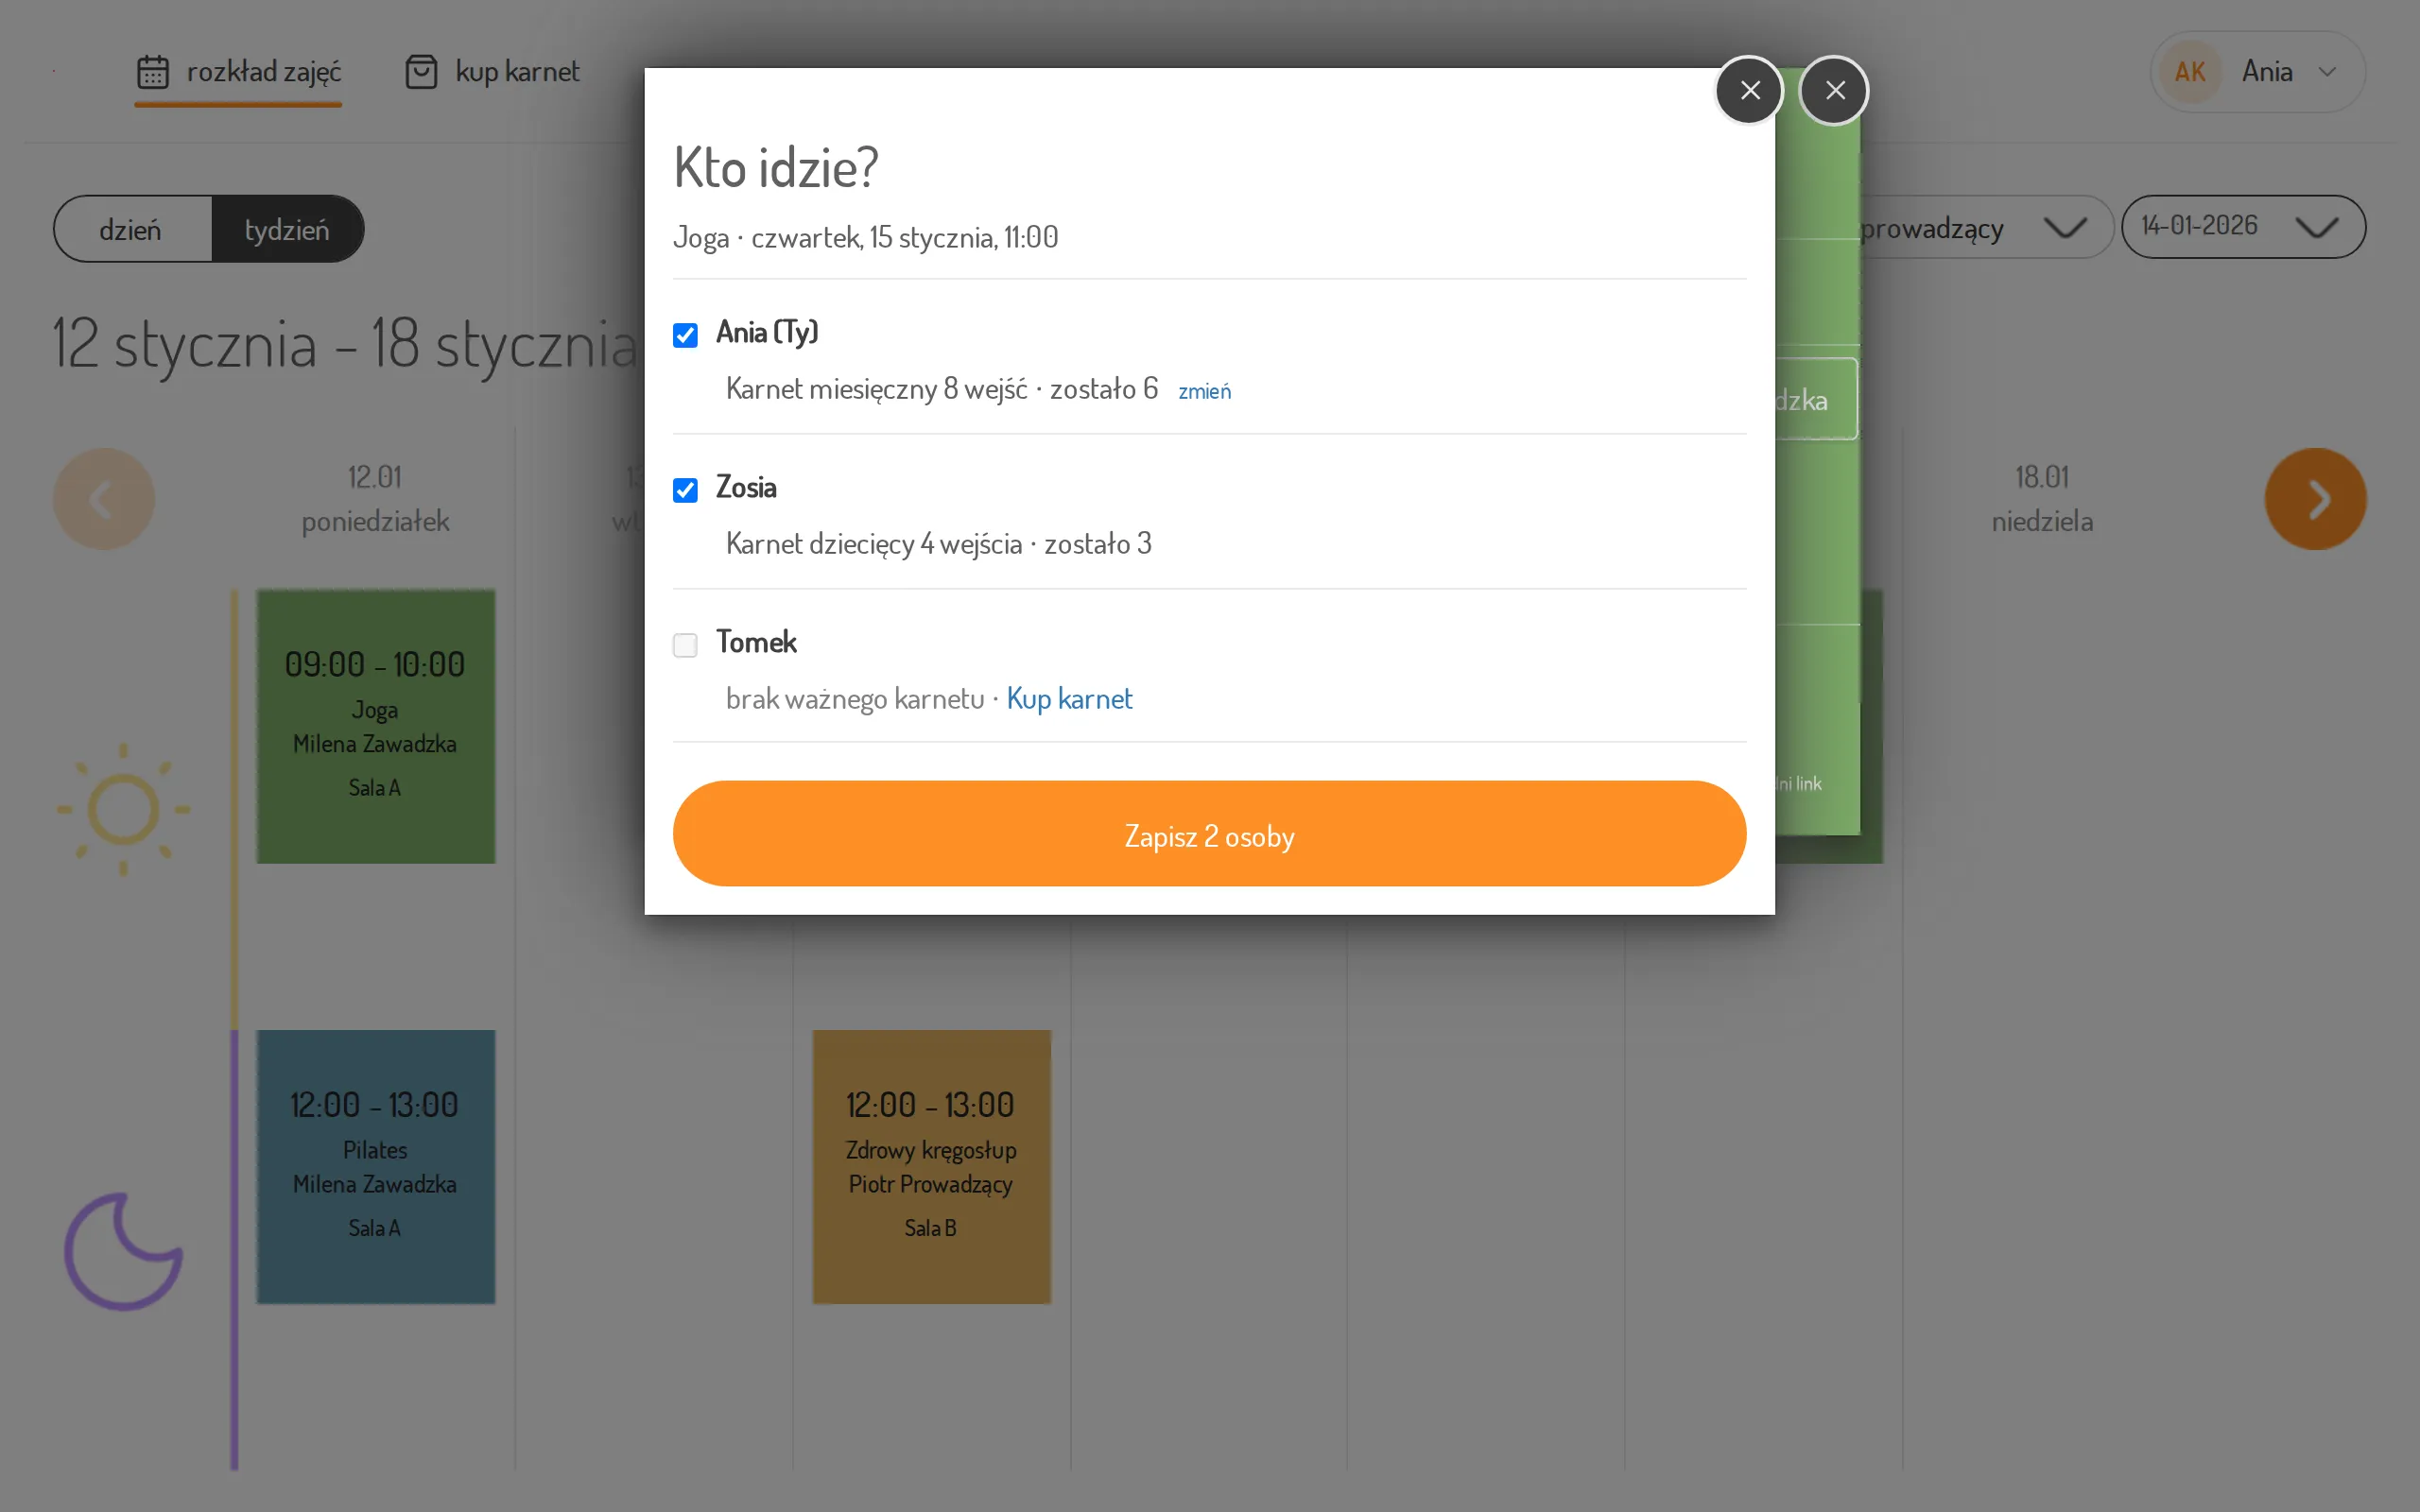
You cannot select a person who does not have a valid pass for these classes—instead of a pass, you’ll see “No valid pass” and a Buy pass link. The link opens the offer already set to that person.
Change a pass for one person
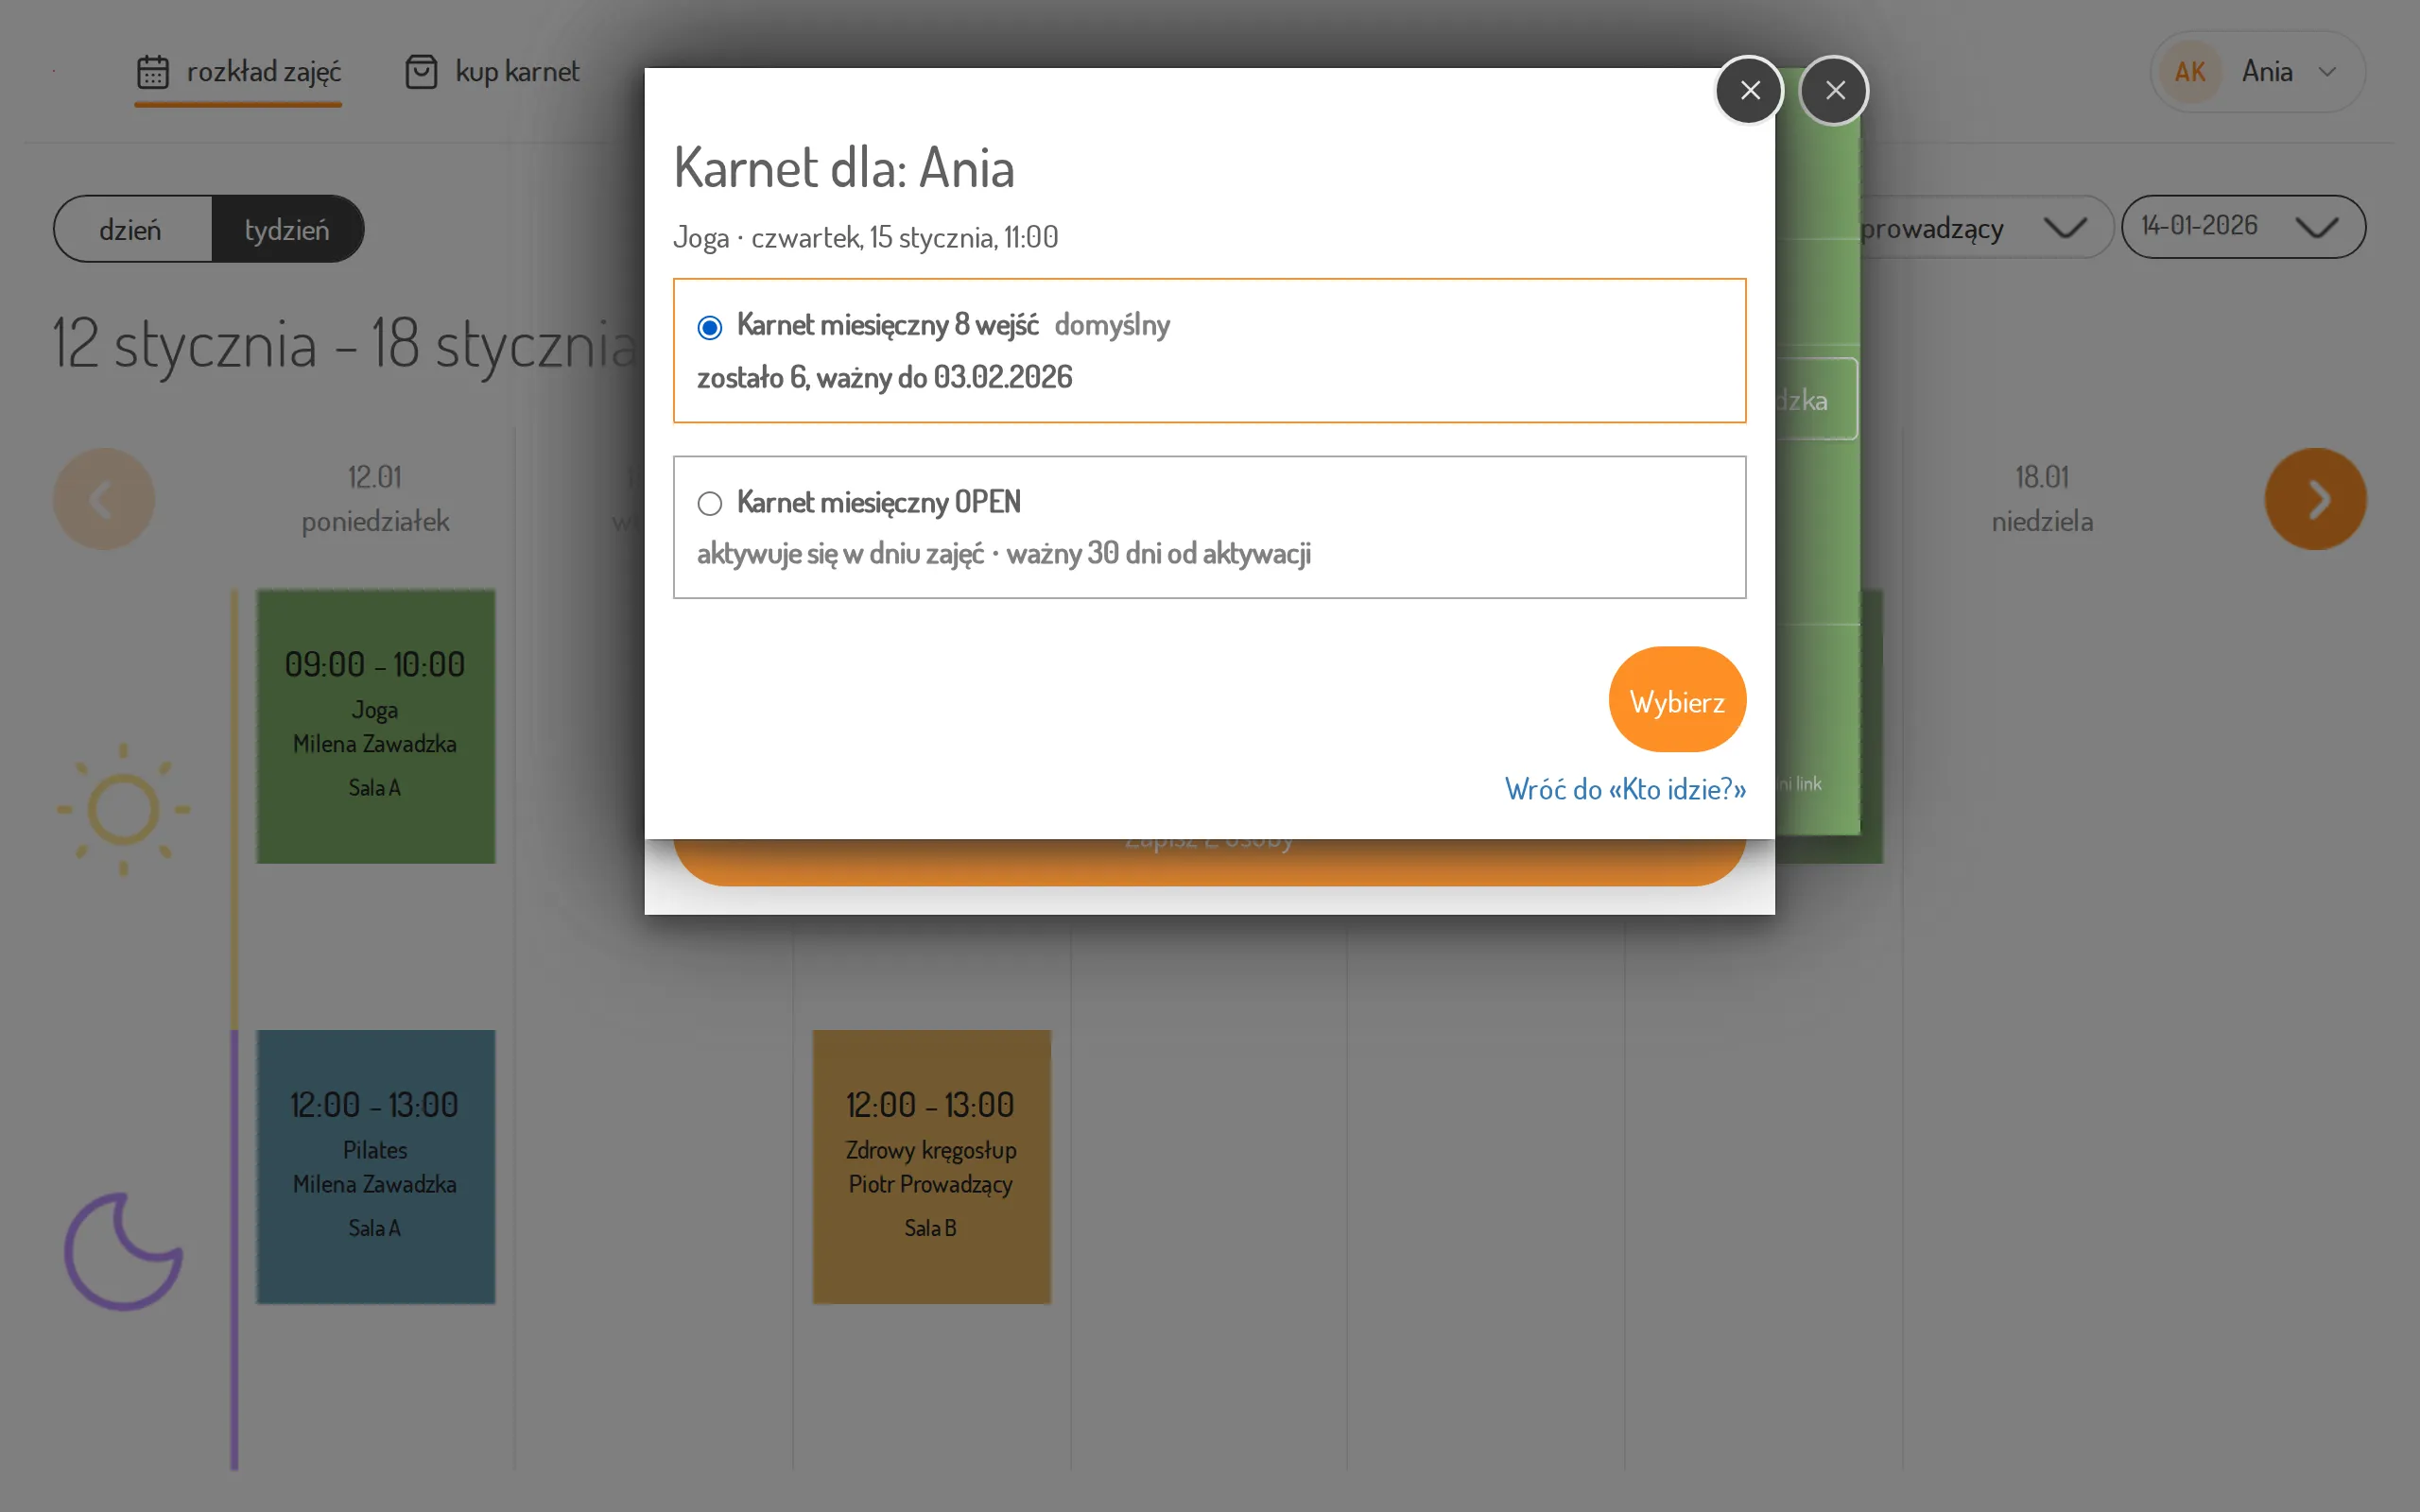
Section titled “Change a pass for one person”If a person has several eligible passes, a change link will appear next to their pass. Click it, select a different pass, and confirm—you’ll return to the Who’s coming? window with the new pass assigned to that person. A pass awaiting activation will show how many days it will be activated for upon registration.
Warning about a shared pass
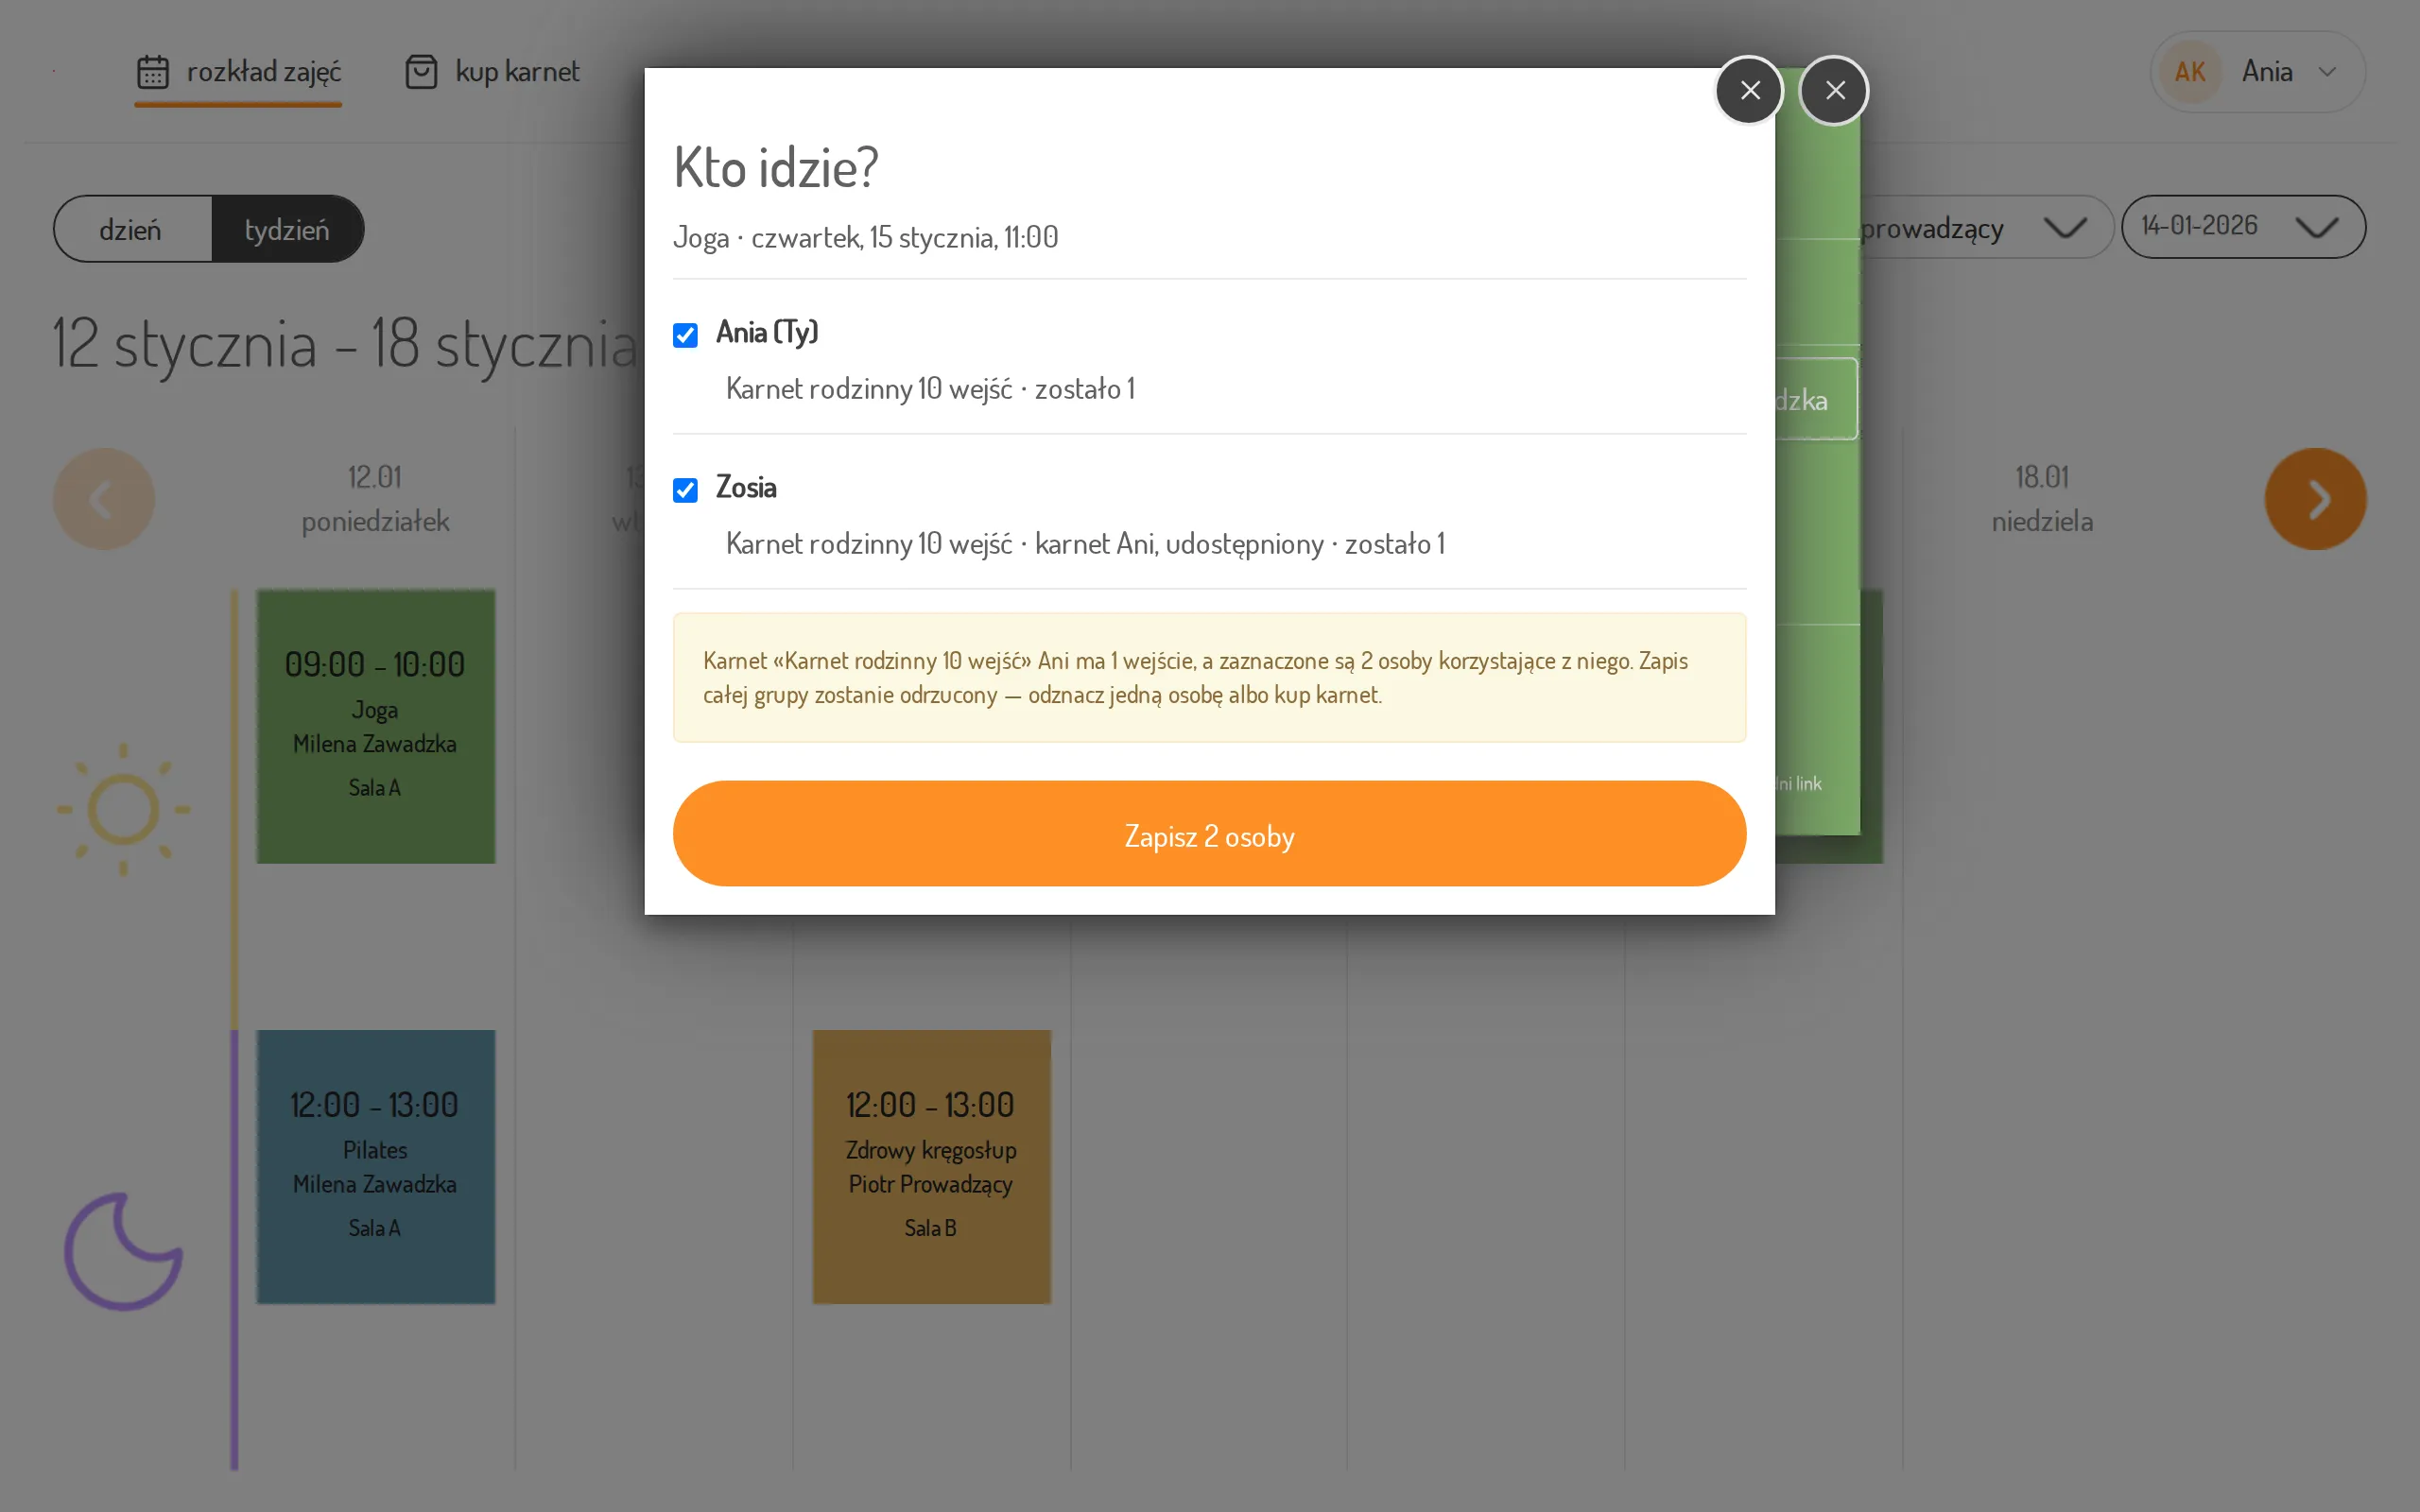
Section titled “Warning about a shared pass”If several selected people are sharing a single pass and there are fewer remaining entries (or spots within the person limit) than the number of people selected, a window will display a warning. The studio will then reject the registration for the entire group—deselect one person or purchase a pass.
When the Studio Rejects a Registration
Section titled “When the Studio Rejects a Registration”Group sign-ups are “all or nothing”: if even one person cannot be signed up, the studio won’t sign anyone up. The window will explain why—for example, if there are fewer available spots than people selected—and let you correct your selection without closing the window.
How Many People Fit in the Class
Section titled “How Many People Fit in the Class”When the studio shows the number of spots, the Who’s going? window counts the available spots live: each selected person reduces them by one. On opening, the window selects as many people as there are available spots, in the list’s order. Once you have selected as many people as there were available spots, the others can no longer be selected, and a message appears under the list—deselect someone to choose another person. When there are no available spots at all, the window asks you to contact the front desk, who will add people to the waiting list.
Who Is Signed Up for a Class
Section titled “Who Is Signed Up for a Class”When you or a person you act for is signed up for a class, the class tile in the schedule shows a ✓. With two or more people signed up, their number appears next to the mark.
The details of such a class show the Signed-up people section with a counter, for example “2 of 3 people”—how many of the people you can sign up are already in the class. Each signed-up person shows the pass they used, and your row is marked You. Below the list you can see until when attendance can be cancelled.
Add More People
Section titled “Add More People”When someone you can sign up is missing from the Signed-up people section and the class has available spots, click Add more people. The Who’s going? window opens: people already signed up are checked, labelled “already signed up” and cannot be deselected. Select the people joining and click Add N people.
Remove One Person from a Class
Section titled “Remove One Person from a Class”In the Signed-up people section, click Sign out next to the person who is not going—the others stay signed up. The button is available until the attendance cancellation deadline; after it, the section shows that the time to cancel has passed.
Remove One Person
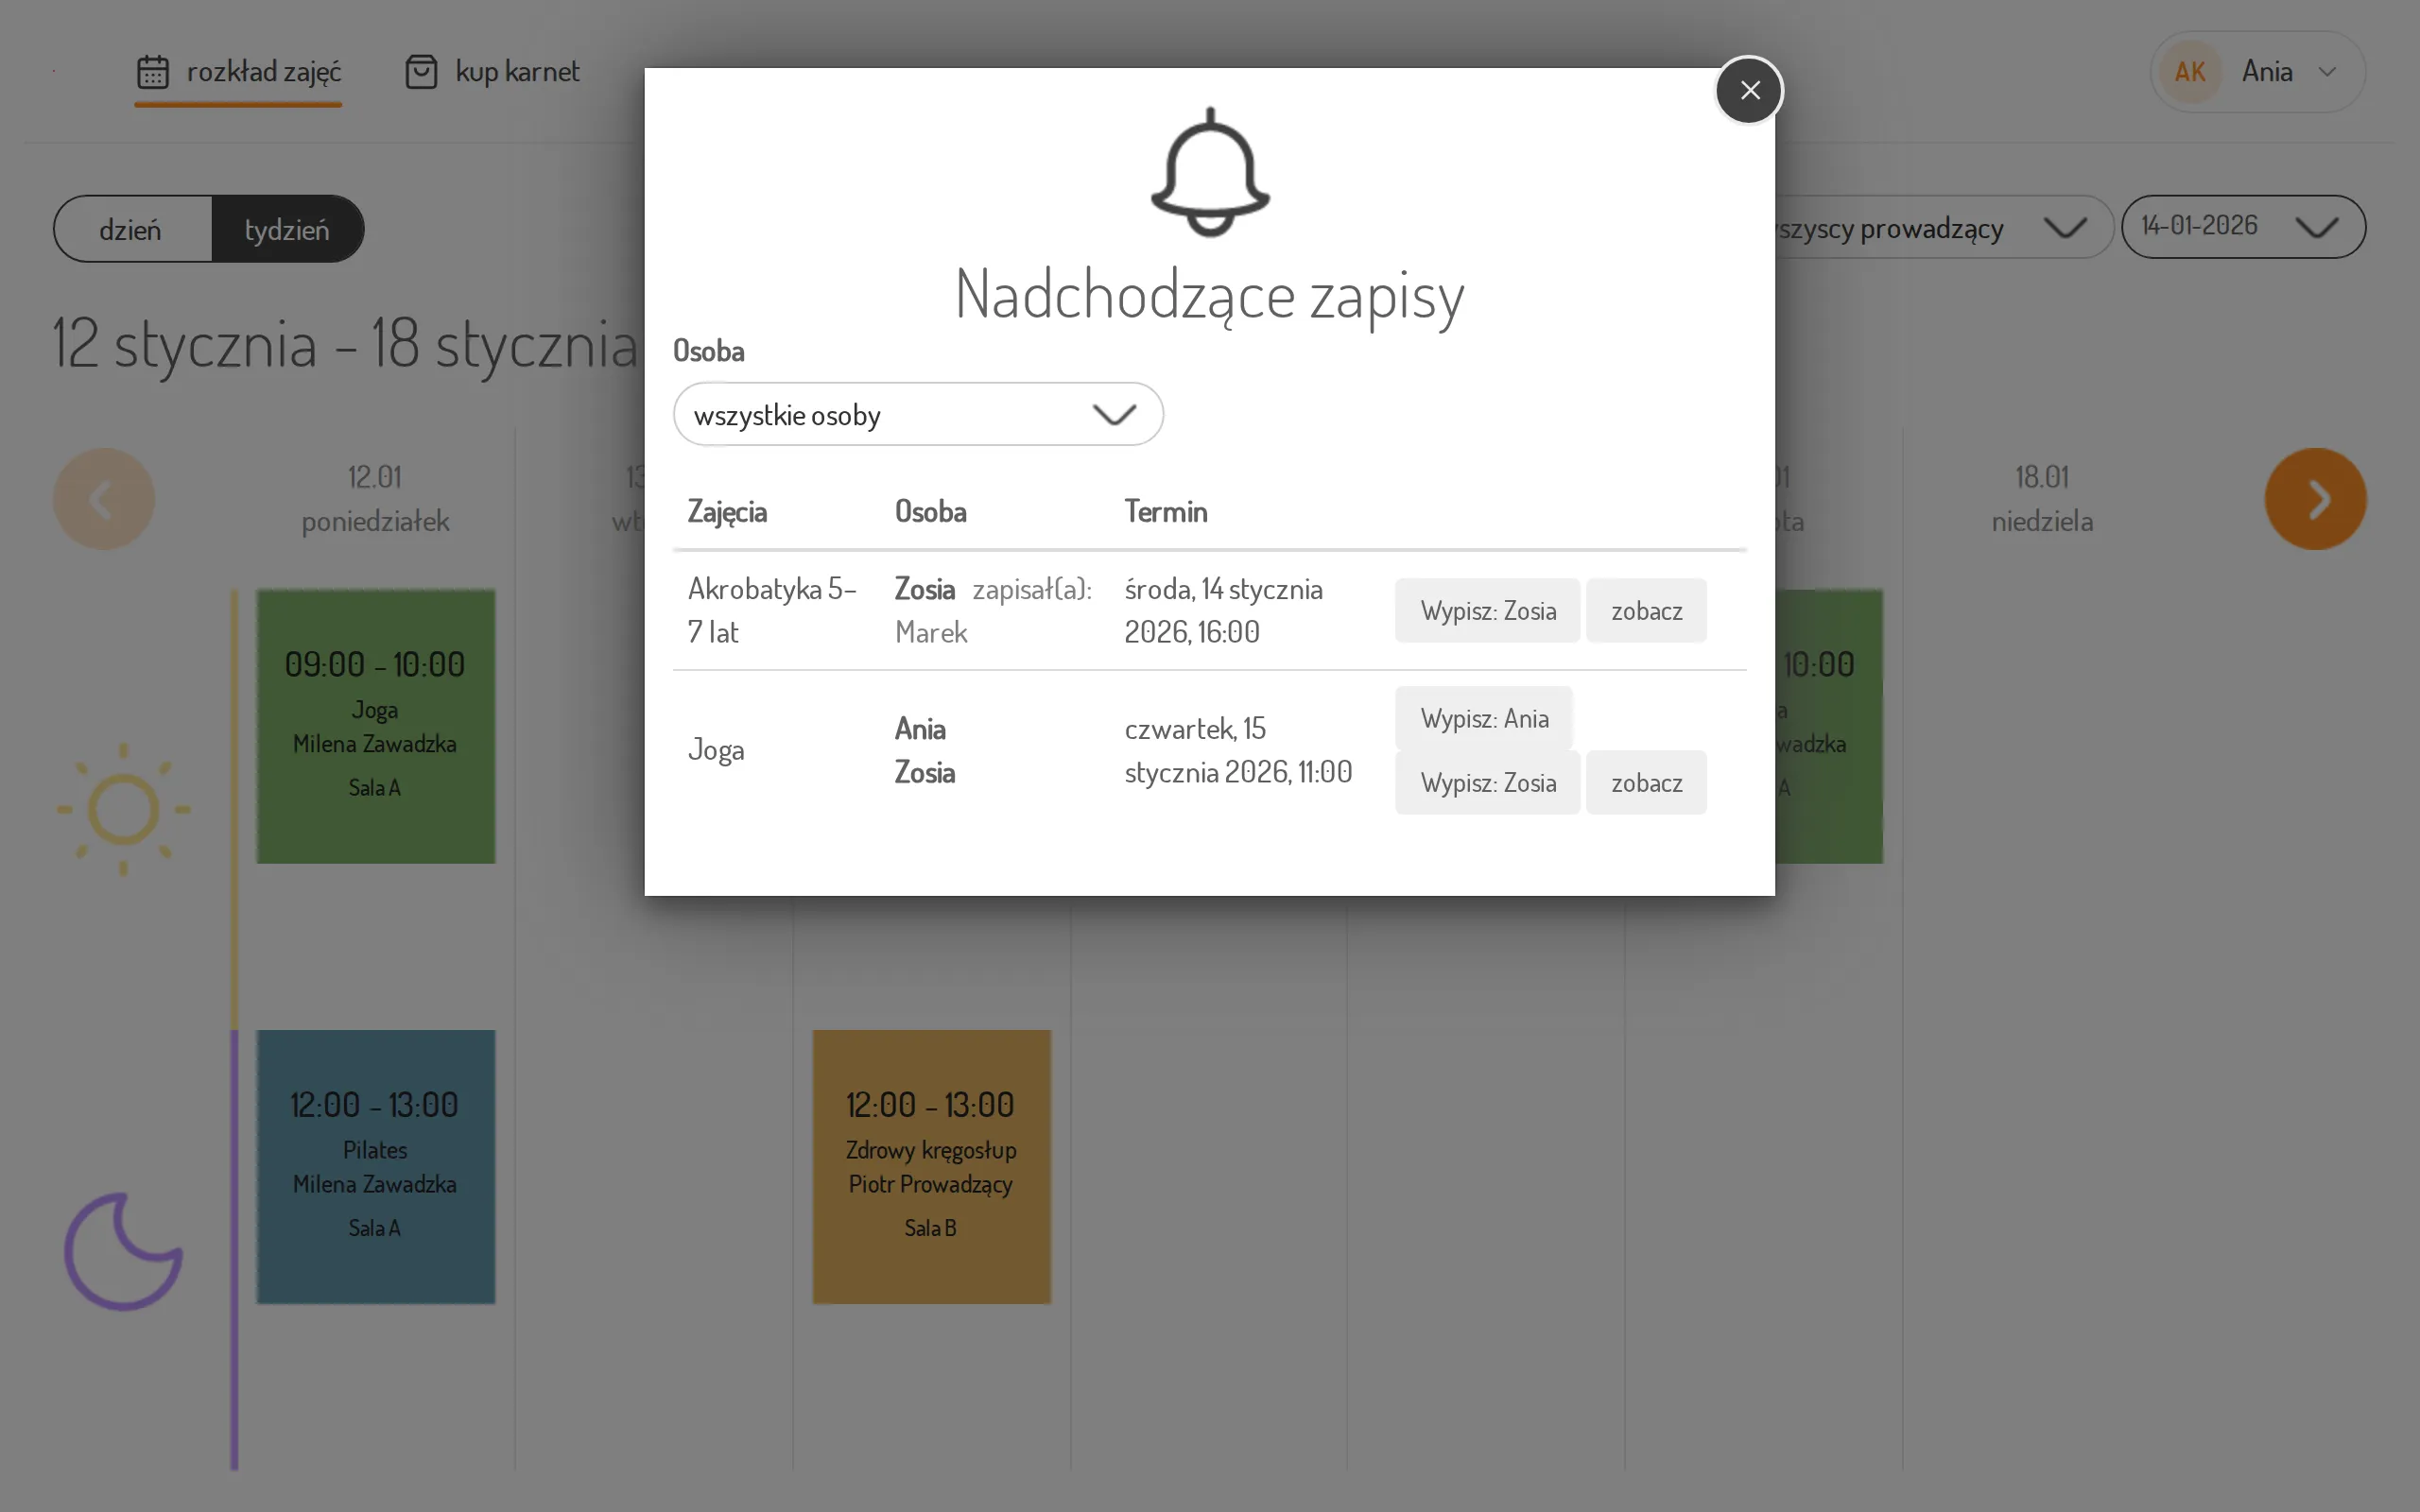
Section titled “Remove One Person”In the profile menu, open upcoming events. For each class, you can see who is registered, and for people registered by someone else—who registered them. The Person filter will show registrations for a single person. Click Sign out: name to sign out only that person—the others stay signed up.
The “Family and Loved Ones” Screen
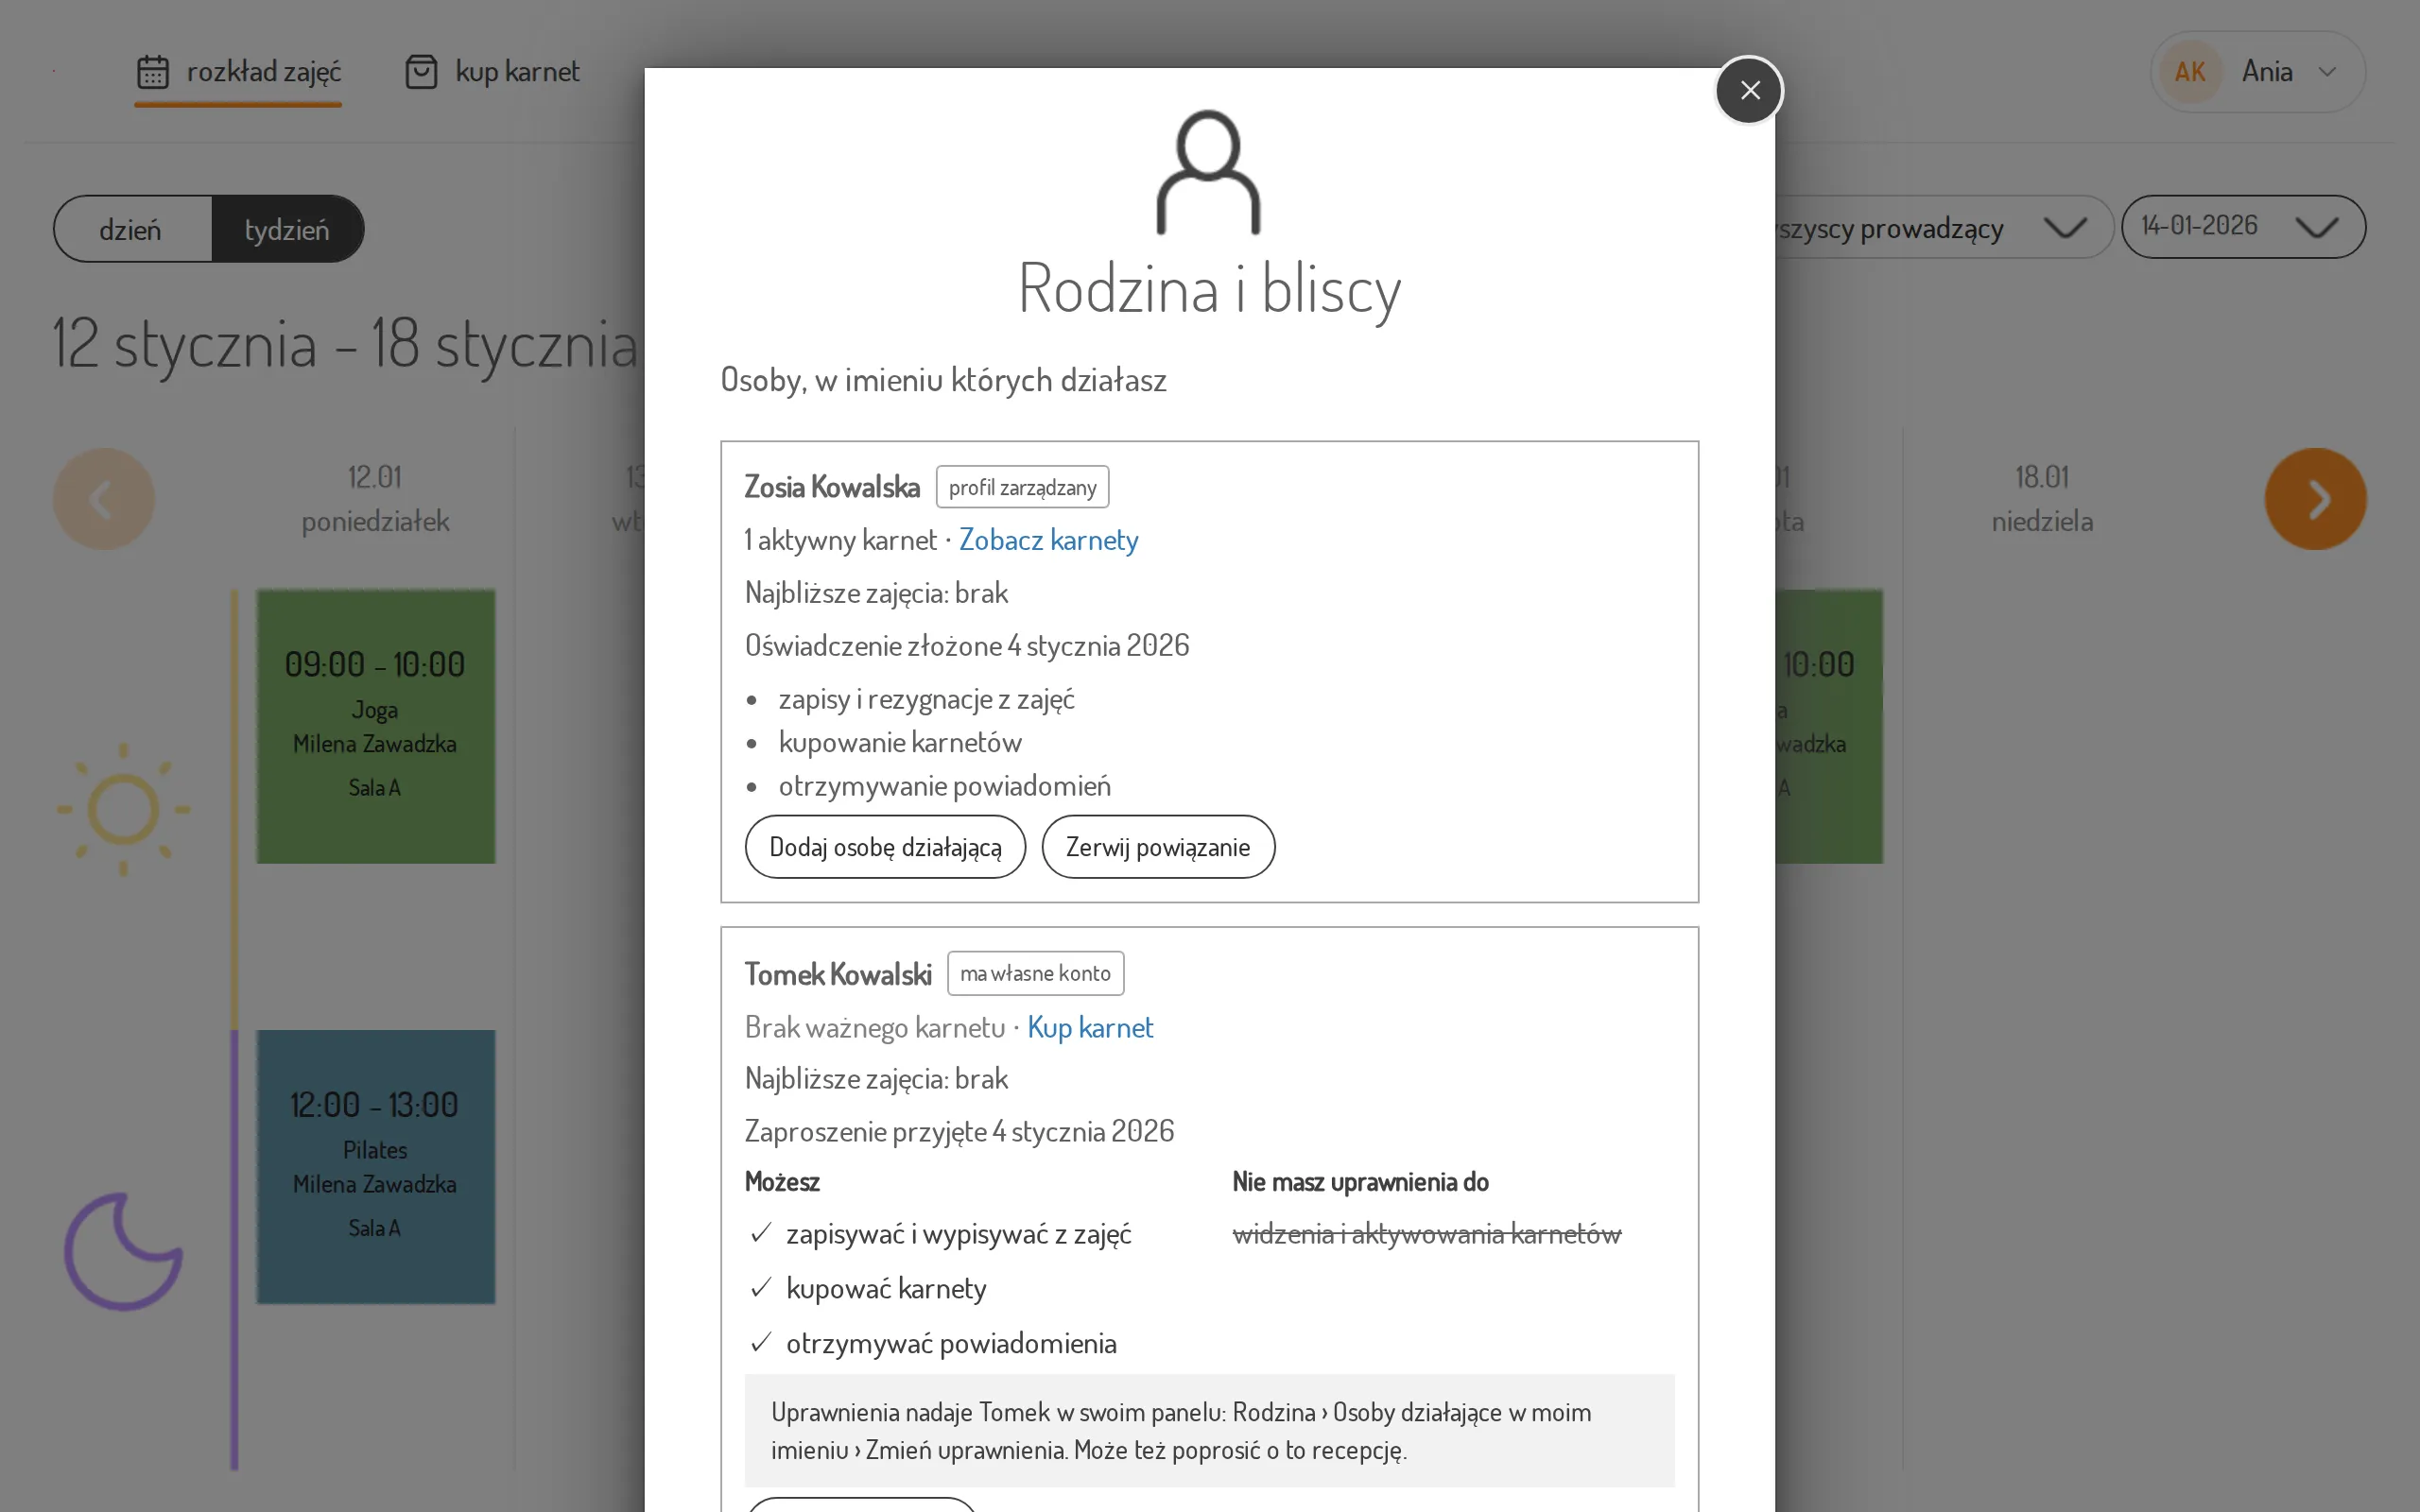
Section titled “The “Family and Loved Ones” Screen”In the profile menu, open Family and loved ones. The screen has two sections:
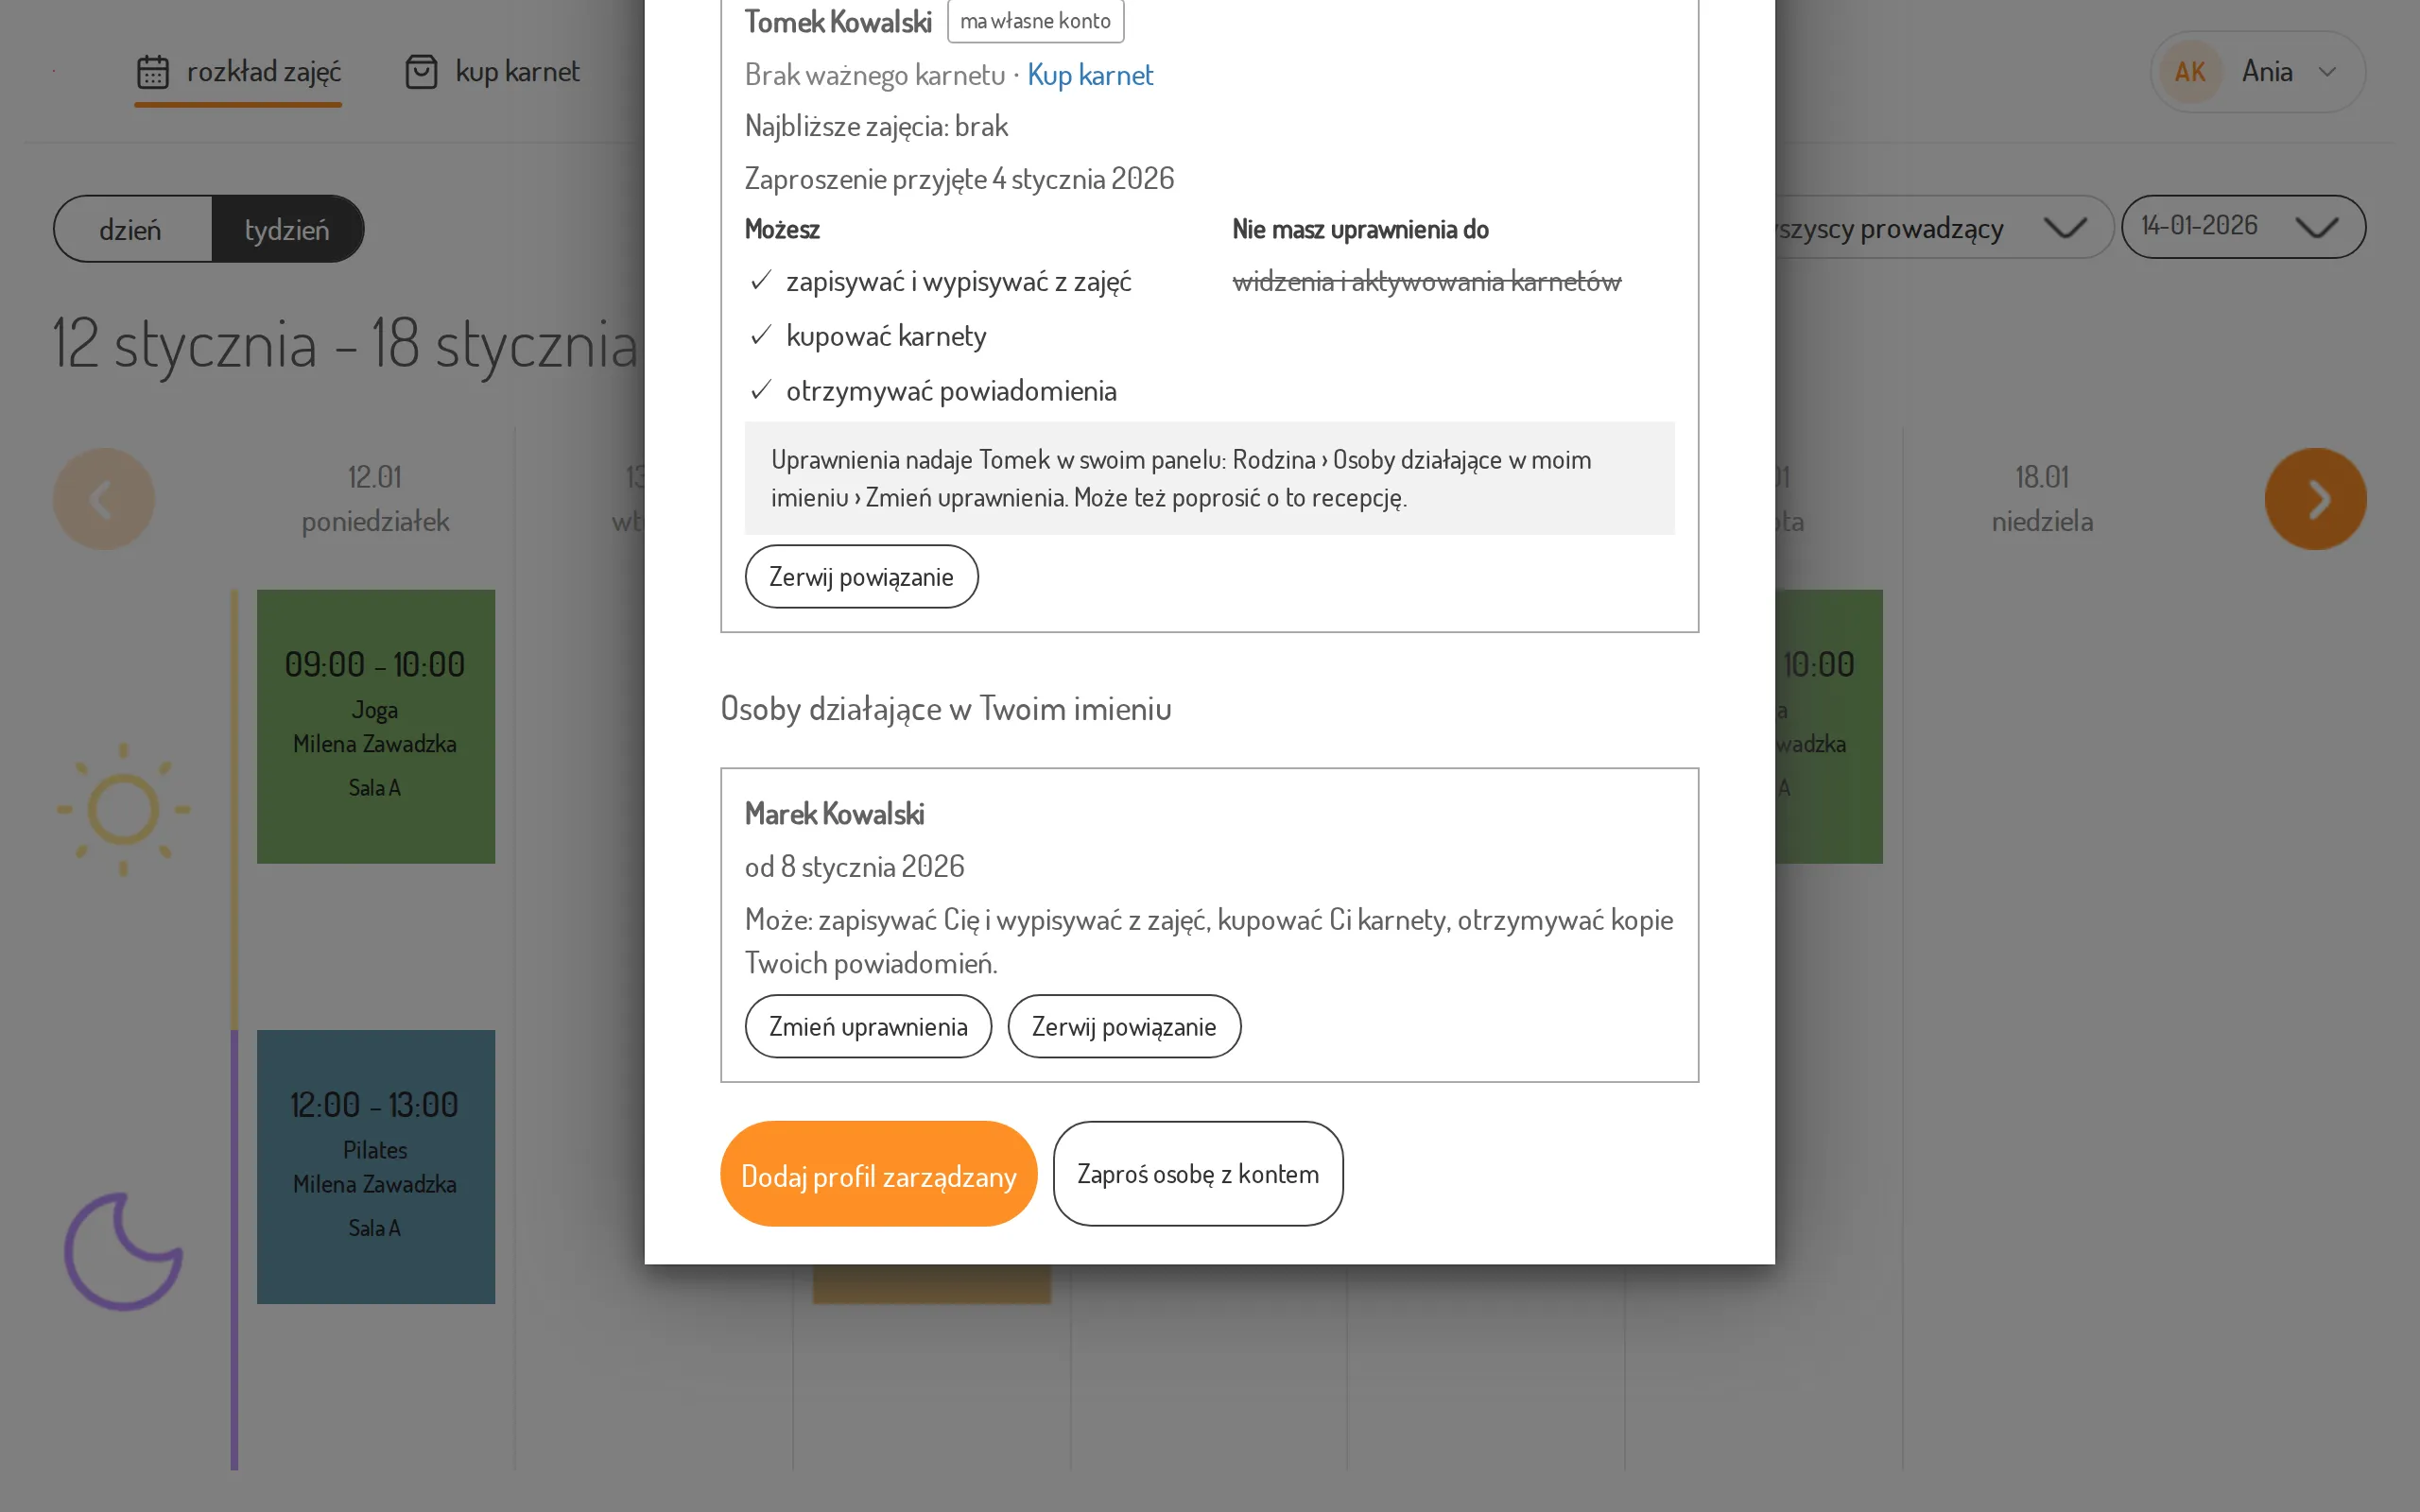
- The individuals on whose behalf you are acting — for each person you can see whether it is a managed profile or a person with their own account, their passes, their next class, the date of the declaration and what you can do on their behalf. For a managed profile, instead of the list of passes you see a summary such as “1 active pass, 1 awaiting activation” and the link See passes, which opens Your passes with that person already selected (see Check your passes).
- Persons acting on your behalf — who can act for you and since when.
Add a Managed Profile
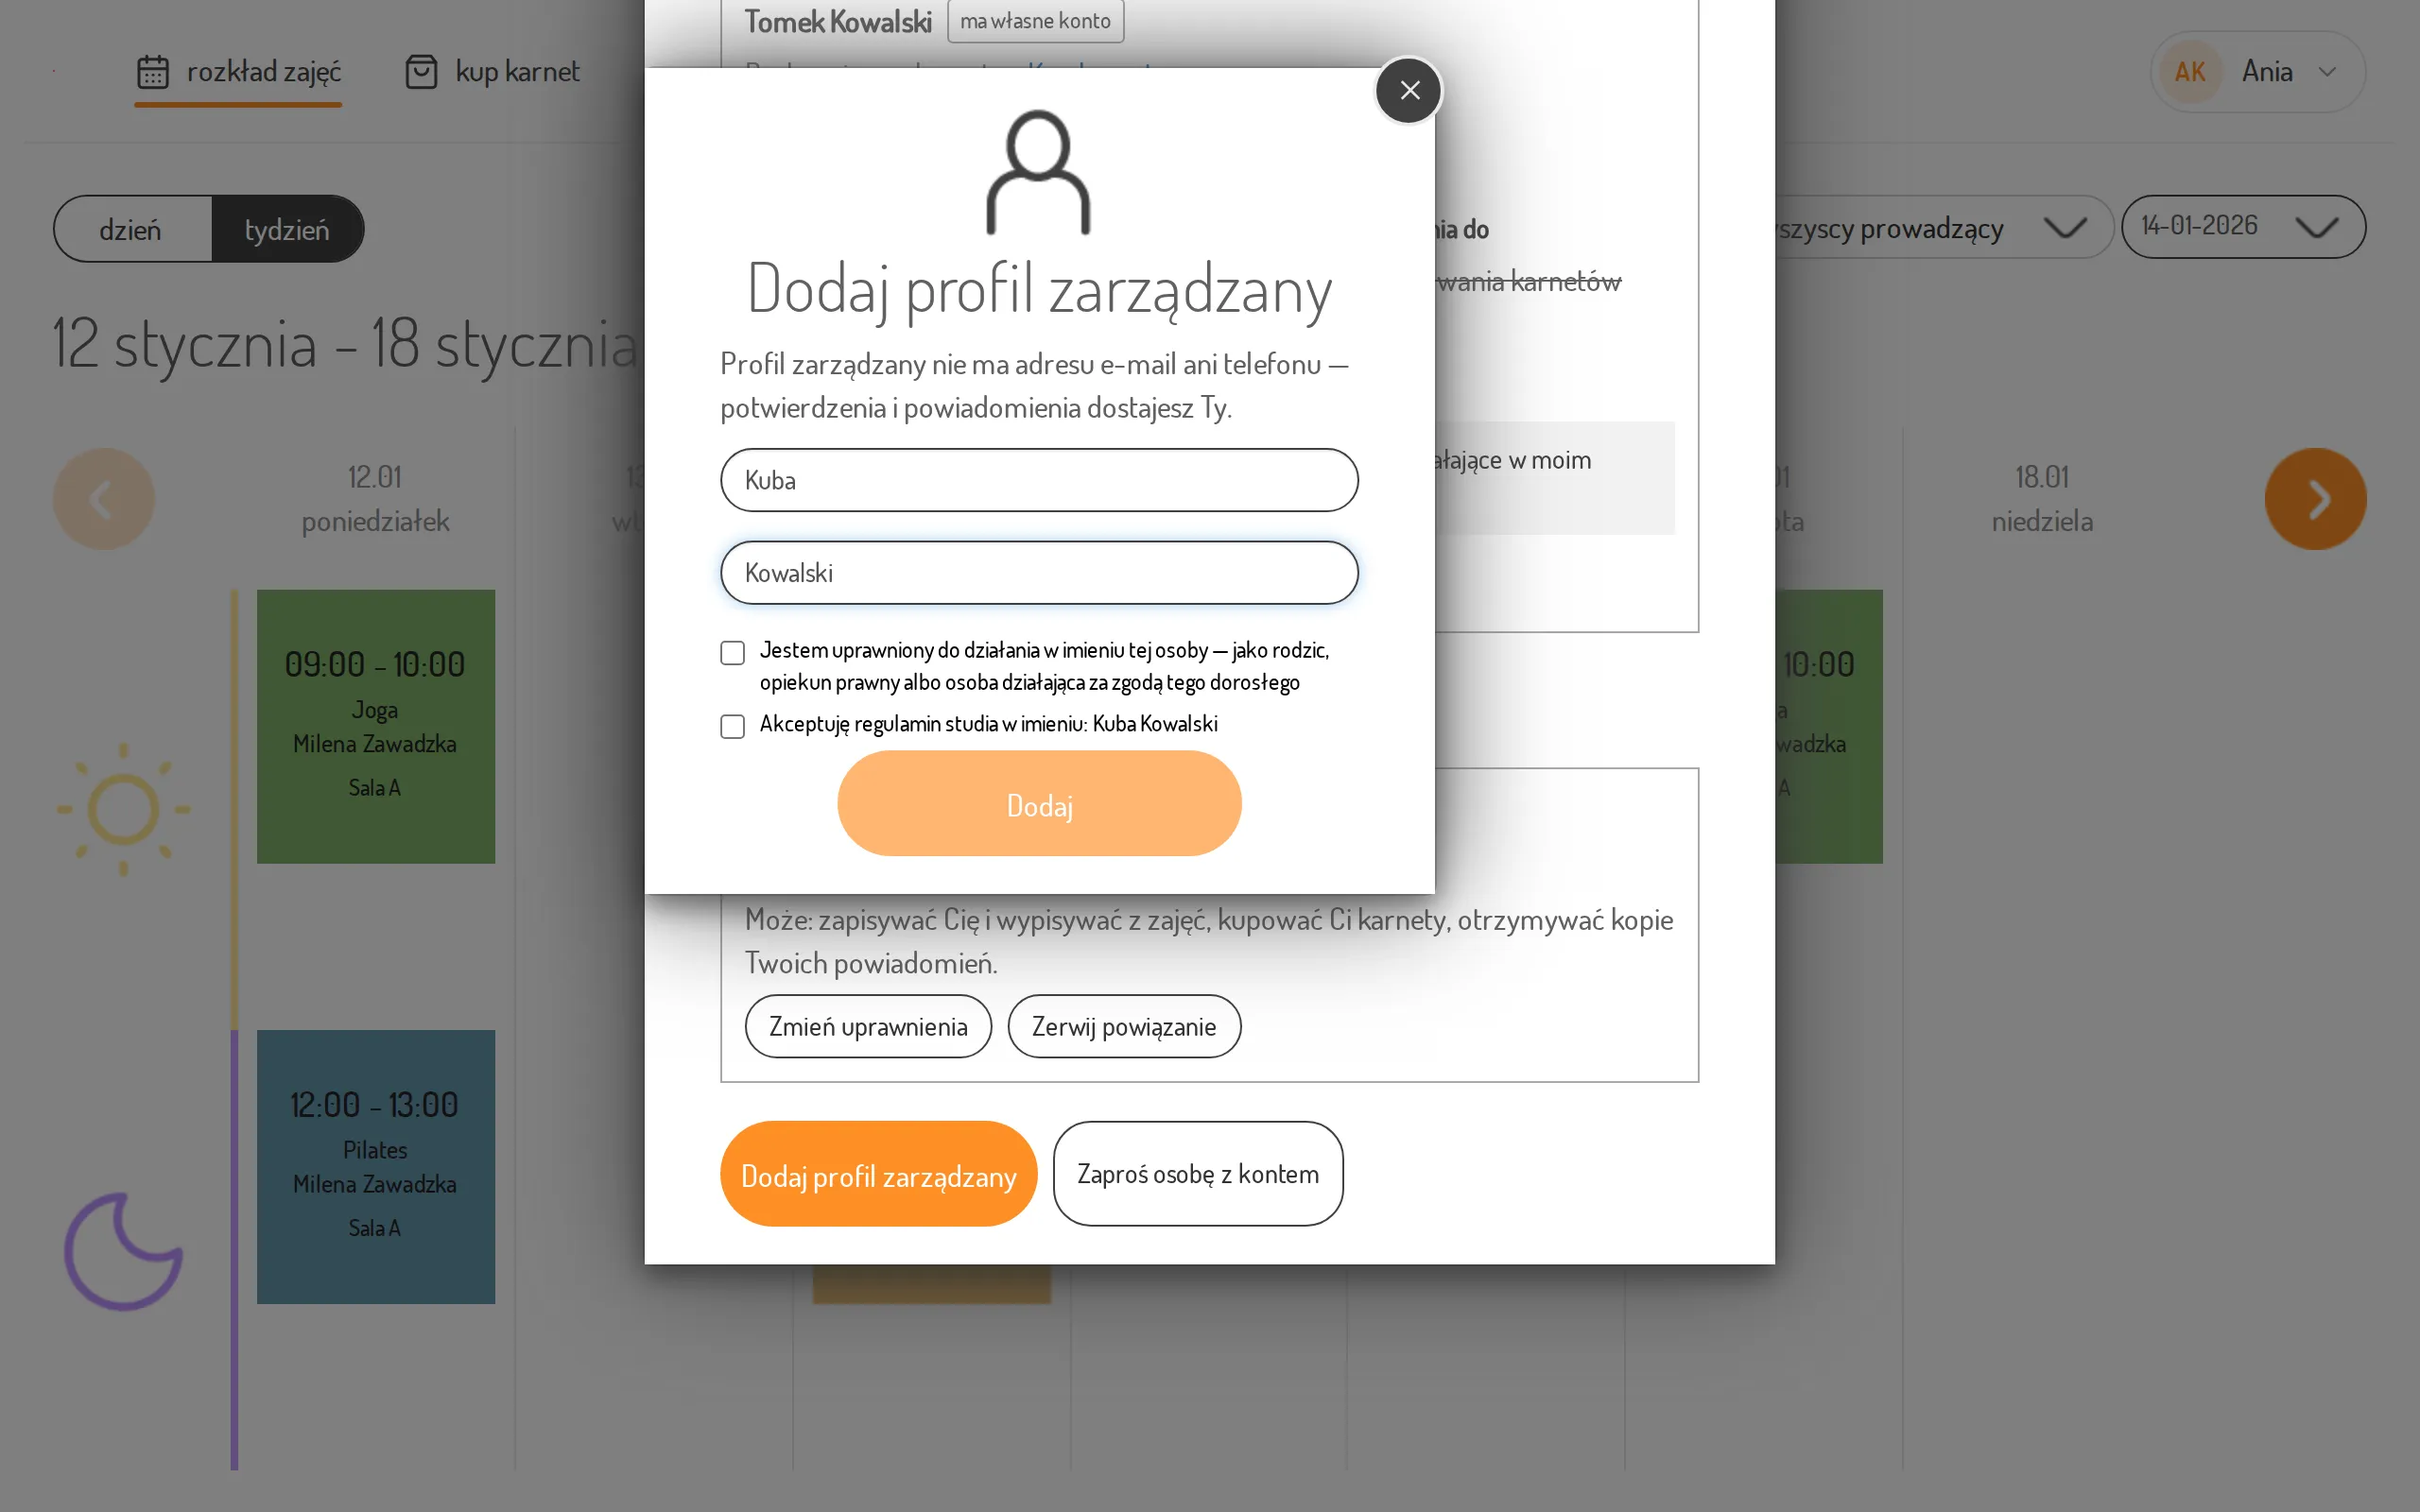
Section titled “Add a Managed Profile”A managed profile is a person without their own account — for example a child. It has no e-mail address or phone number, so you receive the confirmations and notifications.
- On the Family and loved ones screen, click Add a managed profile.
- Enter the first and last name.
- Tick both consents: the declaration that you may act on this person’s behalf (as a parent, legal guardian or with the consent of that adult), and the acceptance of the studio’s terms on their behalf.
- Click Add — the button works only once both names are entered and both consents are ticked. The new person appears in the list.
Invite Someone with an Account
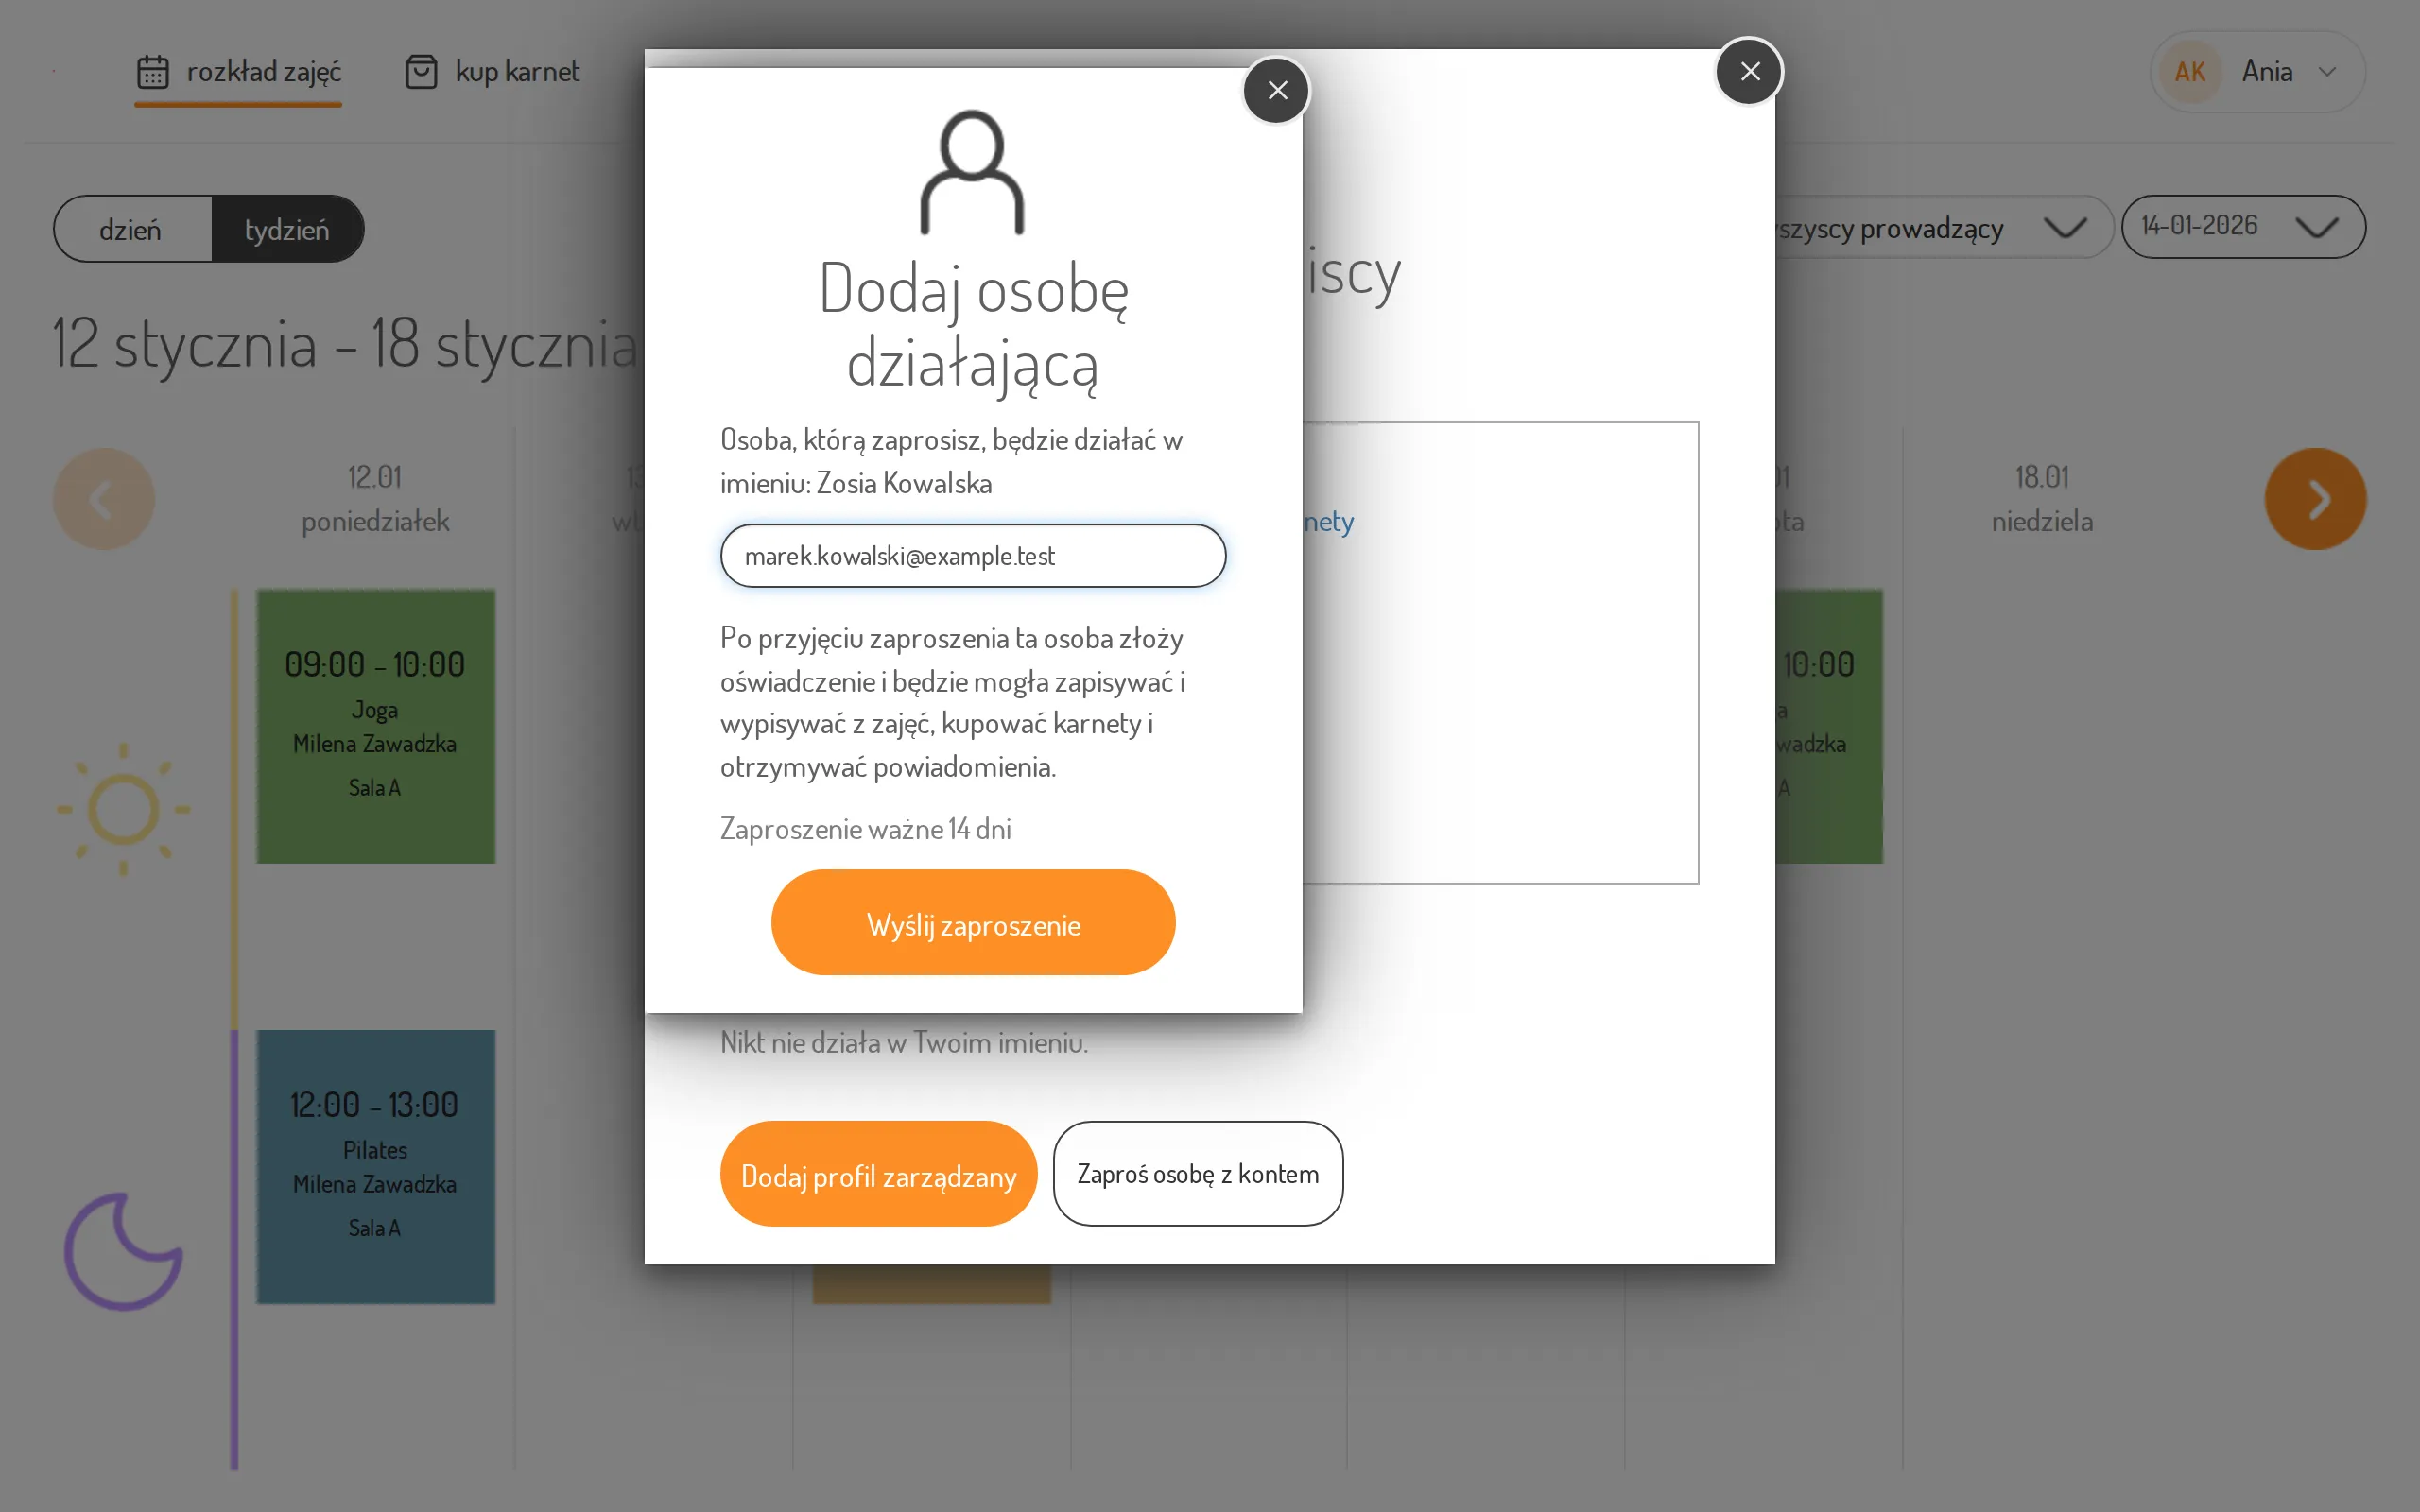
Section titled “Invite Someone with an Account”You link a person who has their own account at the studio — for example, your partner — with an invitation. The link is created only once that person accepts it.
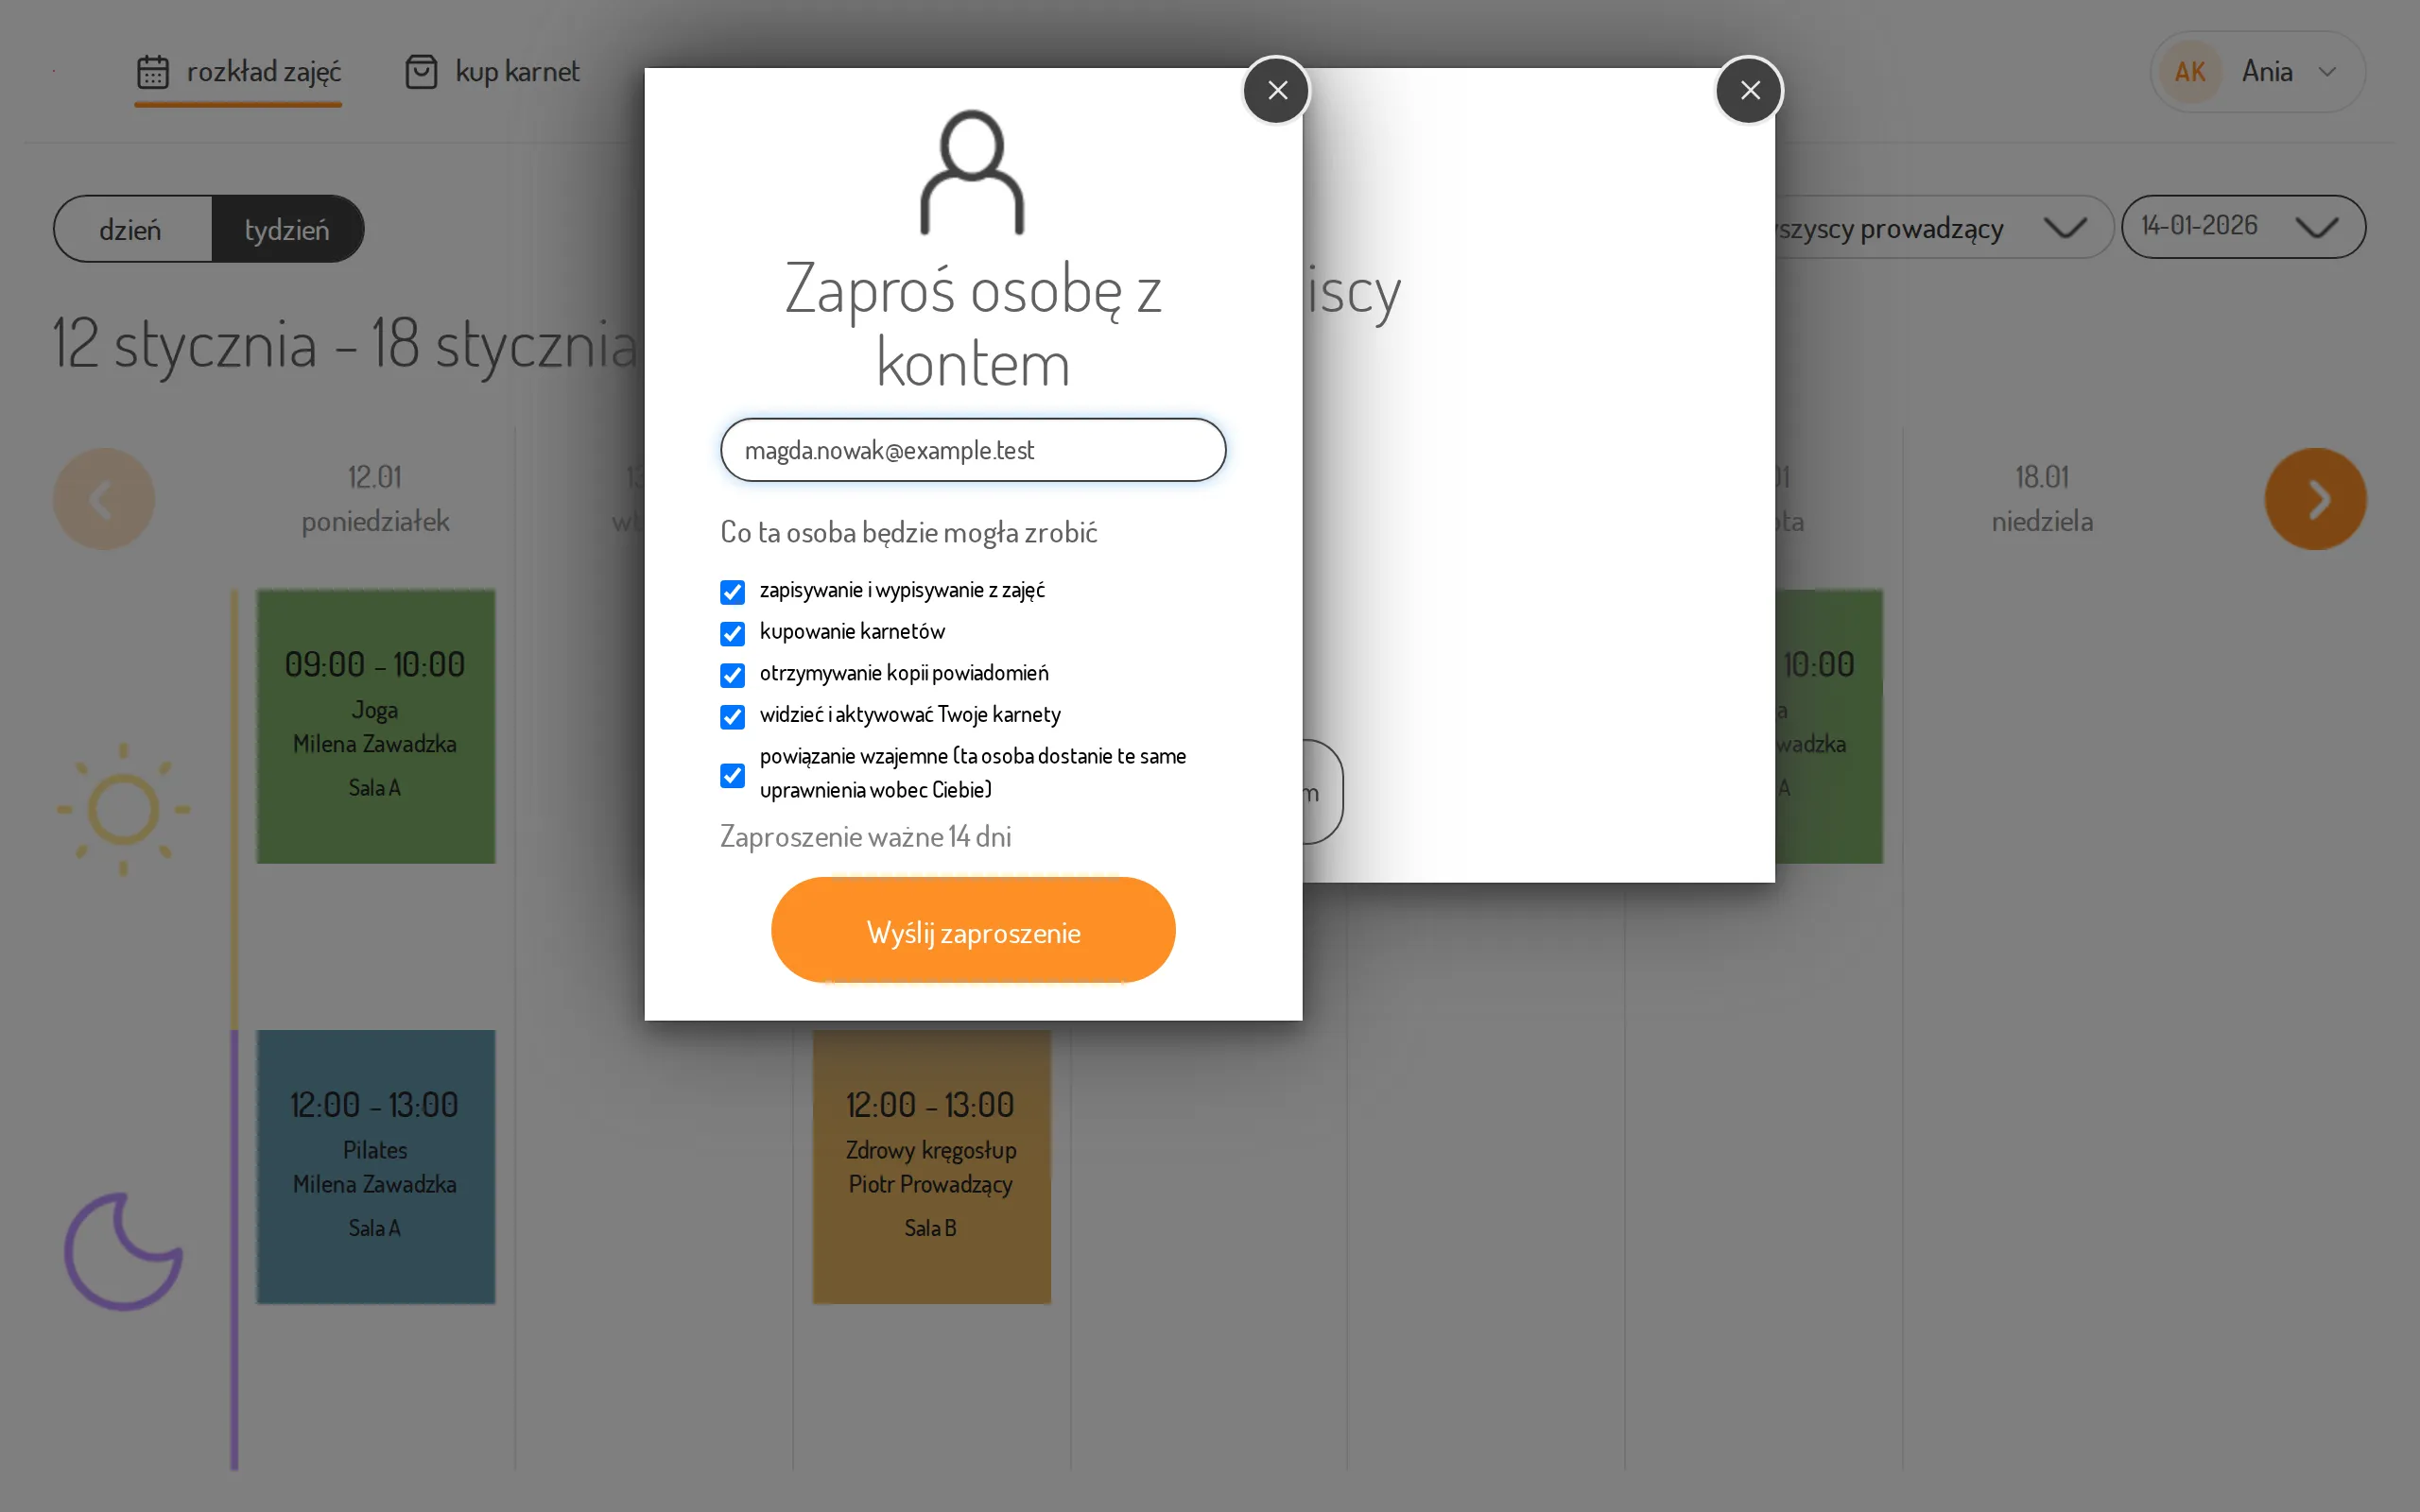
- On the Family and loved ones screen, click Invite someone with an account.
- Enter the person’s E-mail address.
- Decide what this person will be able to do: booking and cancelling classes, buying passes, receiving copies of notifications, view and activate your passes — all of them are checked from the start. Keep at least one permission checked — if you uncheck them all, the form shows “Select at least one permission.” and Send invitation is blocked.
- Leave mutual link checked if you should get the same permissions towards this person.
- Click Send invitation. The invitation is valid for 14 days — until then the screen shows it as pending.
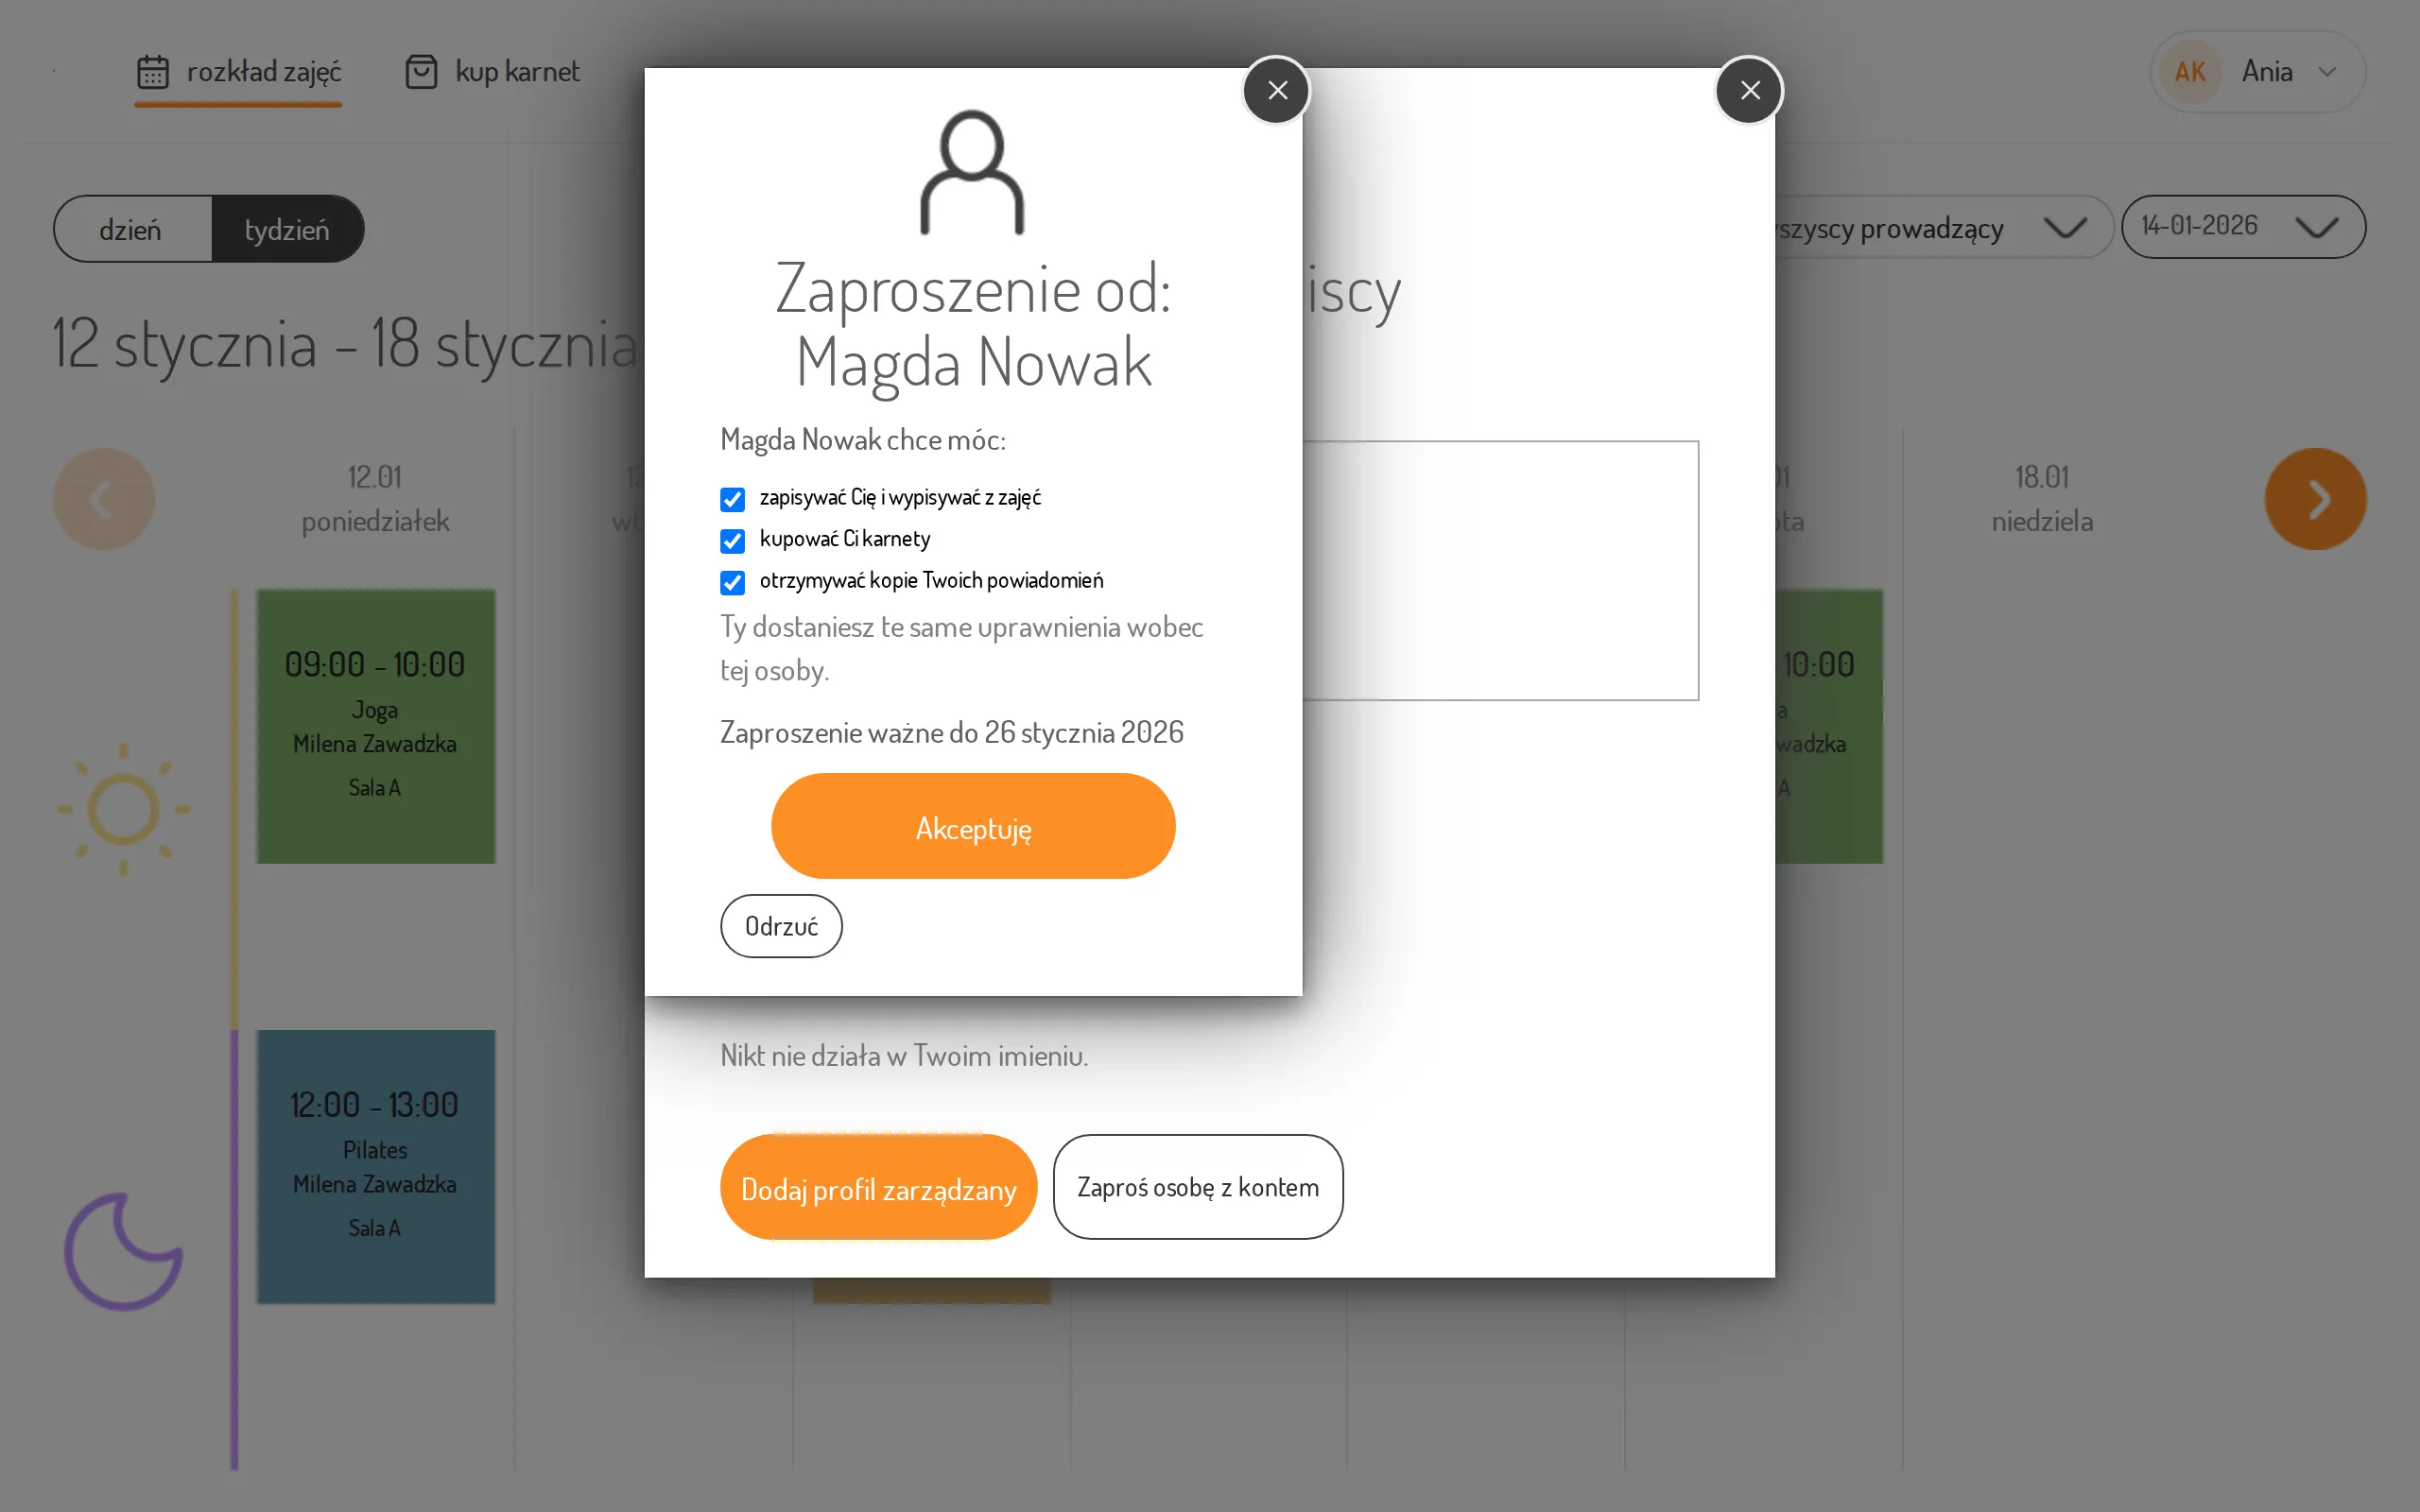
Accept or Reject an Invitation
Section titled “Accept or Reject an Invitation”When someone invites you, you receive an e-mail with the Accept the invitation button.
- Click Accept the invitation in the e-mail. The customer panel opens on the class schedule.
- If you are not logged in, you see the login window with an “… invites you” frame and the date until which the invitation is valid. Log in to the account the invitation was sent to.
- The invitation window opens over the schedule with two sections: What … can do on your behalf — uncheck here the permissions you do not want to give — and, for a mutual link, What you can do on behalf of …. If you uncheck some permissions of a mutual link, the window warns that the permissions will not be equal.
- Click I accept or Reject this invitation. After accepting, the window confirms that the link is active and lists both sides’ permissions; click Done to return to the schedule.
If several invitations are waiting for you, the window shows “Invitation 1 of 2” and moves to the next one after each decision.
The link in the e-mail cannot open the invitation in two cases:
- you are logged in to an account other than the one the invitation was sent to — the window offers to log out and log in to the right account;
- the invitation has expired or has already been accepted or rejected — the window says it is no longer valid; ask the inviting person for a new one.
You can also accept an invitation from the Family and loved ones screen: the Invitations for you section shows pending invitations with the date until which they are valid.
- Click View next to the invitation.
- The window shows what the inviting person wants to be able to do on your behalf: book and cancel classes for you, buy passes for you, receive copies of your notifications and — if the invitation includes it — view and activate your passes. You can uncheck the permissions you do not want to give. If you uncheck them all, the window shows “Select at least one permission or decline the invitation.” and I accept is disabled.
- Click I accept to create the link, or Reject.
Add a Second Acting Person
Section titled “Add a Second Acting Person”More than one person can act on behalf of a managed profile — for example, both parents.
- On the managed profile’s card, click Add a user.
- Enter the second person’s e-mail address and click Send invitation.
- Once the invitation is accepted, this person submits the declaration and can book and cancel classes, buy passes, manage the profile’s passes and receive notifications. Until then the card shows the invitation as pending.
Confirm Acting Persons at First Login
Section titled “Confirm Acting Persons at First Login”If you used to be a managed profile — without your own login — and the studio gave you an account, at your first login you will see the Who acts on your behalf window. It lists the people who acted for you while you had no account.
- Expand each person and check their permissions: booking you into and cancelling you from classes, buying you passes, receiving copies of your notifications, viewing and activating your passes. Uncheck what you do not want to grant.
- If this person should stop acting on your behalf altogether, click Stop acting on my behalf. The window warns that passes shared within this link will no longer be shared; Undo — keep the link restores the person.
- Click Confirm.
If you close the window without confirming, the links keep working as before. You can change the permissions later on the Family and Loved Ones screen. For a person whose permissions you confirmed, the card in the Persons acting on your behalf section shows the line “Confirmed by you” with the confirmation date.
Change the Permissions of a Person Acting on Your Behalf
Section titled “Change the Permissions of a Person Acting on Your Behalf”You decide what a person acting on your behalf may do. That person’s card in the Persons acting on your behalf section shows the line “Can: …” with the list of their permissions.
- Click Change permissions on the person’s card.
- Tick what you agree to and untick what you want to take away: signing you up for and out of classes, buying passes for you, seeing and activating your passes, receiving copies of your notifications. Under each permission you see what it gives that person. A changed permission is marked you grant or you revoke.
- Click Save changes. The card returns to the “Can: …” line with the new permissions. Cancel closes the editing without saving — the permissions stay as they were before your changes.
A link must grant at least one permission. When you untick all of them, the card shows a warning and Save changes is disabled. If the person should no longer do anything on your behalf, click break the link in the warning — see Break a Link.
When You Lack a Permission
Section titled “When You Lack a Permission”On the card of a person with their own account in the Persons you act on behalf of section, the heading You can lists what you may do on their behalf. If the person has not granted you some permission, the heading You do not have permission to lists the missing permissions, struck through. Permissions are granted by that person in their own panel: Family › People Acting on My Behalf › Change Permissions. They can also ask the front desk to do so.
Share a Pass
Section titled “Share a Pass”A pass that the studio has marked as shareable can be shared with people linked to you — in both directions: people you act for and people who act on your behalf.
- In the profile menu, open Your passes and choose the pass.
- Click Share and tick the people who may use entries from this pass.
- Click Save.
Entries of the people you share the pass with are deducted from one shared pool on this pass, and you remain its owner. If the pass has a person limit, you see how many people already use it. A ticked person who has not yet attended a class with this pass is marked “not using” — they do not take a place in the limit. A subscription pass stays shared in the following cycles until you change it.
A managed profile’s pass is also shared from Your passes: choose the profile in the Person field (or click See membership passes on its card in Family and Loved Ones), click Share next to its pass, tick the people and click Save. The pass of a person with their own account can only be shared by that person.
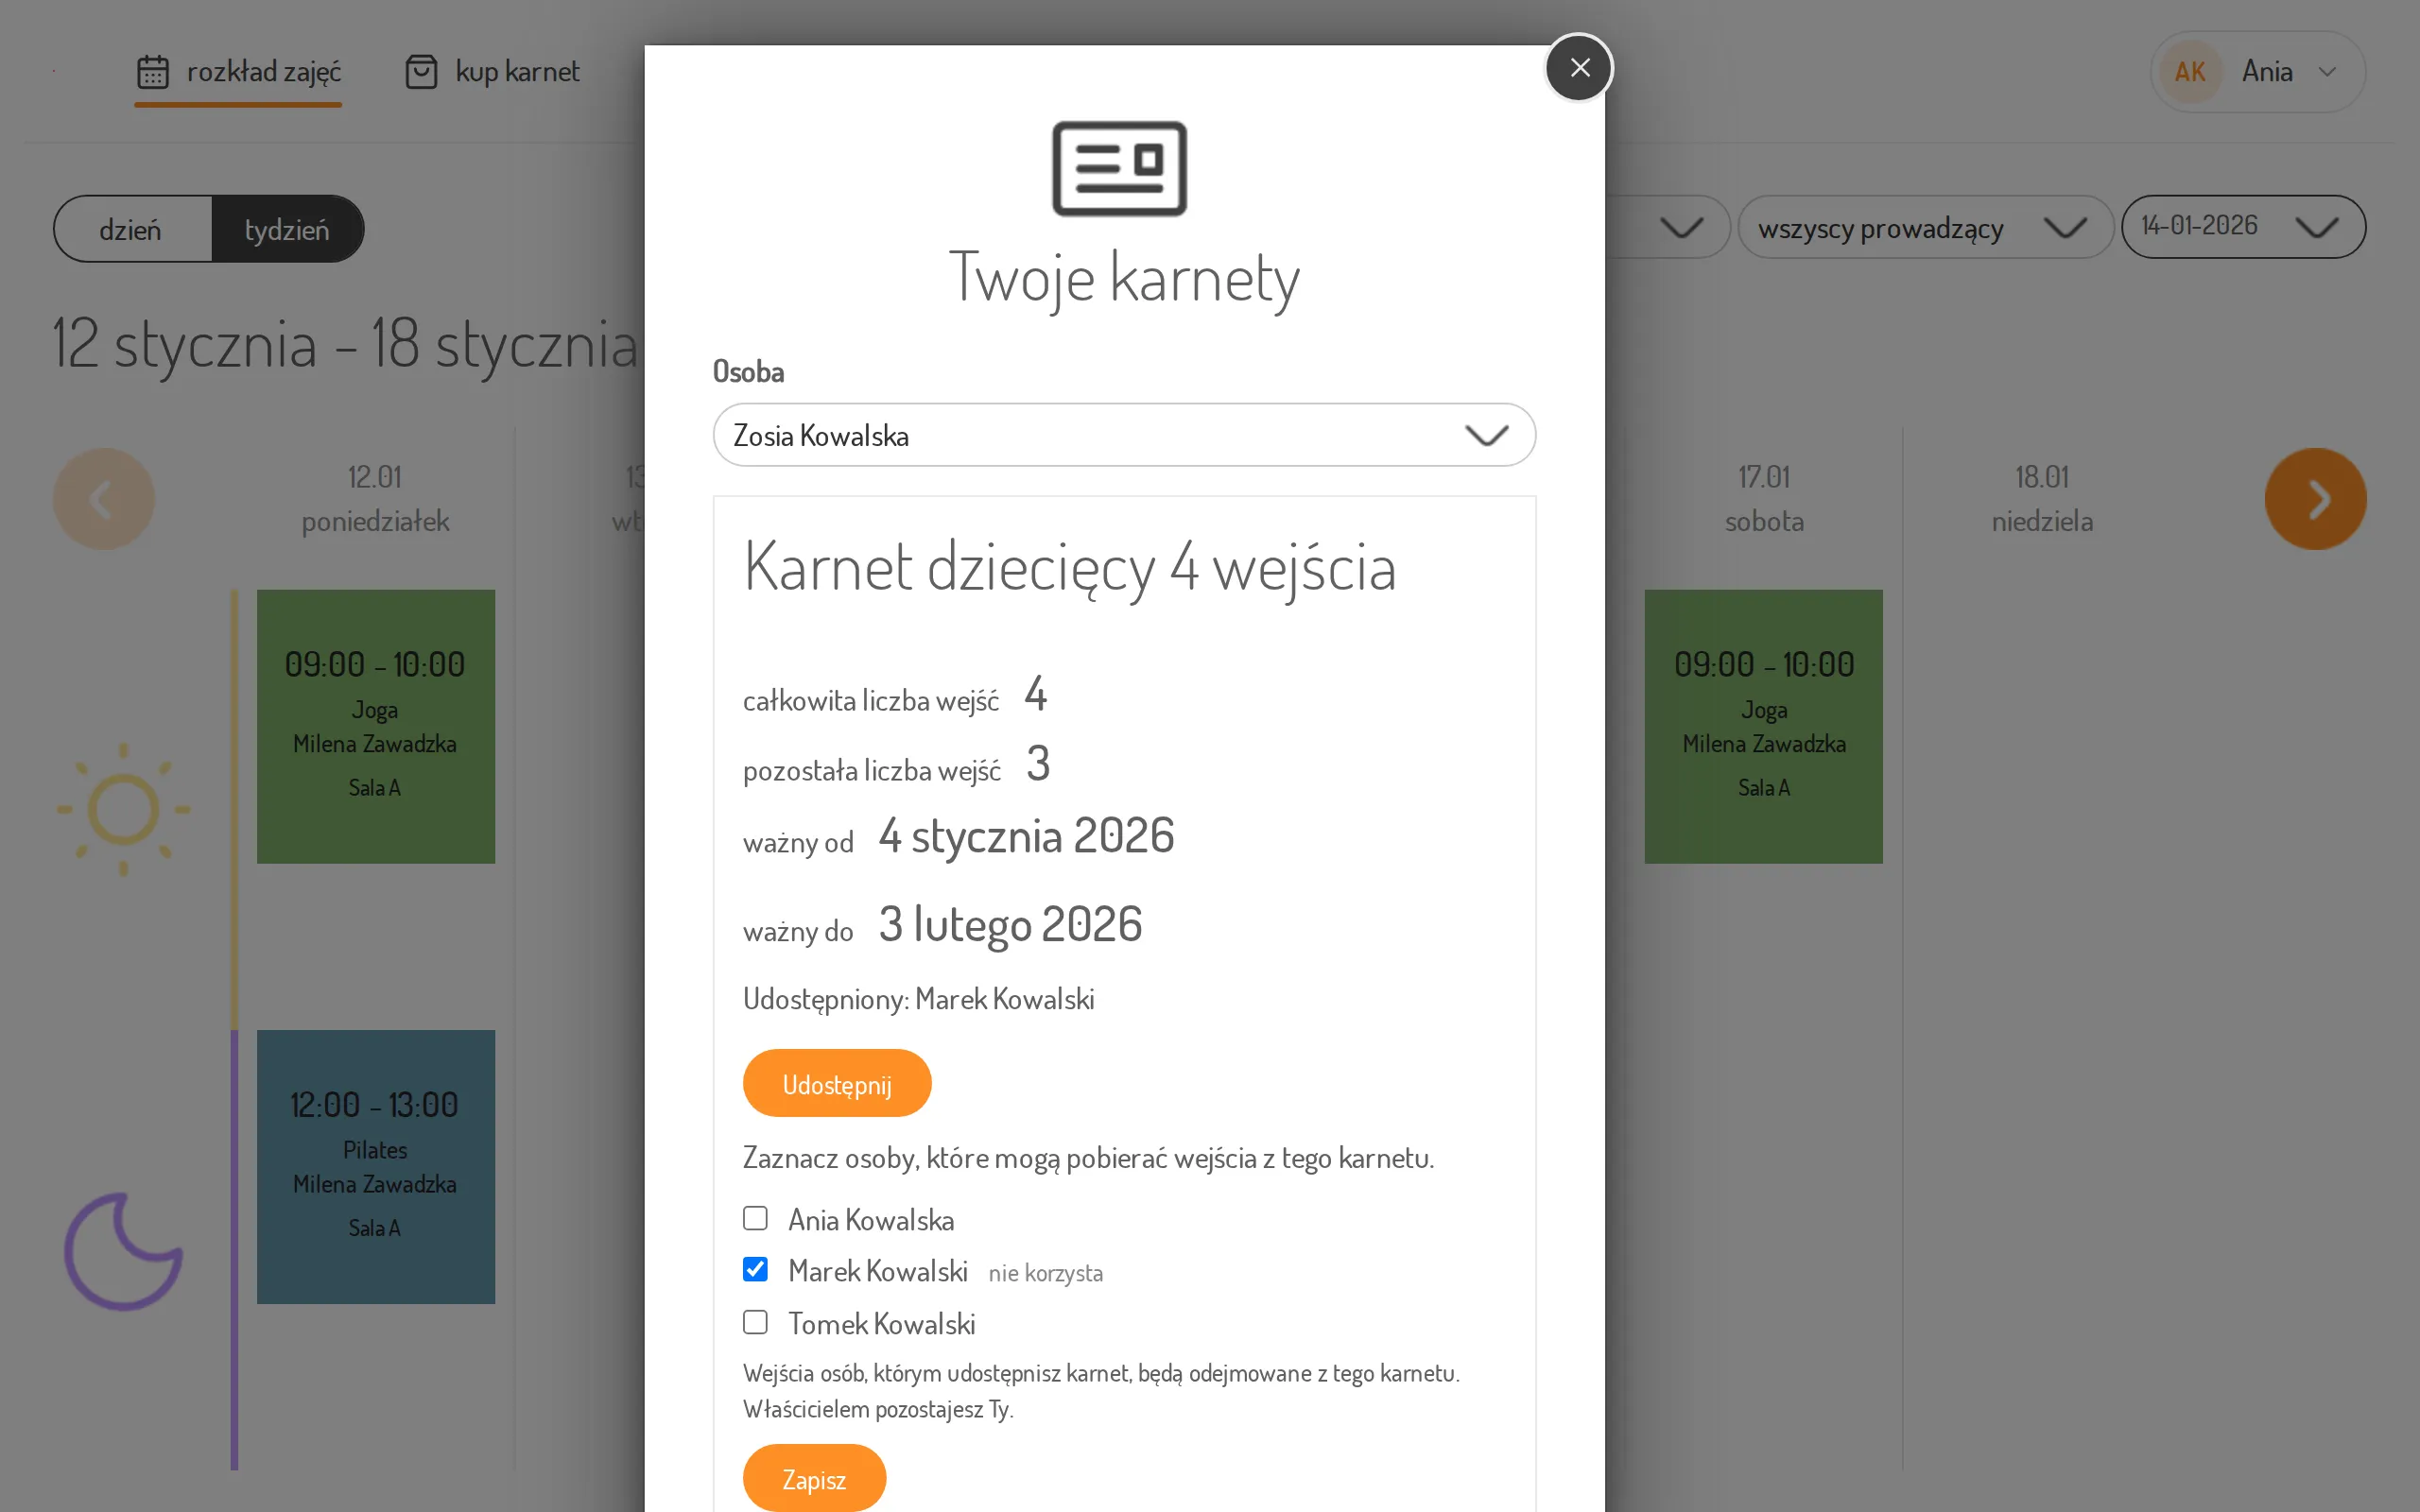
To stop sharing a pass, untick the person and click Save.
Break a Link
Section titled “Break a Link”Click Break the link next to a person — in either section. From then on that person no longer acts on your behalf, or you no longer act on theirs. The card disappears from the list, and passes shared within this link stop being shared.
If a subscription was bought within the link, you first see the question Cancel the subscriptions bought within this link? with the subscription names. No, keep the subscriptions is selected by default. Choose Yes, cancel the subscriptions if they should end, then click Break the link. Back closes the question without breaking the link.
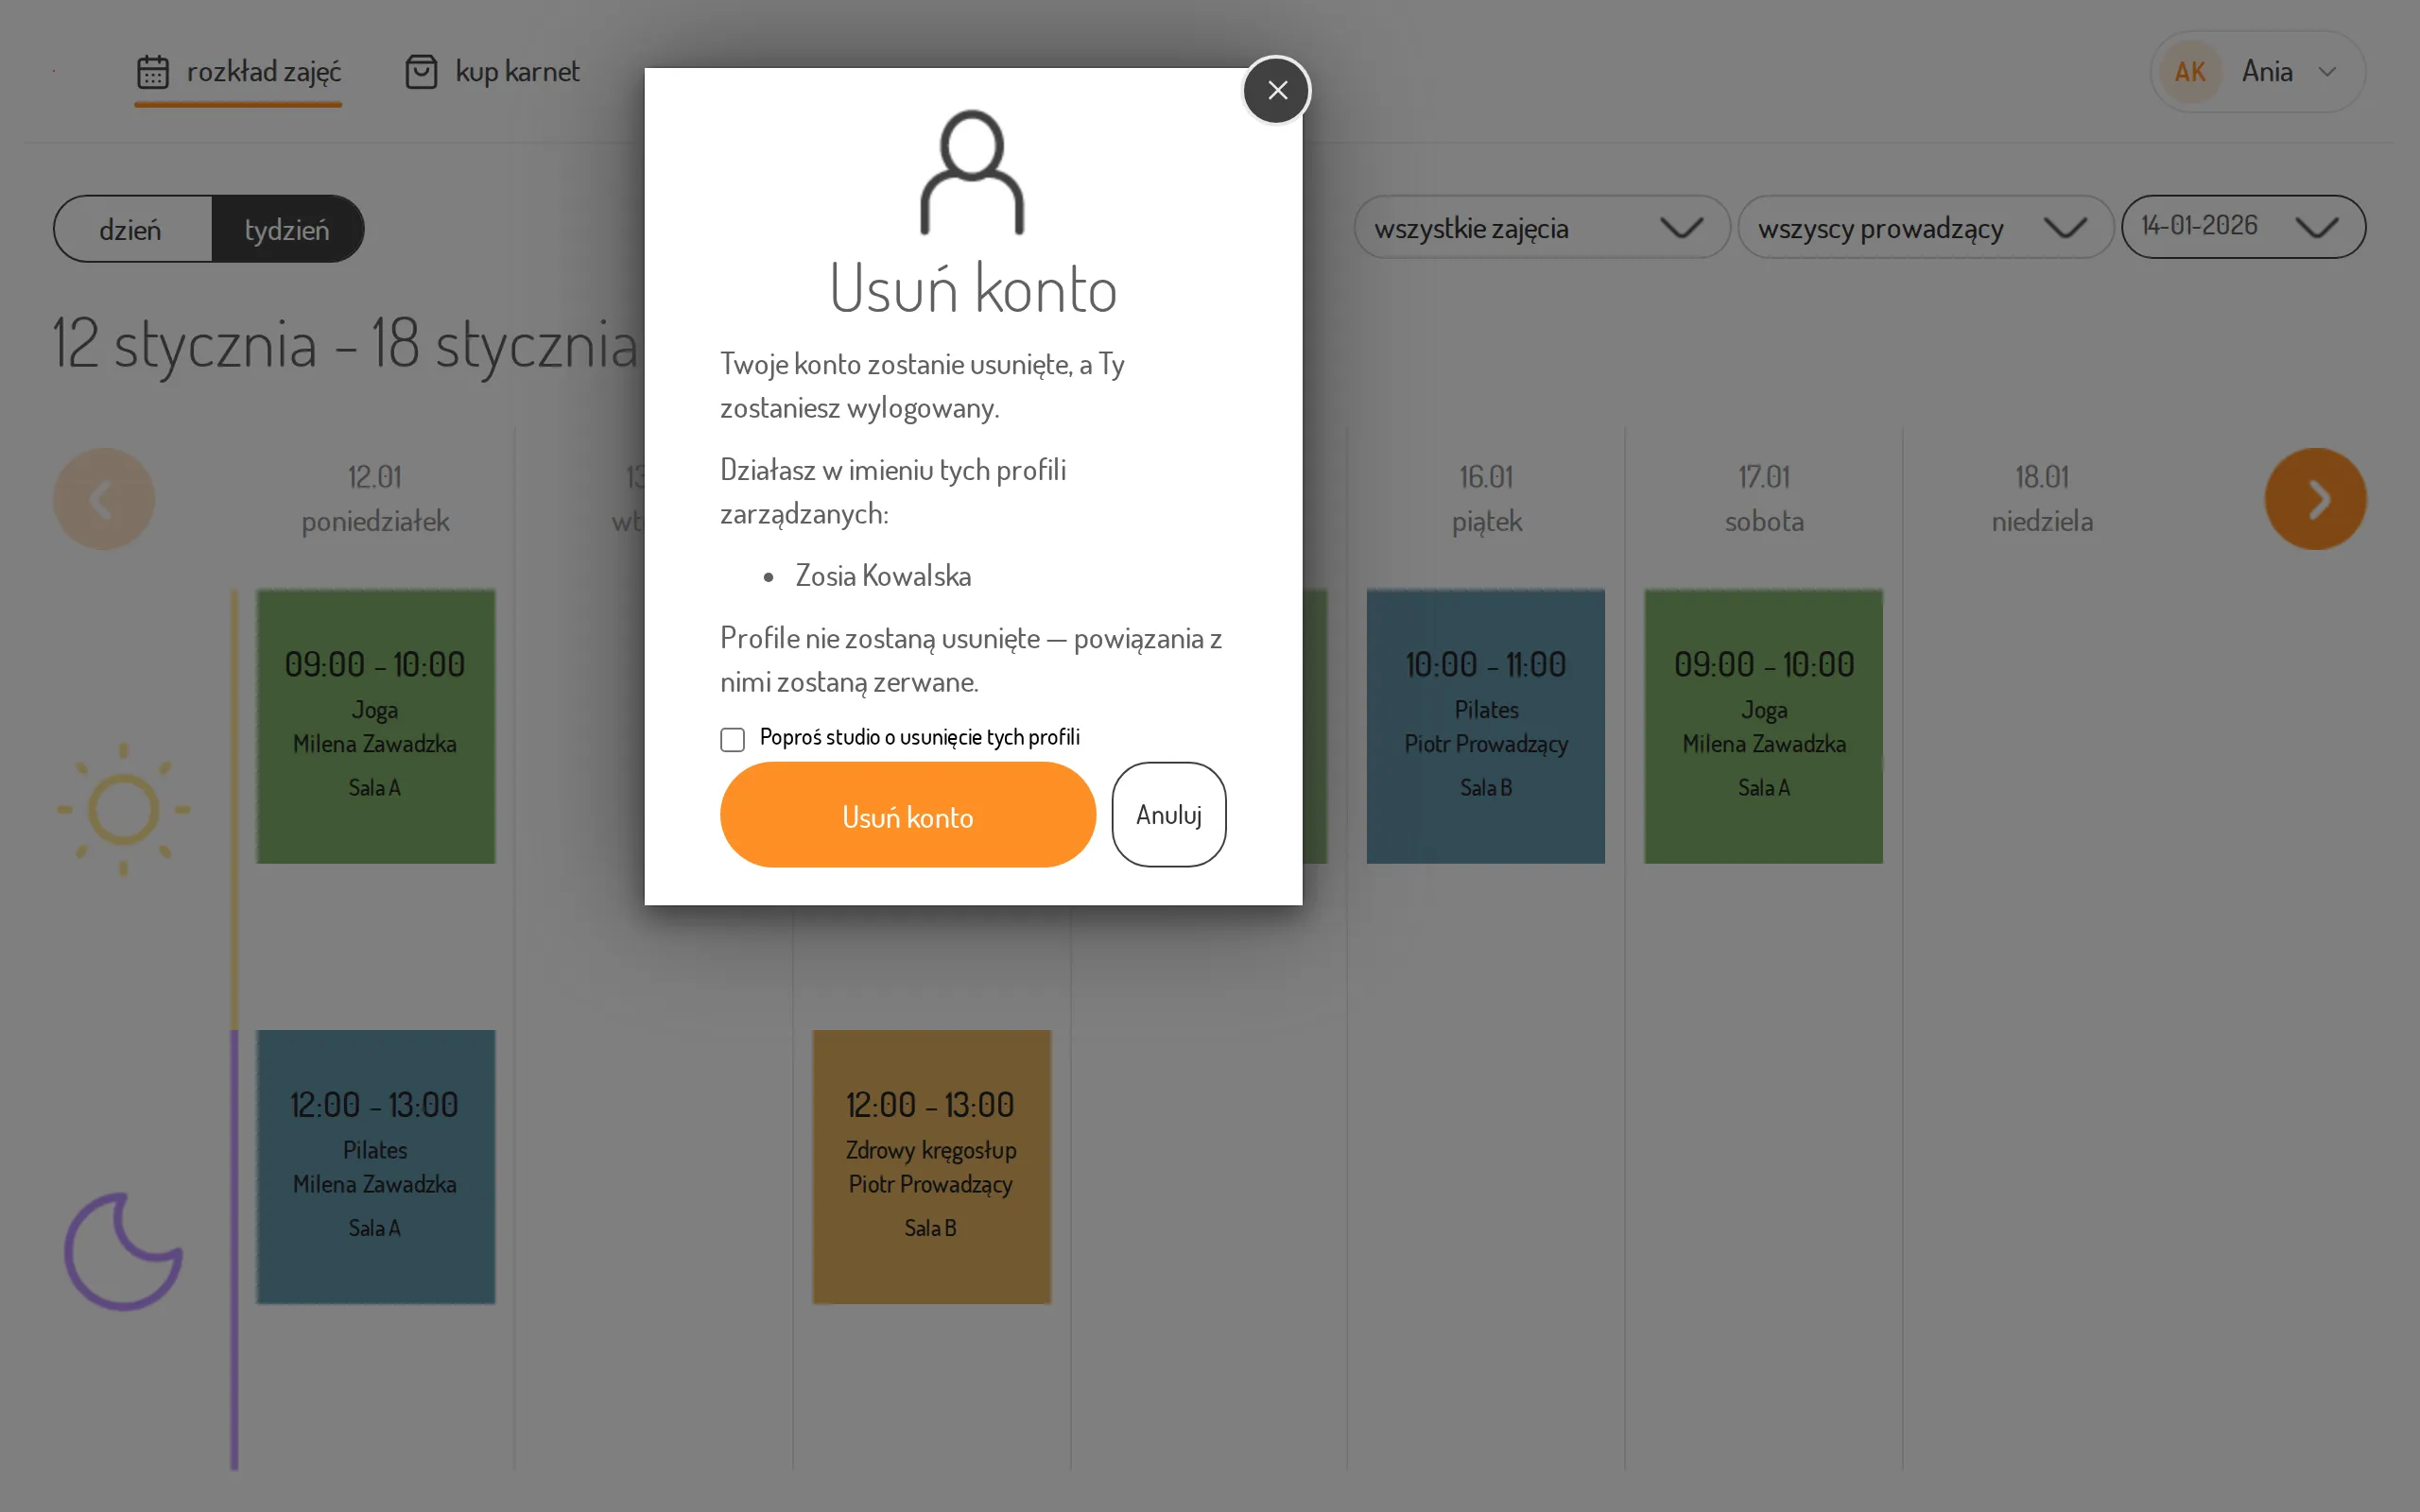
What Happens to Managed Profiles When You Delete Your Account
Section titled “What Happens to Managed Profiles When You Delete Your Account”In the profile menu, open Your profile and click Delete account. If you act for managed profiles, the dialog lists them by name. The profiles are not deleted — the links to them are broken. You can tick Ask the studio to delete these profiles; it is unticked by default. Click Delete account to confirm — you will be signed out. Cancel closes the dialog without deleting the account.